About d.3 admin
Hints on the user interface
Prerequisites
Additional information
In the following, you will find the individual chapters dealing with the topic of permissions.
Below is not only general information about user permissions, but also how to create, search, configure and remove users.
Every person, which should have access to the d.3 repository, must first be configured as a d.3 user. The users "batchimp", "hostimp", "d3_server" and "d3_async" are system users and are not displayed in the user overview of d.3 admin.
In this chapter you can find information on the local user creation and management in the d.3 repository.
If a connection via LDAP is realized, then the users are created in the d.3 repository with their first login.
A further system user is the "d3_admin". It is not necessary to administrate this user. You do not need to assign any authorization profiles, classes or groups to this user.
The user name cannot be changed in the d.3 environment. Alternatively, you can create a new user under a different name and copy all files from the processing, the mailbox or resubmissions from the old username into the new user's directories. Once the old user has no documents in his directory structure any more it can be deleted.
In the overview, you can also see, if a user account is blocked. The context menu allows you to unblock the user. The system differentiates between a user which is blocked due to failed login attempts with wrong passwords etc. or, if the it was locked through policies (group membership) (see d.3 policy manager). In this case, the unblocking must be explicitly confirmed.
Do not create a "dummy" user, because this user name is already used internally by the server processes.
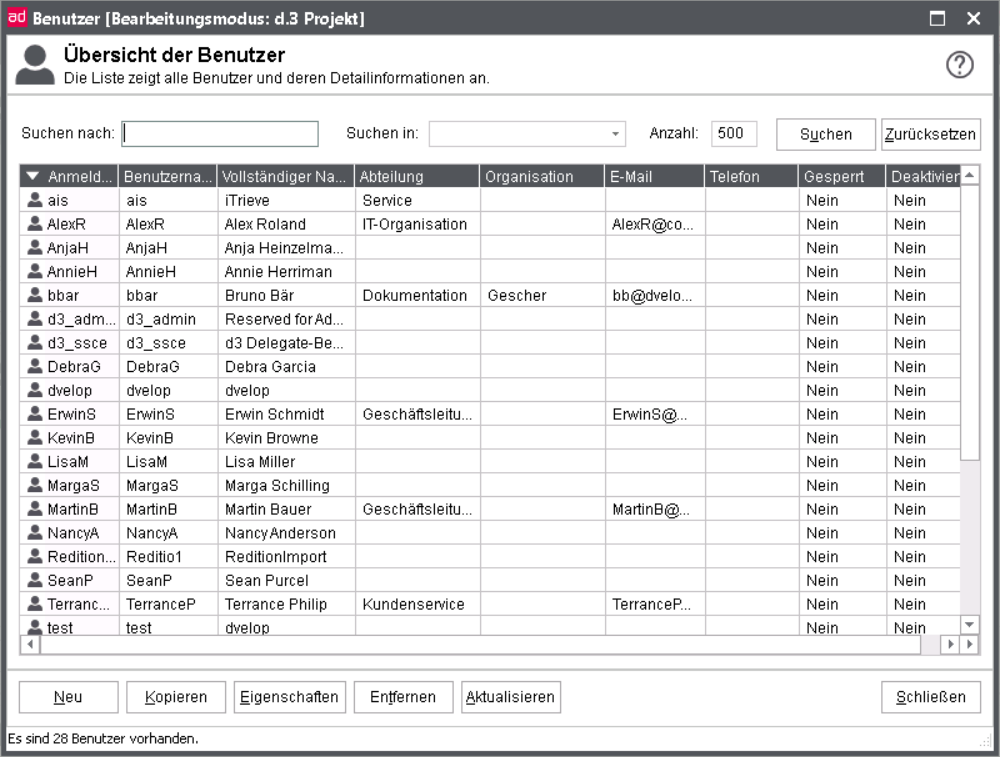
The filter and search mechanism greatly simplifies administration, especially in an environment with many users.
In the upper part of the overview window of the user administration you can control the filter and search mechanism.
Search for: Initially specify the search pattern, the string will be searched in all fields of the user list and the result will be immediately reduced respectively.
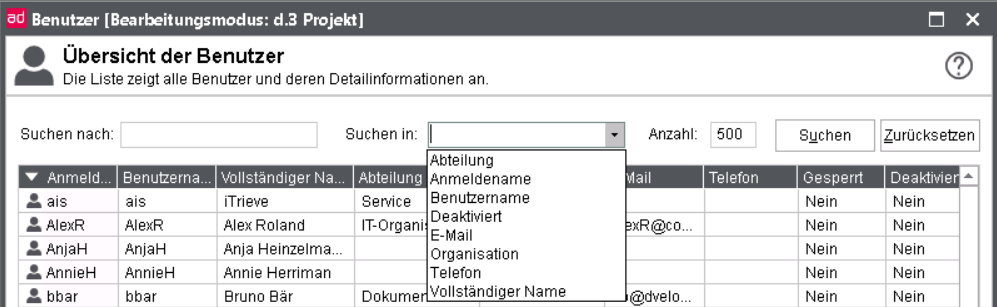
Search in: The defined string can be searched in a column you specify here afterwards.
Count: Indicates the maximum number of listed users; the count can be predefined via the configuration file in d.3 admin.
Search: Executes the search for the string and highlights the rows, that contain the search pattern in the selected column.
Reset: Resets all entries back to default value; the search fields will be deleted, the count will set on the value of the configuration file (ManyUserFindLimit).
You can customize the behaviour of the user filter in the configuration file of d.3 admin. Two methods exist for this effect:
Example of the file d3admin.ini
[Performance]
ManyUserSupportEnabled=1
ManyUserLimit=500
ManyUserUpdateCount=500
ManyUserFindLimit=500
The parameters have the following meaning or effect:
Section Performance:
Parameters
ManyUserSupportEnabled: Enabling of the user filter for user assignments, too, e.g. for authorization profiles, groups. Values: 1 (default: yes), 0
ManyUserLimit: Count of users, that enables the advanced search. Value: 500.
ManyUserUpdateCount: Count of users to be displayed, after which the display is updated. Value: 500.
ManyUserFindLimit: Maximum count of users while searching via filter. Value: 500.
When defining a new local user, various data must be entered. In the following, the sequence of dialog to define a new user is described.
If a connection via an LDAP server is realized, then the users are created in the d.3 system with their first login. Prior to d.3 version 8.0.0 it was erroneously possible to edit a user synchronized via LDAP although these changes were lost with the next synchronization. With version 8.0 you can now no longer fully edit such a user.
Complete Name
Here, you can specify the full name of the d.3 user.
This name is often used in d.3 applications, e.g. for the mailbox mechanism of d.3. This field is limited to 50 characters. The name is more descriptive than the technical name since this is truncated to 10 digits.
The full name is displayed on the title bar of d.3 smart explorer, but also in various picklists.
Department
To differentiate the users, you can assign them to certain departments. The picklist containing the departments is dynamically extended. This means, when you create the first user in d.3, this picklist is still empty. Creating the user n, the different departments are displayed for selection which you already assigned to the previous users. This field is limited to 50 characters.
Organization
The plant is another field to differentiate between users. This picklist is also dynamically extended. The field must not exceed 50 characters.
Phone
The phone number is limited to 40 characters.
The user’s e-mail address is limited to 100 characters.
If the SMTP support for the d.3 repository is enabled, then an automatically generated e-mail will be sent by the d.3 server. This means that with receiving a document in the d.3 mailbox of a d.3 user an e-mail is generated automatically. Thus, the e-mail system remains the leading system for the distribution of information.
If the subscription service of d.3 is used, then the notifications on changed documents are also sent to this e-mail address.
User name
Enter the d.3 user name here. This is the name used when the d.3 user logs in the d.3 repository. You can use a maximum of 30 characters for a user password. The characters must be taken from the following set ['a'..'z','A'..'Z','0'..'9','_'] . All other characters must not be used in user names.
All characters are allowed, if the d.3 repository supports Unicode. d.3 creates a unique 8-digit name, which contains no special characters.
In the directory edit in the document tree of the d.3 repository, a folder is created under the technical name for every user (8-digits).
User and group names are significant in the first 10 characters, so, each user and group name must differ from any other user and group name in the first 10 characters. If more than 10 characters were specified for a user name, then the name is truncated to 10 characters by the d.3 system and defined as unique. The original name can be used as an alias for the login.
Example: The user name ClausChef is substituted by ClausCh1. Under this name he is entered in the user administration.
It is not possible in d.3 admin to create a user and a group with the same name. If you receive a respective message, please check if there is a user with this user name already.
Password/Password confirmation
When creating a user, a password must now be specified. Even when changing a password, a new password must be specified. The syntax depends on a variety of configuration parameters.
The parameter PASSWORD_MIN_CHARS specifies the minimum Length of a password. It can be defined in the d.3 config.
The parameter PASSWORT_EXTENDED_SYNTAX defines the syntactic rules for passwords. If this parameter is set to "Yes", then the password must at least include one sign of 3 of the following 4 character groups: A-Z, a-z, 0-9, special characters.
The option PASSWORD_EXPIRE_DAYS specifies the default lifetime of a password in days, but only if the option PASSWORD_EXTENDED_SYNTAX is set to "Yes".
The default setting for this parameter is "10957", which is equivalent to a time of 30 years.
The password will not be displayed, when you edit a user. Thus, the fields password and password confirmation remain empty. Hence, changes to a user's settings doe not affect the user’s password. The old password is overwritten only if the new password is explicitly specified.
You can use a maximum of 20 characters for a user password. The length and syntax rules for a password can be further configured in the d.3 configuration.
If the password does not comply with the valid rules then an according message is displayed.
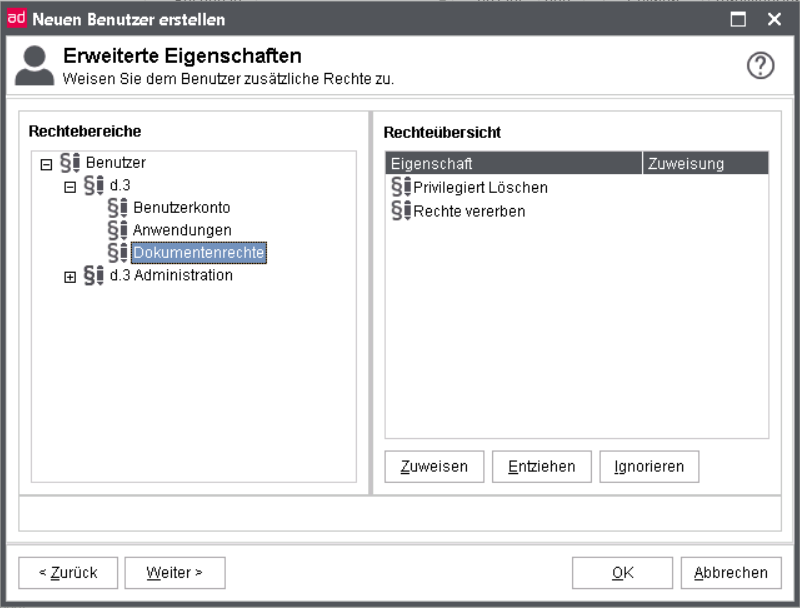
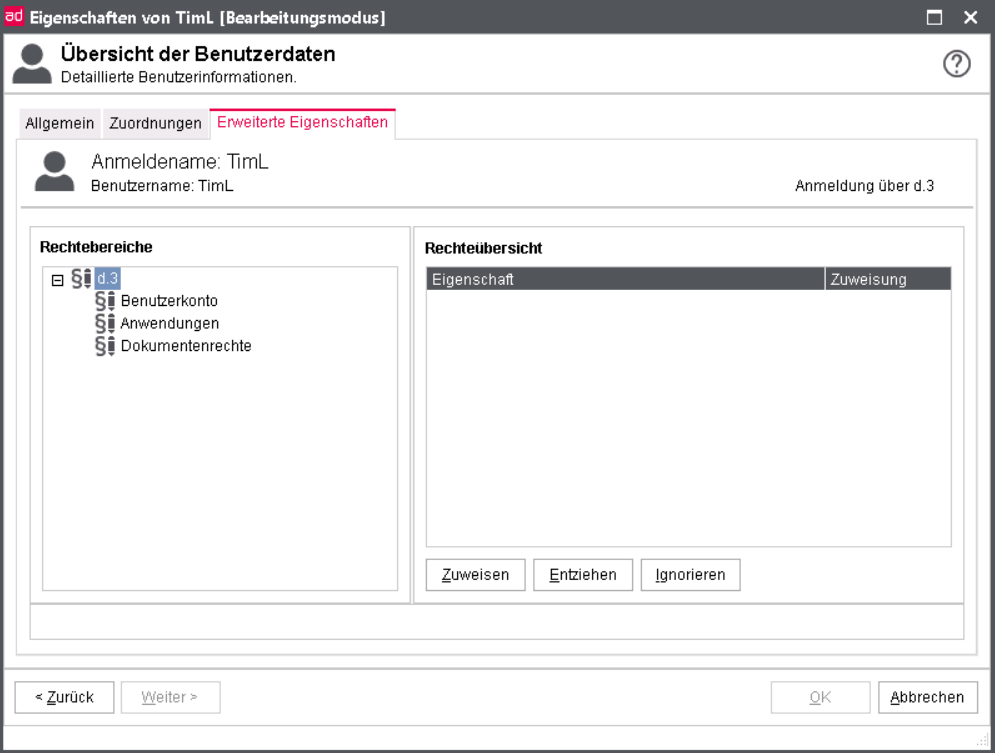
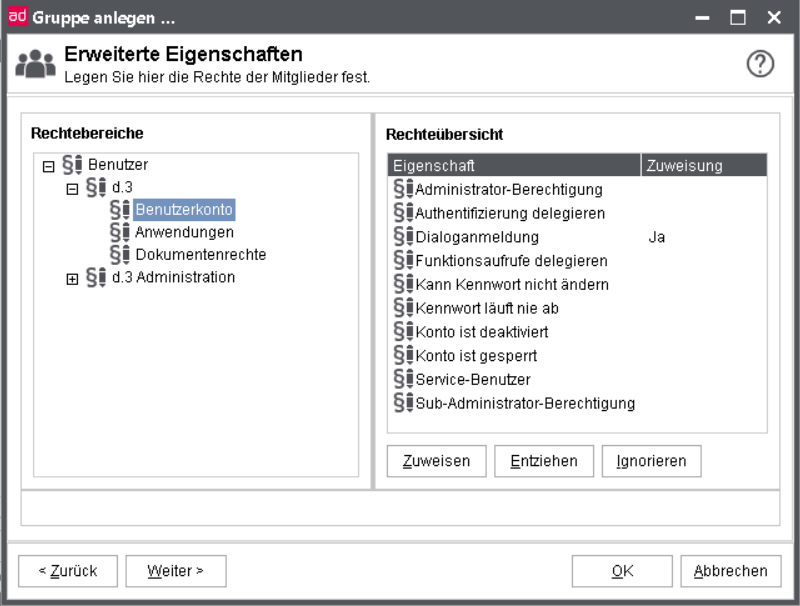
The advanced properties (policies) are further described on the chapter d.3 policy manager. Thus, their configuration will only be briefly mentioned here.
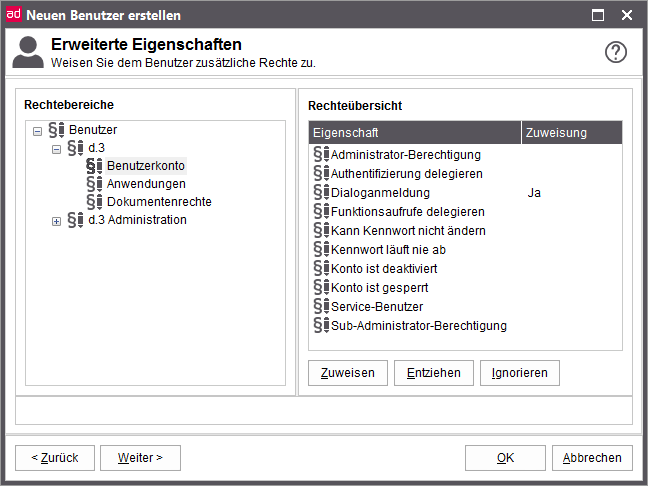
For every user rights can be given for the listed properties. The assignment here has the same meaning like the rights in the authorization profiles.
Assignment
yes: Right assigned
no: Right denied
<Empty> Ignore right
The rights are assigned either with a click on the respective button or with a click on the property. Every click changes the property value in a cycle.
The user is enabled to log in via d.3 login manager. However, if the user is configured as a service-user, then it cannot log in from the dialog (implicit denial).
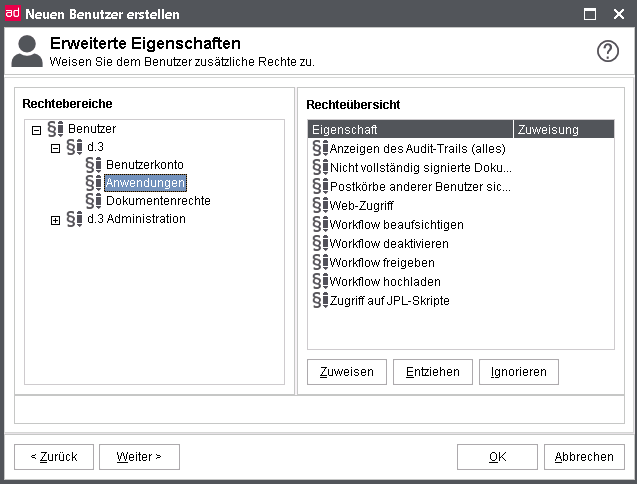
You can define rights both on applications and on documents.
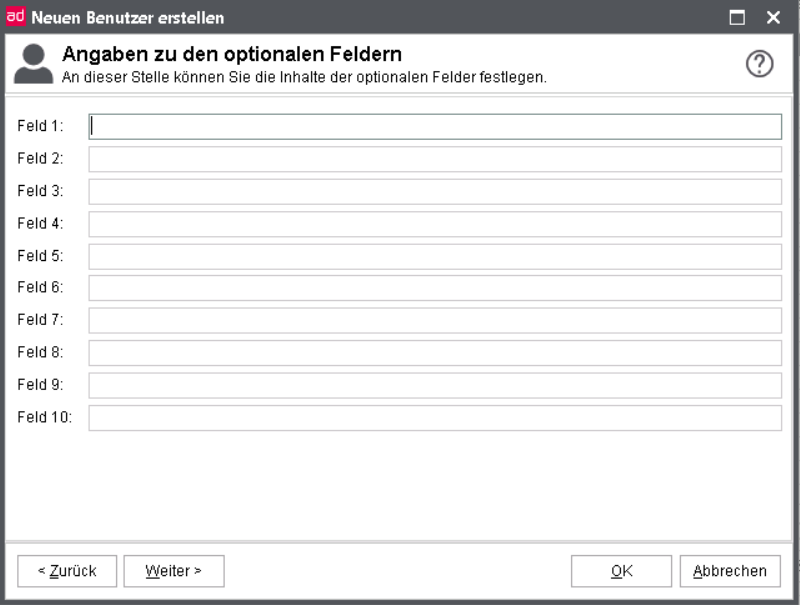
The optional fields allow you to store additional information about a user. You can enter a maximum of 50 characters in each of the 10 optional fields. In older d.3 systems the optional fields were often used to store the e-mail address.
The superior of a user must then be specified in an optional field of the user. You can also use the optional fields to store the superior of a user so that he can change his checkout-status in case of sick-leave.
Also d.3 abo service reads an optional field. The optional field 1 can contain the ID of the abo-manager (see documentation d.3 abo service).
The caption texts cannot be changed.
Every user can be member of multiple groups. User groups combine employees with the same job profiles and identical rights. More details can be found in chapter Groups.
Please note that the assignment process can take several minutes if you select more than 10 groups.
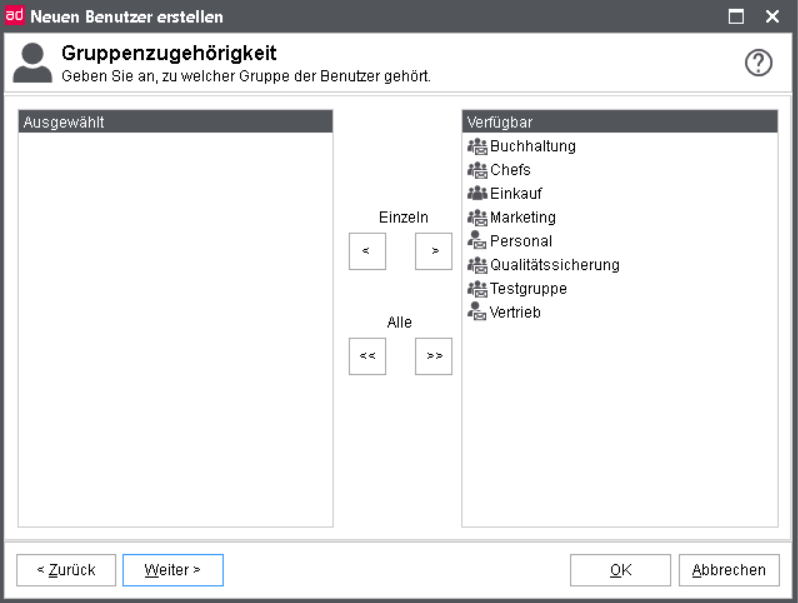
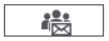
Here, the symbols and text labels have the following meaning:
 Distribution of documents to all group members (mailbox without workload balancer)
 Distribution to one member of the group (mailbox with load balancing)
 no distribution, the group is used to assign permissions
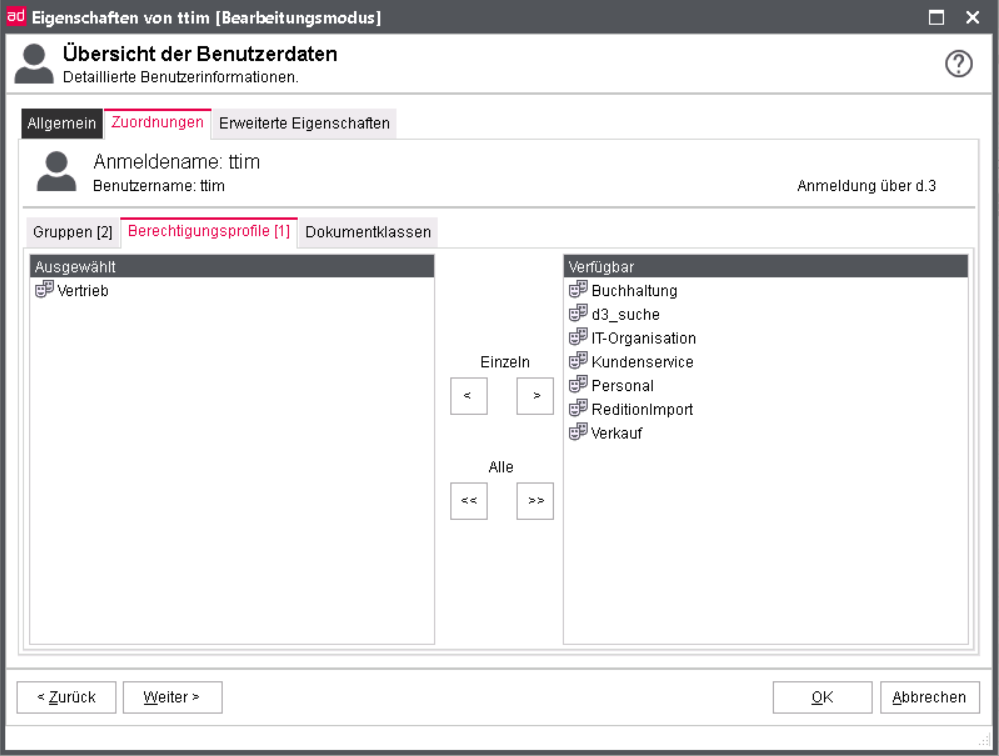
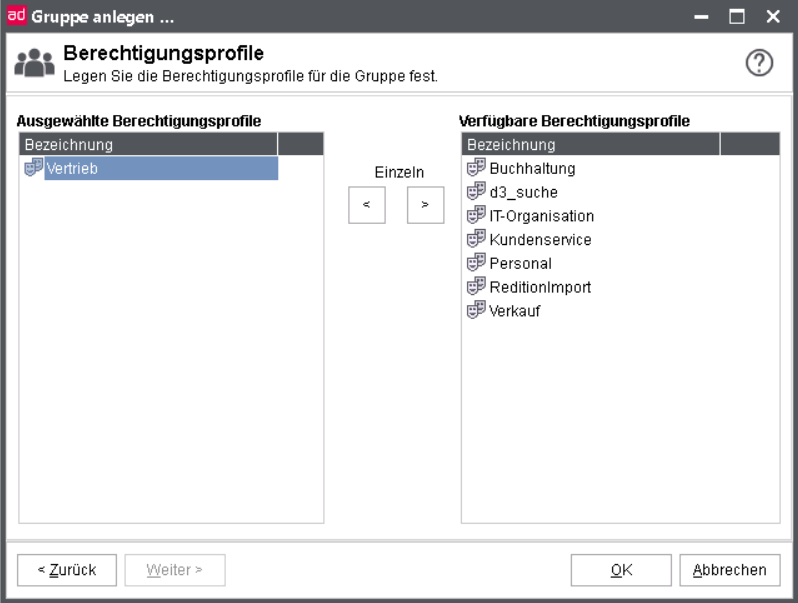
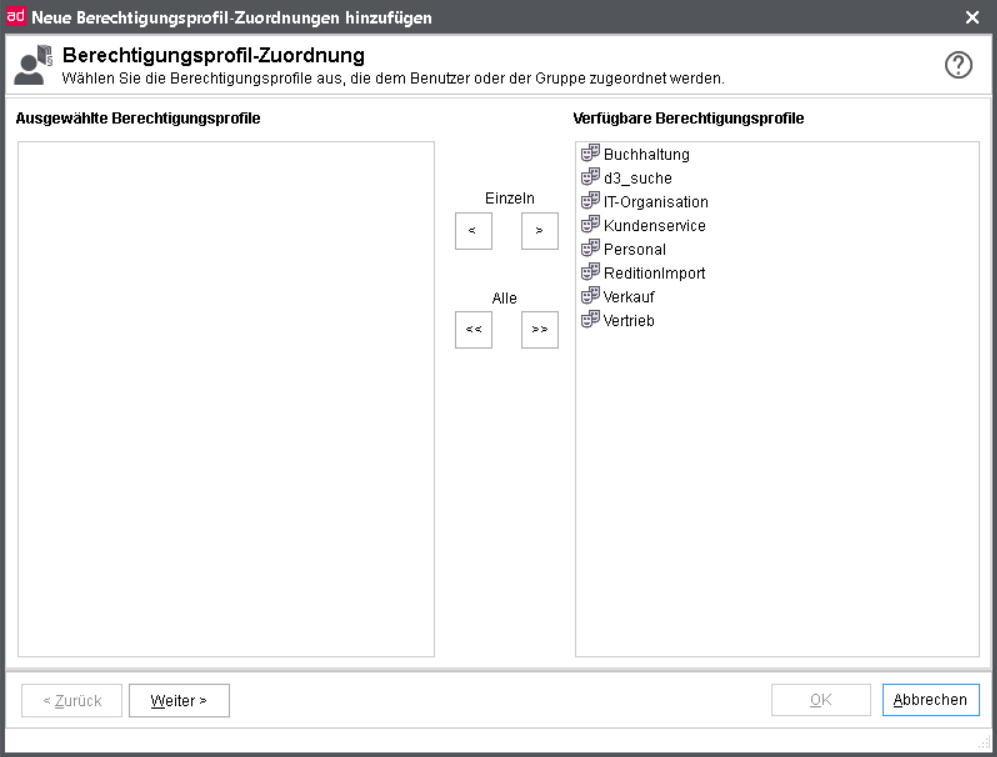
With the concept of access rights in d.3 you can directly assign rights via an authorization profile.
Here, you can assign one or more authorization profiles to a user.

Choose the authorization profiles on the right.
Add them to left window with the button Add.
To remove an authorization profile, do the following:
Select one from the left window vice versa.
Click the button >.
The new user will be created, as soon as you click on OK.
Additionally or alternatively, you can also directly assign document classes to a user. This way, you could extend the rights, e.g. for key users or further restrict them.
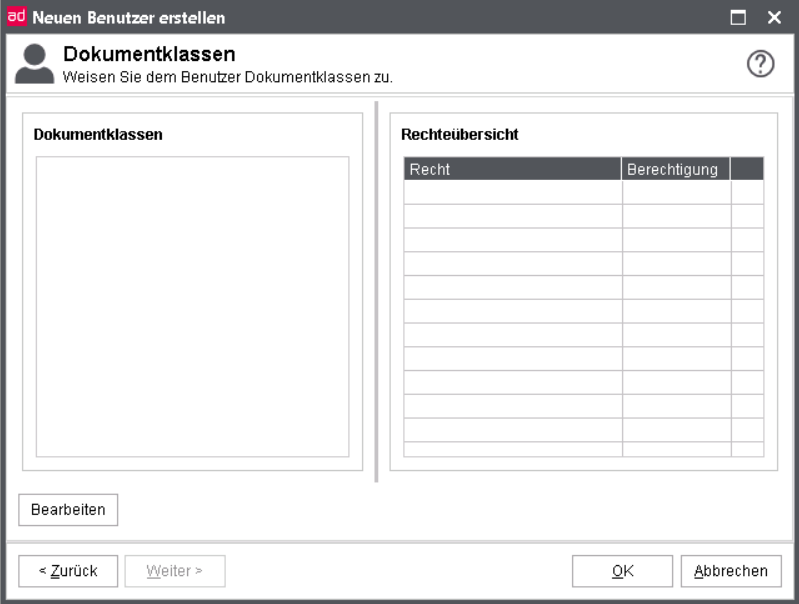
Open the user overview via Rights | User.
Choose a user.
Choose the Properties with the context menu option.
Then open the properties to see an overview over the selected values of the user.
Über die jeweilige Tab General , Assignments , Advanced properties ) können Sie die konfigurierten Daten einsehen und auch edit.
On the tab Common you can see and edit the User data, enter optional fields and leave a Checkout message.
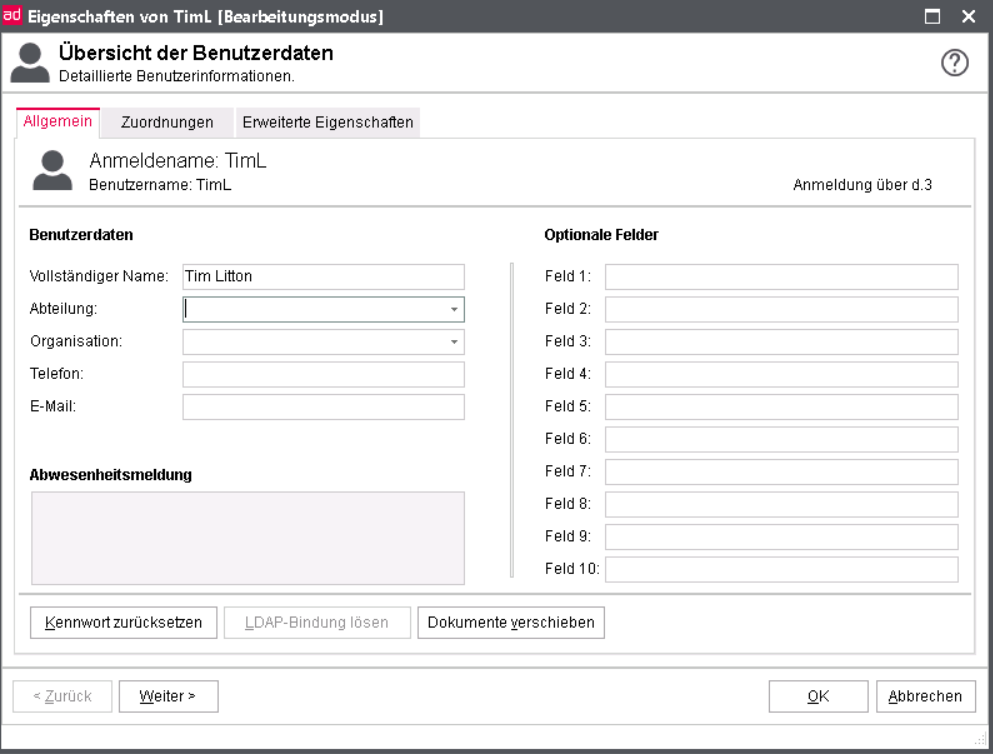
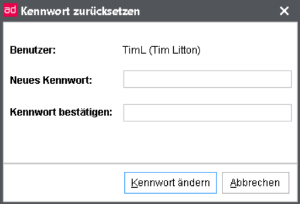
Reset password
Via the button Reset password you can define a new password for this user for the d.3 login.
Unbind LDAP
The button Unbind LDAP is available, if the user is a LDAP-user and allows to unbind LDAP.
Move documents
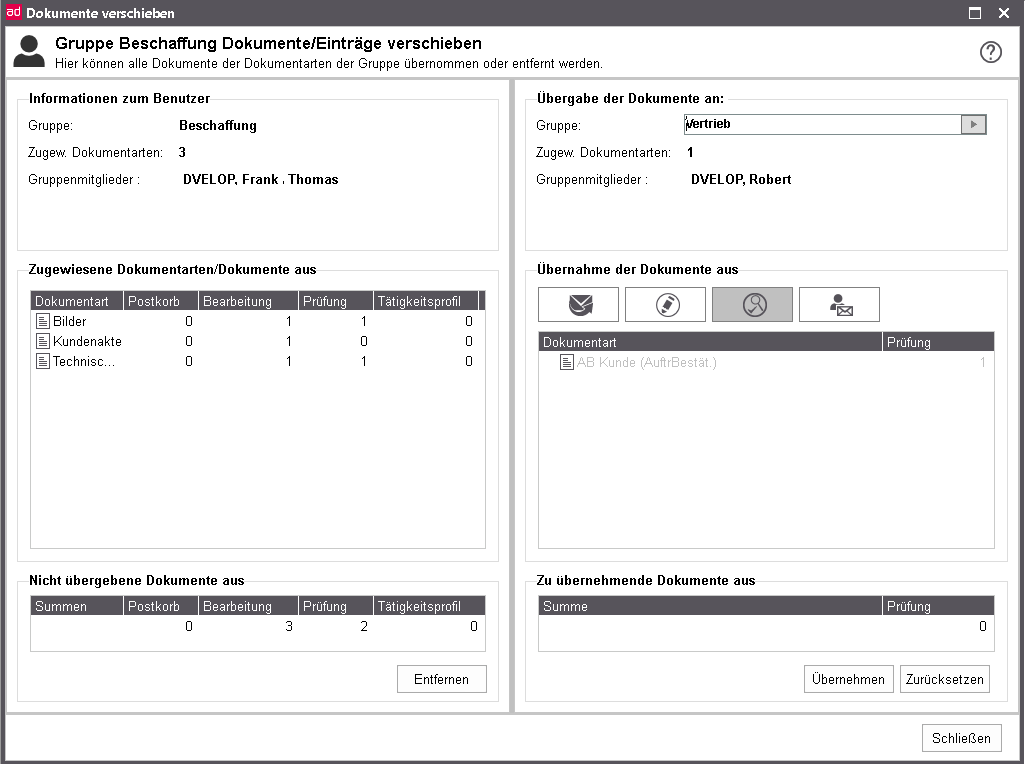
If you want to move all documents or document type of user to another or to remove it, use the dialog Move documents, which you can open by click on the button with the same name.
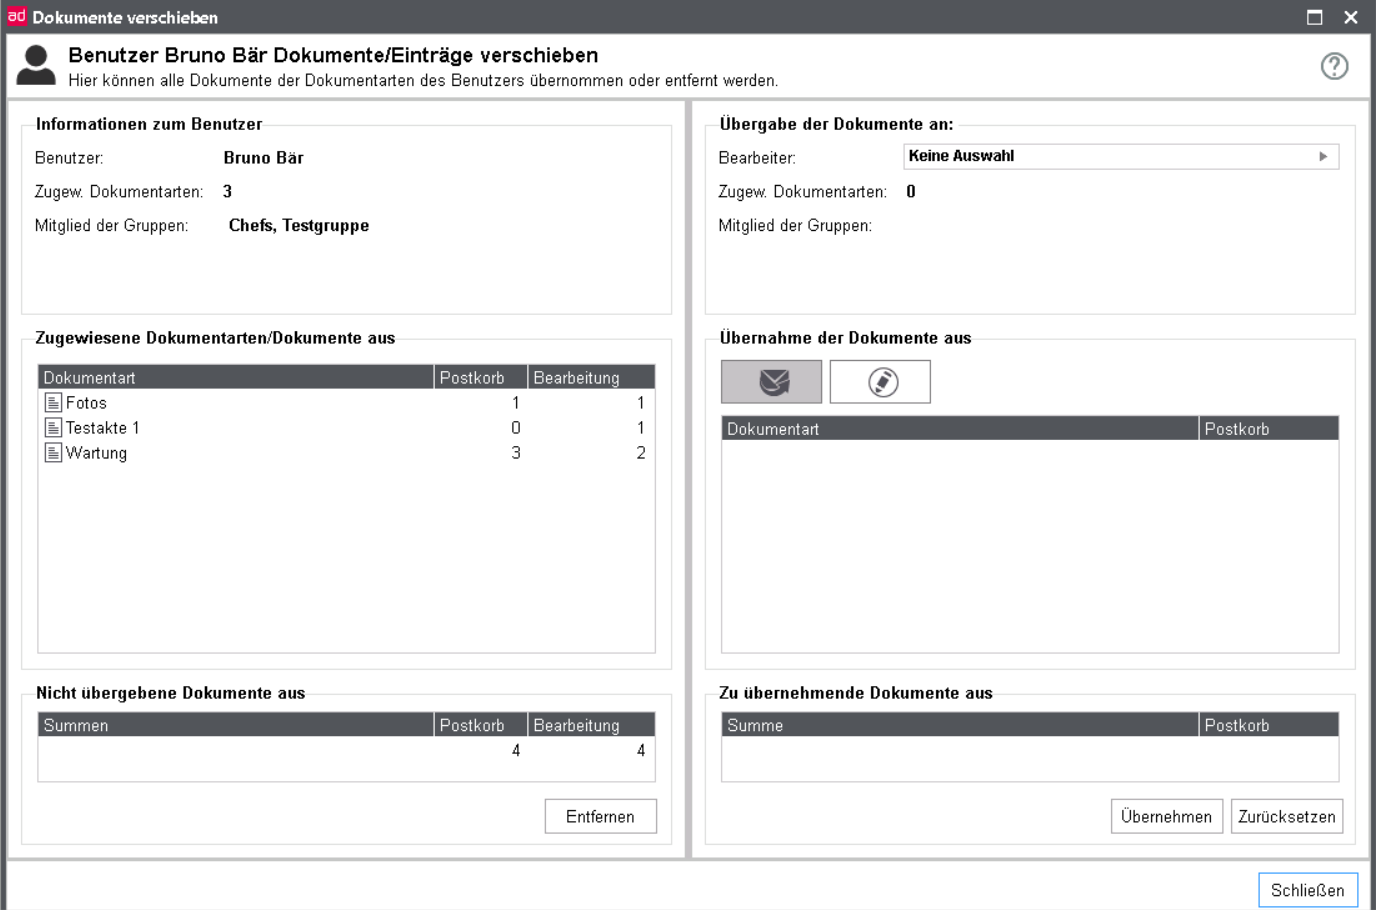
In the left half of the window you can see Information to the user and the document types, in which the user owns documents. For this effect the amount of not adopted documents per document type is visible in each category.
In the right half you can choose a user or a group for adopting the documents. For the user or the group the same information will be displayed. In addition to that, for the user are all document types displayed, on which he has the required rights. For adopting you can choose between documents from the mailbox or documents in Processing. The documents to be adopted will be displayed below.
To move documents the following steps are to be done:
Choose a category from which the documents are to be moved (mailbox, processing).
Check the documents of the desired document types to be moved in the list.
Click on Apply to move the documents or
on Reset to discard the changes.
Moving documnets is not without risk and should be done with care!
For users mailbox entries and documents in processing can be moved.
Removing entries is an additional opportunity for mailbox entries and job profile links. The documents must be adopted previously.
On the tab assignment allows you to see and edit the assignments of the user in groups , authorization profiles and document classes .
The tab Advanced properties shows the respective rights of the user, which you can manage via the buttons Assign right, Deny right and Ignore right, see Advanced properties - User rights.
To remove a user, do the following:
Choose the respective user from the Overview of Users.
Click on the button Remove.
Confirm the following query with Yes.
If the user to be removed has still documents in processing in his mailbox, an additional dialog appears, which allows you to move these documents to another user or to delete these documents, too.
Concurrent user
In this model several users share one license.
If a user executes a function in the d.3 repository, then a free license is occupied by him/her for 30 minutes. If the same user executes within the 30 minutes more actions, the occupation is set to 30 minutes for each action. If none actions are made within the 30 minutes, then the license can be used by another user after this time.
The login to d.3 smart explorer / d.3 smart start does not occupy a license.
From version 8.0 of d.3 smart explorer the license is not being released directly after closing the application. The license is available after 30 Minutes.
Named Users
In this model each user occupies a license. For each user who shall work with the system, a license is required. This also applies for part-time employees.
General information
With d.3 version 8.1 the new license typ d.3ecm user S was introduced. Users of this license type only have read-only access to the document in the d.3 repository and are allowed to participate to a workflow.
For this license type the d.3 server differentiates between an "only reading" user (called read-only-user) and a "writing" user (called full-user).
Reading the license data
When starting the d.3 processes the following license types are read from the liccheck.lic:
"d.3-named" for full-user
"d.3-named read only" for read-only-user
In the d.3 log this is indicated by the log entries:
"Max. number of full users = ..." and
"Max. number of read-only users =...”,
System group "$ReadOnly$"
A new system group "$ReadOnly$" was introduced and by the membership of a user either a full-user license (not member of this group) or a read-only-user license (member of this group) is occupied.
The group is only created, if really read-only-user licenses are accounted in the license file.
The group cannot be changed or deleted.
Only the user memberships can be changed.
Service users cannot be a member of this group. Neither is it possible to adopt other groups as members of this group. This group also cannot be member of another group.
Read-only users
A user occupying a read-only user license has only read-only access to documents. A document import, changes to document properties or linking documents is therefore not possible for these users.
Phase after replacing the license file
If a named user license was found in the license file after the first start of the d.3 processes, the phasing-in period of 30 days begins. In this phase the users can switch between full-user license and read-only-user license without time delay or blocking the licenses.
Because all d.3 users are full-users at first, it is necessary to assign the users to be act as read-only users to the group "$ReadOnly$" in d.3 admin after the installation.
Occupancy of a license
A Named User license is only occupied when a user actively logs on to the d.3 system. No licensing takes place during user creation. In the case of user changes, especially those involving a license change, only the previously occupied license is deregistered with the license server and blocked for 5 days after the introductory period. The new license is not registered.
Daily registration of licenses
The async process runs through a routine once a day to register users with the license server. The following rules apply for this:
Disabled user accounts are not registered.
The registration distinguishes between the read-only and full-license.
Switching a user to a read-only user license
Within the phasing-in period of 30 days of the named user license users can be changed to read-only users without blocking a license.
Else the following rules apply:
The restricted rights for the users take effect immediately.
After the introductory period has expired, the previously occupied full-license is blocked for another 5 days.
The read-only license will be occupied by the async process at the next login or the next daily registration.
Switching a user to a full-user license
A previously occupied read-only user license is immediately released. The full-license will be occupied by the async process at the next login or the next daily registration.
Service users
A service user occupies no named user license. But if the service user becomes a "normal" user, it occupies a license that becomes active at the next login or through the daily registration by the async process.
If a named user becomes a service user, after the introductory period the respective license (full-user or read-only user) is blocked for 5 days.
Deleting users
After the deletion of a user the previously occupied license is blocked for 5 days.
Disabling users
If a user has been disabled, the occupied license is blocked for 5 days.
License management with an LDAP connection
Each new LDAP user initially occupies no license.
By an assignment to the system group "$ReadOnly$" via the LDAP configuration the user occupies a read-only user license.
The behavior on license switches is the same as without LDAP connection: When switching a license to a license with a smaller range of functions the previous license is still occupied for 5 days.
Comfort function: If a user loses all rights because no groups or authorization profiles are assigned via the LDAP configuration, the user will be disabled in d.3. This also releases the license of this user after 5 days.
Comfort function: If a disabled user gets d.3 access rights via the LDAP configuration again, the user will be enabled automatically. The user will occupy a license with the next login.
If a user still exists in the d.3 repository but not in the directory service, the user will be disabled in d.3. This releases the license (after a block of 5 days due to the license switch).
An automatic verification checks regularly, if a user has or has not any rights in d.3. It is sufficient to revoke the d.3 rights from the users and the rest will be done by the automatic license release.
If the message "The system group ‘$Deactivate$' no longer exist! Please create a new group with the right 'Account is disabled' and assign it instead." after a login of a user or during the synchronization of the LDAP users by the d.3 async process appears, then do the following:
The reason for this message is that the system group "$Deactivate$" was adapted to the LDAP configuration to disable users and to avoid occupying a license at the same time. Due to the reason that from version 8.1 hotfix 6 of d.3 server disabled users do not occupy a license, the group was deleted entirely. Instead now another group (at best a group with the option "No distribution to group mailbox") needs to be created for which the advanced property "User->d.3->User account->Account is disabled" is set to "Yes". Then, this group needs to be set in the LDAP configuration instead of the group "$Deactivate$". If this recommended change is not applied, then the functionality is given as before in spite of the removal of the group "$Deactivate$".
Below is not only general information about group permissions, but also how to create and manage groups.
Groups are used in d.3 to combine users with the same tasks in order to select them as a recipient in the mailbox dialog or to use them in the concept of access rights.
The group name can have up to 100 characters.
The group name must differ from any other user or group name in the first 8 characters.
Traditional boundaries for user groups and authorization profiles no longer exist. Nevertheless, keep an eye on main memory usage and performance when evaluating document permissions. In particular, a high number of permission assignments increases the main memory requirements and has a cumulative effect on search speed when the number of results is high.
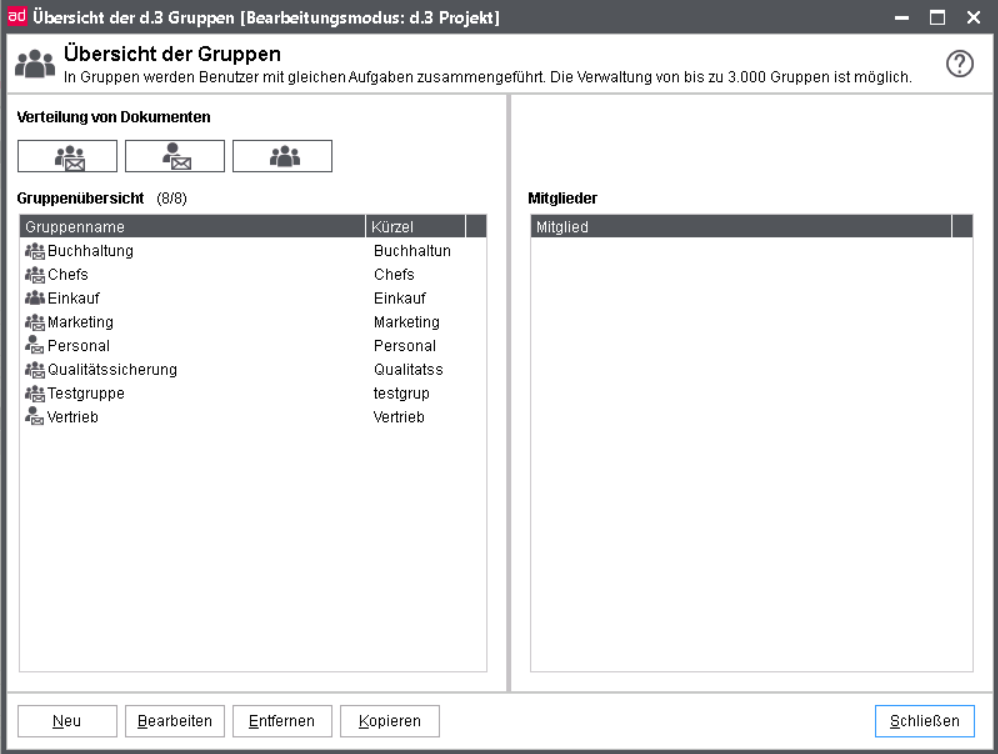
All available groups are displayed in the group overview screen. Using the respective icon, the type of group is illustrated.
Select a group to see a list of all members in the right window. As you can see, groups can also be members (nested groups).
 Distribution of documents to all group members (mailbox without workload balancer), group type cannot be changed later.
 Distribution to one member of the group (mailbox with workload balancer), group type cannot be changed later.
 No distribution, all employees will be grouped (initially), group type can be changed later, if e.g. the type of the mailbox distribution is checked.
To filter for group types, click on the respective icons above the list.
Use the button Remove to delete a group. A multiple selection is possible in the group overview, so that several groups can be removed in one step. During this process, however, the members' display is cleared and the buttons New, Edit and Copy are disbaled.
If documents are still assigned to a group when you delete them, a corresponding dialog is displayed. Here the documents can be moved.
When deleting several groups, this dialog is displayed separately for each group. If the documents are not moved, you can cancel the process for this group by a new query and continue with the next one.
If the process is not cancelled for a group, but the documents are not moved either, you will end up in a kind of endless loop.
With the button New on the overview of d.3-groups you create a new group in the d.3 repository.
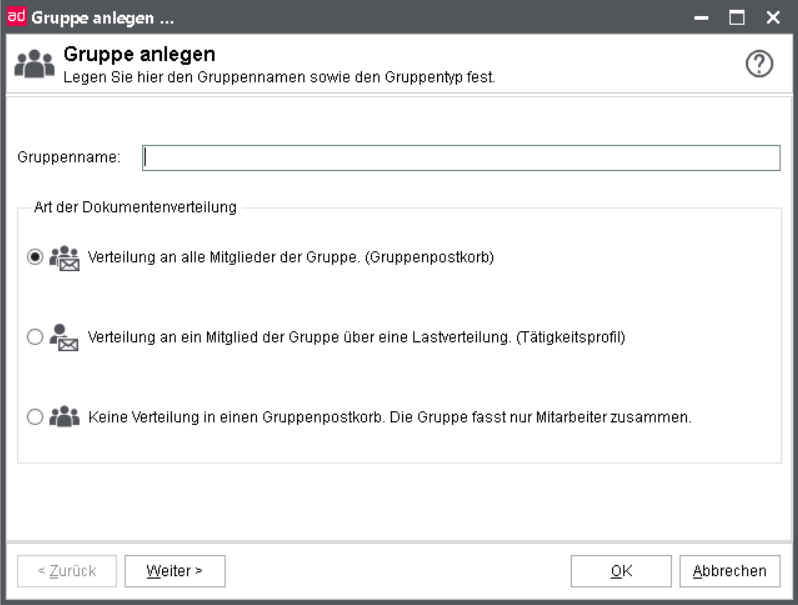
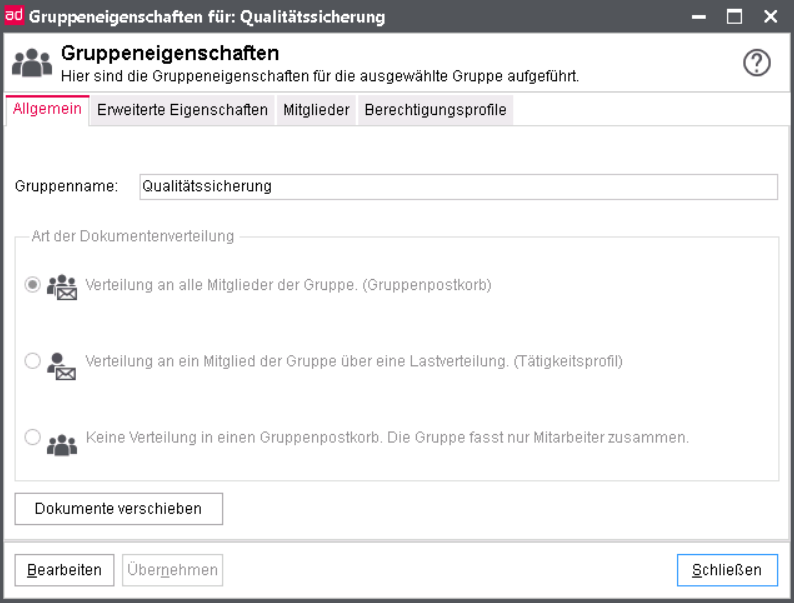
First, enter the general information.
Type of document distribution:
Distribution to all members (group)
If a document is sent to the d.3 mailbox, then the document can be sent to all group members with the same rights. Every group member receives a notification in his d.3 mailbox.
Group documents should then be accepted by a member of the group for further processing (see d.3 smart explorer manual).
Distribution to one member (activity profile)
If a document is sent to the d.3 mailbox, then the document can also be sent to an job profile. In contrast to the sending to a group, exactly one member of this group receives the document as a task in his mailbox. Assign additional values to the workload balancing later for the control.
No distribution
This group does not appear in the d.3-applications, e.g. in the mailbox-dialog. Here, you group members only. The type can be changed later. When creating the company structure, you can also use this group.
Additional information can be found in the advanced properties at the user properties or the chapter d.3 policy manager.
Members of a group can be users as well as user groups.
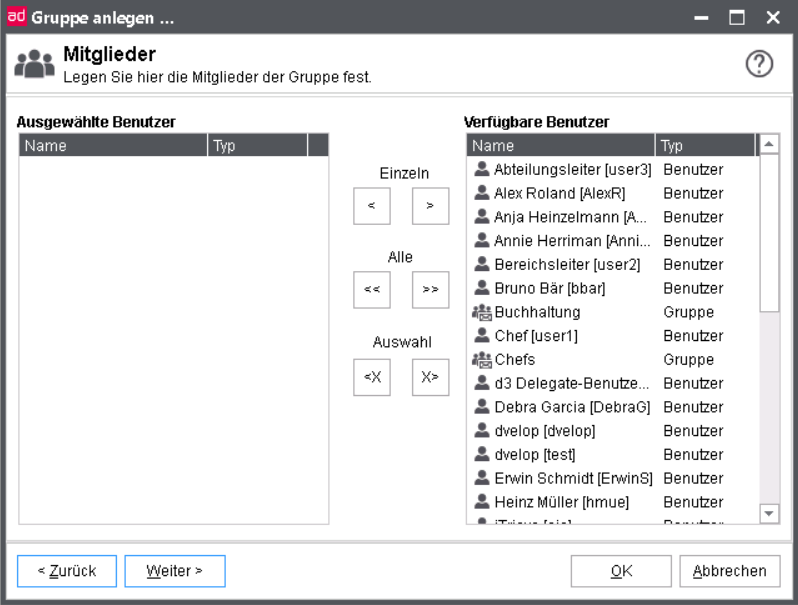
Choose the members of the group to be created from the list in the right window. A multiple selection can be applied using the usual Microsoft Windows functionality. You can assign normal mailbox groups only.
With d.3 version 7 authorization profiles can now also be assigned to a user group.
Having successfully created a new user group, the following information is displayed.
If a group is configured for the distribution to one member (activity profile), then the members of this group appear in the overview.
For each member the fundamental information with reference to the distribution of tasks can be assigned in the following dialog.
Initially, define the type of load balancing:
Load balancing
Based on the weight and the existing mailbox entries, the mailbox dispatch is controlled. For this effect, the parameters in the d.3 configuration are interpreted.
Fill level distribution
The mailbox dispatch is controlled based on the threshold values. Tasks will be assigned as long as the maximal value is reached. The weighting and the current balancing is considered for this.
Equal distribution
The mailbox dispatch goes by the number of the documents which have been sent previously via this activity profile to the user and not by the current number of the mailbox entries. The weighting is included here.
Configure the weighting for the selected member by double-click.
You can gather or edit the settings for the load balancing to the selected user or group.
Deputy
Enter the employee's deputy here. This delegate can receive documents from his colleague's mailbox in the absence of his colleague via the mechanism of the delegation rules. You can also specify a group as deputy which makes all members automatically a deputy for the employee.
Weight
If you want to implement a conversion that distinguishes between part-time and full-time employees, for example, so that this is taken into account when sending documents, then define a (self-selected) weighting here. Any values are permitted.
Example 1: "8" could be equivalent to an 8-hour day (full-time), while "4" could represent a 4-hour day (part-time).
Example 2: Count of tasks (on the "desktop") of a employee: by reaching the maximum count, he no longer gets a task (in relation to all other group members).
Maximum treshold for document distribution
For the mechanism of the fill level distribution you can enter a freely definable lower limit here, under which an employee shall receive additional mailbox entries again.
Example: Enter the number of mailbox entries. Whether all entries or only the unread ones are counted is controlled by the corresponding parameter in the delegation rules.
If the upper threshold value is reached for all users, an internally determined coefficient determines the next recipient of a document. It is therefore guaranteed that a document will always find a recipient.
Lower threshold value for document distribution
For the mechanism of the fill level distribution you can enter a freely definable lower limit here, under which an employee shall receive additional mailbox entries again.
Example: Enter the number of mailbox entries here, from whcih the employee should receive additional mailbox entries again.
Head of job profile
If you want the employee to control this section, enable the checkbox. This employee is then eligible to set the colleagues in his activity profile absent or available (see Substitution rules). If he was granted the respective permission, he is also able to view the mailbox entries of his group members.
Participates in document distribution
You can remove employees from the distribution of documents, for example, a possible employment for the superior.
If a group is selected for the configuration of the load distribution, only the weighting or threshold values can be entered.
Additionally, the group can be excluded from the document distribution.
If different weights or thresholds are defined for the user (directly) and for the group, then those values assigned to the group apply. The user entries are not interpreted in this case. This also applies to the participation in the document distribution.
You can get to the group properties after opening the Overview of groups (Rights | Groups).
Choose the desired group and click on the button Edit.
Or perform a double-click on the name of the group.
On the tabs Common, Advanced properties, Members and Authorization profile you can see the entries, done while Creating the group and change them via Edit later.
The button Move documents provides to move documents or mailbox entries of a group to another group or user. The function resembles the button with the same name in the Overview of users.
Additionally to the mailbox entries and the documents in processing for groups it is possible to move documents in verification and job profile links.
In contrast to users for groups only document types from which the group has documents are displayed in the right list of the dialog.
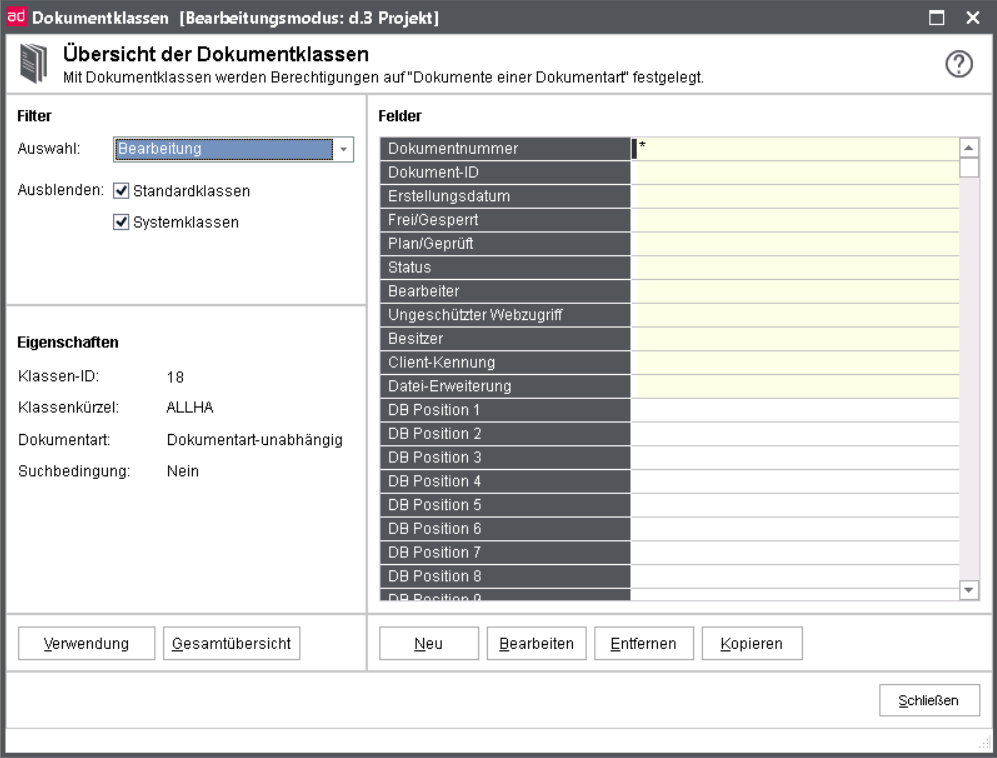
Document classes are a part of the rights concept. Document classes allow you to define rights to "documents of a document type".
A simple example of "documents of a document type" is the permission to display "all invoices with an invoice amount of less than 10.000 €".
Document classes always determine a subset of the possible documents.
Basically, there are two types of document classes. The first is the document type dependent class type (here supplier order (K)) while the other one is document type independent (or even cross-document type) class type.
The document type-related document class is easily understood as it defines a sub-set of an entire document type using certain criteria such as the limitation of "all invoices" to "invoices below 10,000 € in the above mentioned example.
In contrast to this, a document type-independent class is used to limit "documents of all document types" in the d.3 repository. These types of document classes are an additional criteria to restrict the access. They cannot be assigned to a user as the only document class.
Let us suppose, you want to grant a user access to a released documents. Then it is not sufficient to generate a document type-independent document class with the restrictions "Status = Release", and to assign this to the user. The user would then not see any (concrete) document- and dossier types in d.3 smart explorer or d.3 import.
You rather create a new authorization profile and assign all default classes and the document type-independent document class to this authorization profile.
The default classes are automatically generated by the d.3 server with a new document type or dossier type. The default classes are marked with the suffix "(K)" ("C" in English repositories) and a class ID with the prefix "CLAS_".
Afterwards you assign permissions only in the document-type independent class. Finally, you could specify a name for this profile (such as "All documents”) and finish it.
This authorization profile is assigned to the user. The user will only see only documents in the status Release as the results of a search.
If you want to implement a contrasting right, (in our example: provide a user with all documents not in the status release), then please follow these steps:
You refuse the reading rights for the document type-independent class ("NO " or "right ignored") but you have to grant reading rights for the default classes ("YES" or "right granted"). For a better understanding, see the document- type-independent class as a template with black areas and the other classes as templates with "holes". All templates are places on to of each other. You can then only see through the holes while the black areas are still opaque.
The user / class assignments should only be used together with authorization profiles, if you explicitly want to grant or deny certain rights.
To add a new document class, click the button New in the overview.
Initially, select the document type for which you want to define restrictions, e.g. “Supplier Order”.
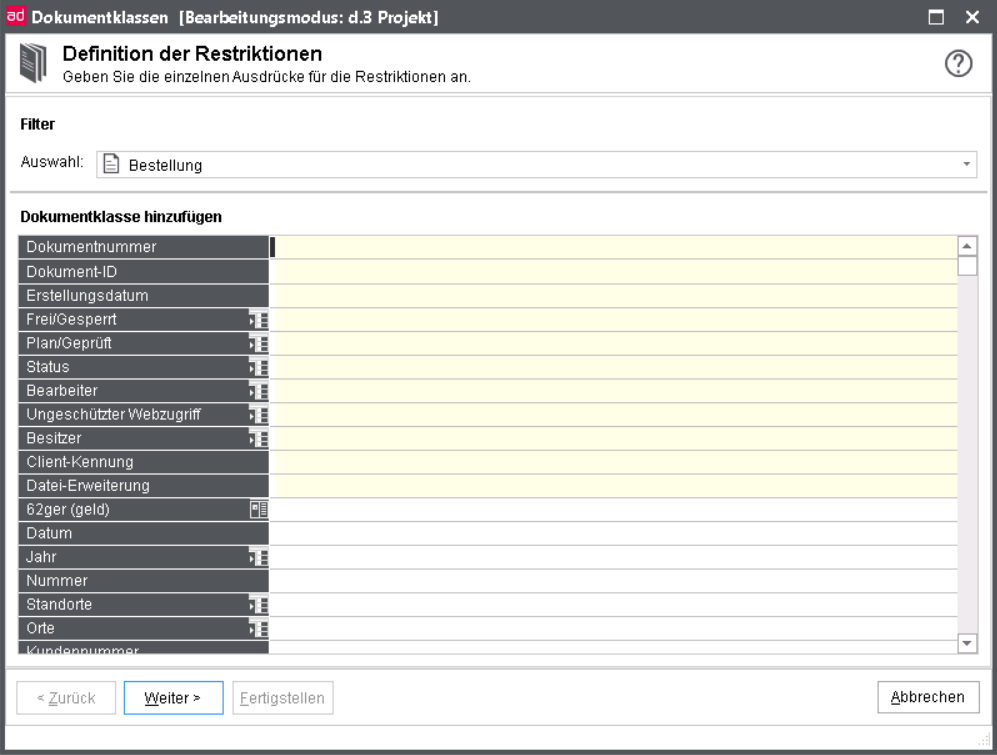
If you selected a document type to which the document class is to relate, only the properties of this document type are displayed in the table. Then define the restrictions in the individual fields.
Depending on the data type of a field, you can also work with special characters and macros.
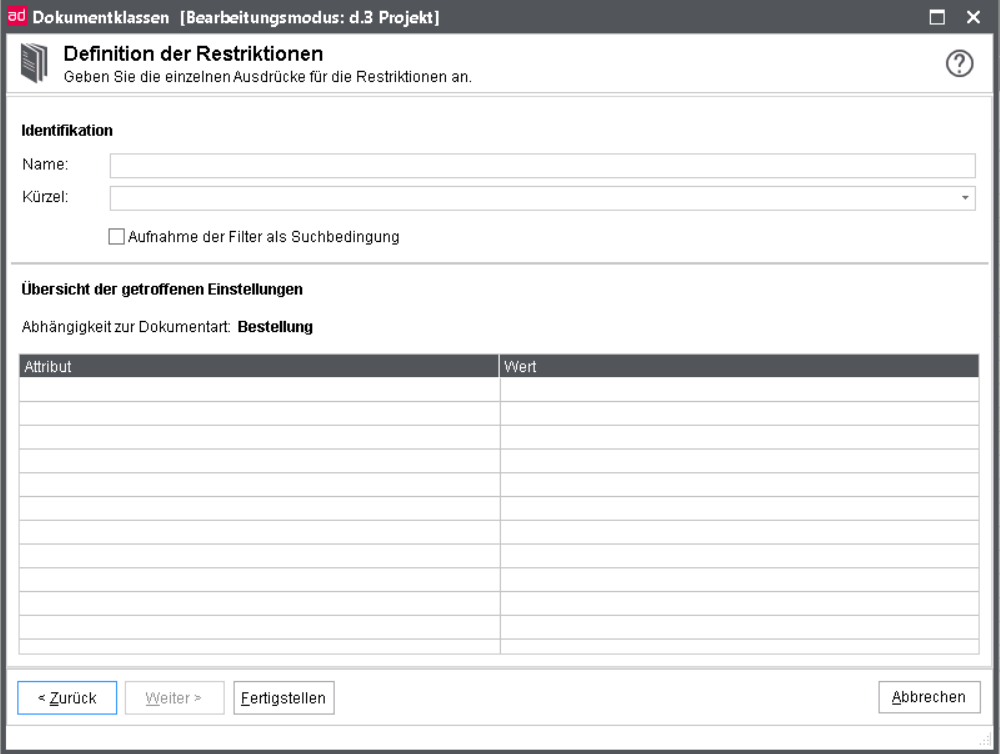
Under Identification enter a descriptive name for the new document class designating some of its restrictions.
The name of a document class has only informative character. You can enter a maximum of 255 characters. Thus, you can specify easily recognizable telling names. A reasonable name could for example be "Invoices with an invoice amount under 10,000 €".
Additionally, you must specify a max. 10-digit distinct technical name (short name). This name is used in the hook-development. The short name is case-sentive, i.e. upper- and lower-case are interpreted.
All default document classes have short names with the prefix CLAS_. This prefix is exclusively reserved for the default document classes. You cannot manually generate a class with this prefix.
Via the option Adopting filters as a search condition it can be configured that the restrictions of the document classes can be integrated into the SELECT statement for the search for documents.
Consider the following for this effect:
Only the document classes are considered which are assigned to the user via the authorization profiles or directly via document class assignments.
If a search is executed for exactly one document type, the restrictions of this document classes based on the created document type apply.
If a search is executed for none or several document types, only document type-independent document classes will be read.
Only the restriction of one document class can be integrated in the search criteria because the document classes interpretation is always executed via OR-connection and this can not be implemented in SQL-commandos, especially when multiple restrictions per class are set. This means: If multiple document classes are assigned with option to the user and these document classes refer to the same document type, then none document class will be considered.
For the integration of document classes restrictions only the properties in the search criteria will be set, which have not been set by the user already.
The following macros are supported: @D3USER, @D3GROUP, @D3USER_REALNAME, @D3USER_LONG, @D3USER_EMAIL, @D3USER_LDAPDN, @D3USER_OPTFIELD, @D3SET
Example:
A document class of the document type "e-mail" is specified (document type short name EMAIL) with the restriction "@D3USER_EMAIL" to the property field "recipient" (DB-position 1).
The user "user1" has the following entry as e-mail address: user1@firma.de
When searching for documents in the document type "e-mail" without more search criteria the following SQL-command is generated (abridged):
SELECT * FROM firmen_spezifisch WHERE kue_dokuart = 'EMAIL' AND dok_dat_feld_1 = 'user1@firma.de'
A document type can be restricted with a restriction, similar to a search in d.3. Hence, the usual wildcards can be applied in the restriction. The possible wildcards depend on the data type of the field. Please note the advanced options for alphanumeric special characters.
You can use wildcards in text fields defined in the d.3 configuration. By default these are the "%" (percent) and "_" (underscore). The % represents an unknown number of characters and the underscore is a placeholder for exactly one character.
Let us suppose, your d.3 repository contains a document type called "Delivery notes". This document type holds a field named "Supplier". This alpha-numeric field should hold the name of the suppliers. In order to allow a user to access documents relating to the supplier “d.velop AG”, you would have to enter the restriction “d.velop AG” in the respective field.
The disadvantage of this exact designation would be that documents filed with a supplier like “Fa. d.velop AG" would not be included. At this point it would be preferable to enter “%d.velop AG”. Now, both spellings would be found. If some documents were stored with an entry like "Fa. d.velop", then again this would not be included in the results for this restriction. To avoid this, you would have to restrict with *d.velop*. The "." in the company name could pose a final problem. Documents where the supplier was specified with a "-" (hyphen) such as "d-velop AG" are still not found. The remedy would be the pattern-matching character "Underscore” (“_”). Thus, the final restriction for our field "Supplier" in the document type "Delivery notes" would be %d_velop%. This value must be entered when defining the document class.
You can also use alternative placeholder characters for "%" and "_" such as the equivalent "*" and "?". From d.3 version 6.2 it is also possible to define additional special characters for the alphanumeric search.
These individually defined characters can be used for the search as well as for the definition of document classes.
However, for document classes, you cannot combine the special characters with the exception of "*", "%","_" and "?".
Exception: Combinations of "*", "%","_" and "?".
You can use the minus sign ("-") in date fields. This allows the definition of ranges "from – to", "since –" and "- until".
Ranges | Restrictions |
|---|---|
from - to | 01.01.1997 - 31.12.2001 |
from... | 01.01.1997 |
to | - 31.12.1999 |
{-m}-{+n} | Example: {-28}-{+28} restriction for the range from (4 weeks ago) until (in 4 weeks) |
Let us suppose, your d.3 repository contains a document type called “Invoice". This document type includes an property named "Date", in which the invoice date is stored.
If an user should have access to all invoices up to the "31.12.2000", you would have to create a document class using the document type "Invoice".
Furthermore, you have to restrict the field Date, entering "-31.12.2000". Finally, this new class would have to be assigned to this user.
You can use the "–" (hyphen) in numeric fields to designate a range.
An example could be the "invoice amount". If you wanted to create a document class for the invoices of less than 10,000 € then you would enter the restriction "-10000" (-up to). In order to specify invoices with an invoice amount larger than 10,000 € you would enter "10000-"(from-).
To search for negative numbers, you would have to precede the number with a back-slash "\".
Field deviation in mm (longer / shorter) from the standard when producing a good.
100-
All deviations where the produced good is more than 100 mm longer than the standard-good.
-10
All deviations where the produced good is more than 10 mm shorter than the standard-good.
\-10
Search for goods being exactly 10 mm shorter than the standard-good
10-100
Search for goods being at least 10 mm longer and up to 100 mm longer than the standard-good
When defining a document class the values for a property with a dataset, its values are displayed for selection via the right combo box.

The stored dataset is displayed.
The upper section of the overview displays the technical fields available as restrictions. These fields are document type-independent.
Document number: This alphanumeric field represents the drawing number (zeich_nr).
Document ID: The document ID is a unique identifier for the document in the d.3 repository. This field is alphanumeric.
Created on: In this field you can specify the restrictions for the creation date of a document. It is a date field and the restrictions have to be applied as described before.
Released/Blocked: This property affects released documents. When defining a document class, you can either enter "Released", "Blocked" or nothing in this field.
The values "Released" and "Blocked" are shown via clicking the combo box on the right side. The combo box appears by clicking two times into the restriction field.
Let us suppose, a user should gain access to all released documents of the document type "Manuals" then it would be enough to set the status (compare chapter Status) with the value "Release" as a restriction (Please note the special case in the chapter Status). Thus, the user has access to all released documents of this document type, even to the blocked documents. To prevent the user from accessing the blocked documents, you must fill the field Released/Blocked with the restriction "Released".
Blocking a released document is useful if it proves to be faulty in content or its validity has expired.
Plan/Verified: This field applies to the first step of verification. The allowed values for this field are “Yes", "No" or nothing. If you select "Yes" here, the respective document must have been verified already. The values "Yes" and "No" are shown via clicking the combo box on the right side. The combo box appears by clicking two times into the restriction field.
Status: This field refers to the status of a document. Possible values are "Processing", "Verification", "Release", "Archive" and nothing.
When the permission is determined, always the most recent status is checked. This means that a restriction like "Release" will only return those documents with the current status "Release". All documents which are additionally in "Processing" or "Verification" are ignored.
In order to define a restriction for "all released documents", leave this property empty and enter the string "Released" in the field Released/Blocked.
Editor: This field applies to the first step of “verification”. You can either select a user name or a group name from this picklist.
You can also enter a macro (see chapter ), especially @D3USER or @D3GROUP Macros).
This property is an alphanumeric field.
Web published: You can publish documents for the web. If a document was published for web-access, a little globe icon is displayed in the d.3 smart explorer. To grant a user access only to these web-published documents, you must choose the value Web Published from the list. In order to explicitly permit access to the documents NOT published on the web, choose NOT Web Published. The third option is to select a NULL value. In this case the property Web Published/Unprotected Web Access has no influence on the permissions.
From d.3 version 6.3, this property is called Unprotected Web Access. However, it provides an obsolete function since it is based on CGI scripts and the d.3 Web Publisher will no longer be supplied in the future.
Owner: In this field a restriction to the owner of the document can be created. The owner is the user name the document imported.
Client ID: 'There is the option to define a client ID for restrictions. Every application is equipped with an internal identification. This is a 3-digit code, for example "200" for d.3 smart explorer. This way it can be made sure in the future that new or external applications can be allowed or rejected via the rights concept. These settings are currently mainly used for customer-specific solutions. For example, d.3 smart explorer, d.3 import and d.3 view are used with the following IDs (200, 220, 100). The IDs are transmitted to the d.3 server with every API-Call and can be found in d.3 logviewer.

File extension: From d.3 version 6.3 a restriction using the file extension is possible. This way it is possible to deposit the users just determined data types.
The following macros can be used when defining the restrictions:
If you enter the macro @D3USER in a field as a restriction for a document class, then this "placeholder" will be filled with the current d.3 user name, when the permissions are defined.
Let us suppose a document type "e-mail" is configured in your repository. This document type holds a field named "user". When importing a document, this field is automatically filled with the d.3 user. All users of the d.3 repository get access to zjos document type. The access to this document type is controlled by a document class. This document class contains the macro @D3USER as a restriction for field "User". If this user is searching for e-mails stored in the d.3 repository using d.3 smart explorer he will only see the documents containing his d.3 user name in the field "User".
When using the macro @D3GROUP it will be checked during runtime, whether the respective property contains a d.3 group name, of which the user is a member. If this is the case, the user will be granted access to the documents.
In order to decide whether a document is included in a class or not it can be helpful to use the macro @D3USER_OPTFIELD_xx in a property field. The effect is that the property is checked against the content of the optional field xx (1 to 10) of the active user from the user administration.
The optional field five in d.3 admin of user "John" contains the value "23" for the department number. You define a class where the property field "Department number" is restricted by the macro @D3USER_OPTFIELD_05. The user will only see those documents where the property field "Department number" equals "his department" (23). If this matches, the user "John" has access to this document.
The document class macro @D3USER_LDAPDN is used during the rights definition for a document and replaced with the LDAP Distinguished Name assigned to the d.3 user the when the LDAP support is enabled.
When using the Microsoft Windows Active Directory Services (ADS) as an LDAP server this is the ADS-GUID of the respective Microsoft Windows user.
For the interpretation of the macro a character string "GUID" is removed for a prefixed ADS-GUID.
Since d.3 version 6.2, the option to define and maintain restriction sets provides a way to do away with various small hook functions. Before you consider a solution with a hook function, you should always check, if a solution with a restriction set is possible (see chapter d.3 restriction set manager).
The use of the macro @D3HOOK allows for the development of a hook function to decide on the permission to access a document. The macro receives the name of the hook function as a parameter, e.g. @D3HOOK (procedure). When the right is evaluated (i.e. this function is called) the property value of the document is passed to the hook function. If the hook function returns the value "1" (TRUE), then the condition is fulfilled and access is granted. If the functions returns a "0" (FALSE), the condition is not fulfilled and the user is not permitted to access the document.
A solution comparing a hook function and restriction sets:
As has been described before for numeric fields, you can only use the restrictions "FROM-TO", "-TO" und "FROM-". A check for several ranges is therefore not possible.
Let us suppose you want to check a numeric field. The user should be permitted to access the document if the numeric field (in this example: "Sup_Nr") is between "1 and 10", exactly 15 or larger than 100.
Problem solution with hook function
A hook function for these task could look like this:
 proc  liefer_nr_klasse (liefer_nr)
   {
    if ( liefer_nr >= 1 && liefer_nr <= 10 \
        || liefer_nr == 15                 \
        || liefer_nr > 100                 \
       )
       return (1)
    else
       return (0)
   }
The macro would have to be specified as follows: @D3HOOK(suppl_nr_class).
Problem solution with a set for numeric values, name: suppl_nr
1-10
15
100-
Problem solution with a set for alphanumeric values: suppl_nr
1~10
15
>100
Requirement for this example: Definition of the extended characters for the alphanumeric search (~ and >)
Referencing the set in the document class definition: @D3SET(suppl_nr)
Before developing your own hook functions you are urgently requested to attend a d.3 hook training at d.velop AG.
This macro allows to assign a defined restriction set to an property field. With the button ... you can choose from the defined restriction sets. Please make sure that the data types are suitable.
Afterwards, the restriction set is referenced via the macro. Information on creating a restriction set can be found in the chapter d.3 restriction set manager.
This macro is substituted by the real name of the user as specified in the user properties.
This macro is substituted by the login name of the user as specified in the user properties.
With this macro the "calling" user is checked for being the disciplinarian of the entered username in the advanced property field.
This macro is replaced with the email address of the logged in user.
If you enter the macro @D3IDPUSER in a field as a restriction for a document class, then this "placeholder" will be filled with the current ID of the Identity Provider (IDP), when the permissions are defined.
Let us suppose a document type "e-mail" is configured in your repository. This document type holds a field named "user". When importing a document, this field is automatically filled with the IDP ID of users. All users of the d.3 repository get access to zjos document type. The access to this document type is controlled by a document class. This document class contains the macro @D3IDPUSER as a restriction for field "User". If this user is searching for e-mails stored in the d.3 repository using d.3 smart explorer he will only see the documents containing his IDP ID in the field "User".
You can only use this macro if you log in to the d.3 system via Identity Provider.
When using the macro @D3IDPGROUP it will be checked during runtime, whether the respective property contains a IDP ID of a group of which the user is a member. If this is the case, the user will be granted access to the documents.
The information in which IDP groups a user is a member is determined at login and stored using jStore. This cached data has a validity of 30 minutes (if no credentials to other d.ecs apps are set using DECS_SERVICE_USER, the validity is 10 days).
Changes to a user's IDP group memberships can be captured by the @D3IDPGROUP macro as only when
if the IDP already delivers them (attention: The identity provider may not provide this directly due to its own cache).
the user logs in again
or, when the expiration time of the jStore cache entry is reached
In contrast to that by choosing document type independent all database fields (DOCUMENT_FIELD_1 to DOCUMENT_FIELD_89) are displayed under the name DB Position X. Thus, the restriction applied here does not logically apply to an property (e.g. Supplier name) but physically to a table field.
Please note for your planning that the respective document class to which a document type independent class should apply has identical database positions. This might be the time, when the meaning of the "Preferred position" in the advanced property field creation becomes clear.
If you choose to edit or create a “document type-independent" class, all possible property fields (DOC_DAT_ FIELDS) are displayed.
Under the label "DB Position 1" you have to understand the DOC_DAT_FIELD_1. In these property fields you can use the above mentioned special characters as restrictions depending on the data type of a field, as well. The positions
1 to 49 are text fields,
50 to 59 are date fields,
60 to 69 are multi-value property fields,
70 to 79 are currency (numeric) fields and
80 to 89 are numeric.
The above mentioned options are also available here.
The complete overview provides an outline of all document classes. If you want to save the complete overview, do the following:
Click the button Save.
Or press the shortcut key Ctrl+S.
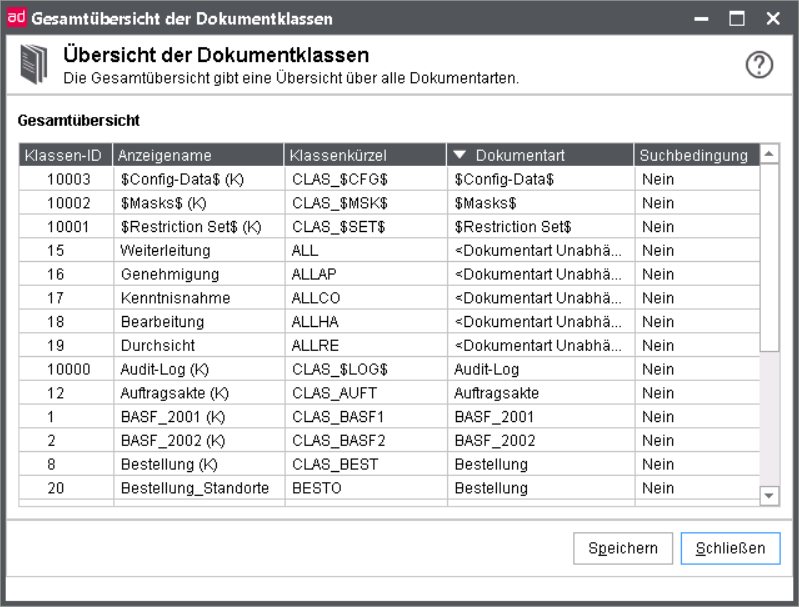
The short name (ID) of a document class (first displayed column) is assigned by d.3 server. You have no influence on the numbering.
d.3 allows the adhoc-inheritance of documents. For its implementation, document classes for the respective document are generated. Since these document classes should not and cannot be edited, they are not displayed in ordinary dialogues. However, the Complete overview shows them specially highlighted.
You can find further information on this in the chapter d.3 inherit rights manager.
With the button Usage on the overview of document classes you can see in the filter when a selection is defined, in which authorization profiles this document class is used.
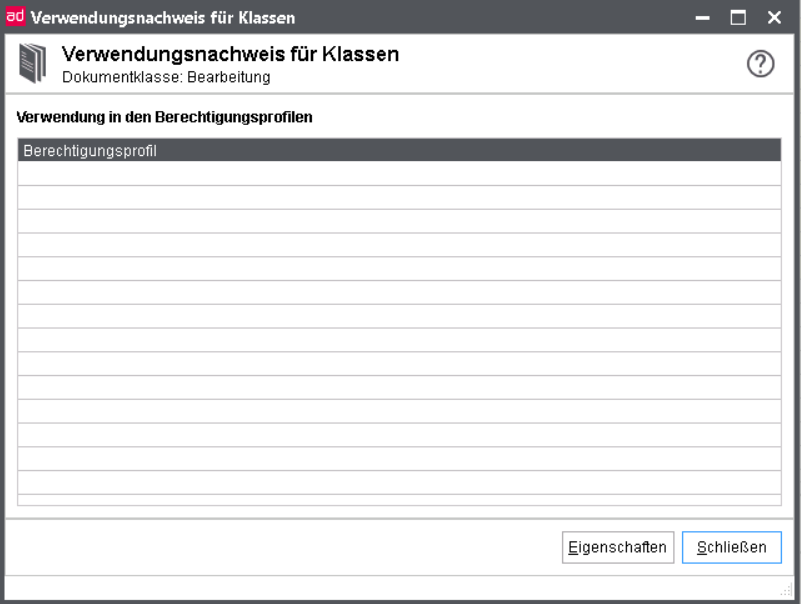
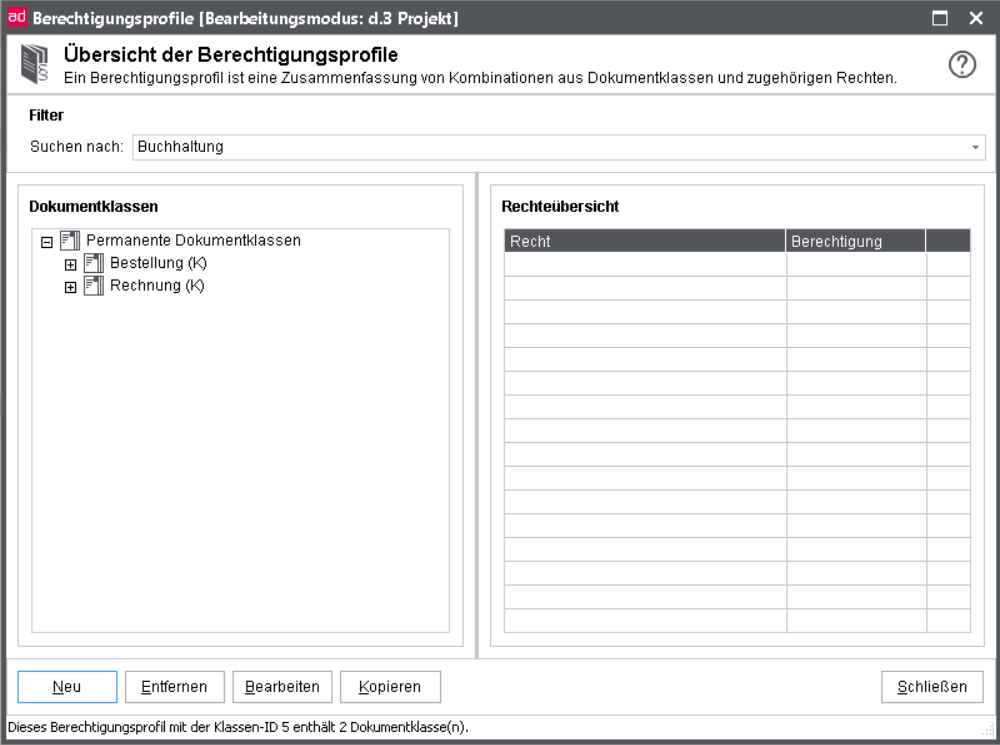
In previous versions, the authorization profiles were called "roles". The name is partially still in use internally.
An authorization profile is a combination of document classes and can be assigned to a user or a user group in order to determine the rights to access documents.
The members of the d.3 project team decide for all roles (departments, responsibilities, etc.) which documents should be accessible according to their range of tasks or job profile.
An authorization profile can now be implemented as the counterpart in d.3 so that this authorization profile just has to be assigned to the members of the department such as “Apprentices Purchasing§ or "Sales Local Office Southern Europe“.
Your company already uses the document types "Delivery Note", "PurchaseOrder" and "Invoice". Your employees in the purchasing department should be able to read these document types. To realize this, you could create three document classes with the permission to read for these document types.
Then, you would assign these classes to each user in the purchasing department with a direct user/class assignment. Now it could happen that sometime later a new document type is needed in your company called "Reminder". Again, you would have to create a new document class for the rights to access this document type and assign it to the users again. This would be time consuming.
The better solution would be the creation of an authorization profile. Here, too, you must create the three document classes for the document types. Then you create an authorization profile with a name like "Purchase" and assign the three document classes to it. Then, all users from Purchasing are assigned this authorization profile (user/ authorization profile assignment). If you now create a document type "Payment order" four weeks later, then it is sufficient to include the newly created document type into the previously created authorization profile.
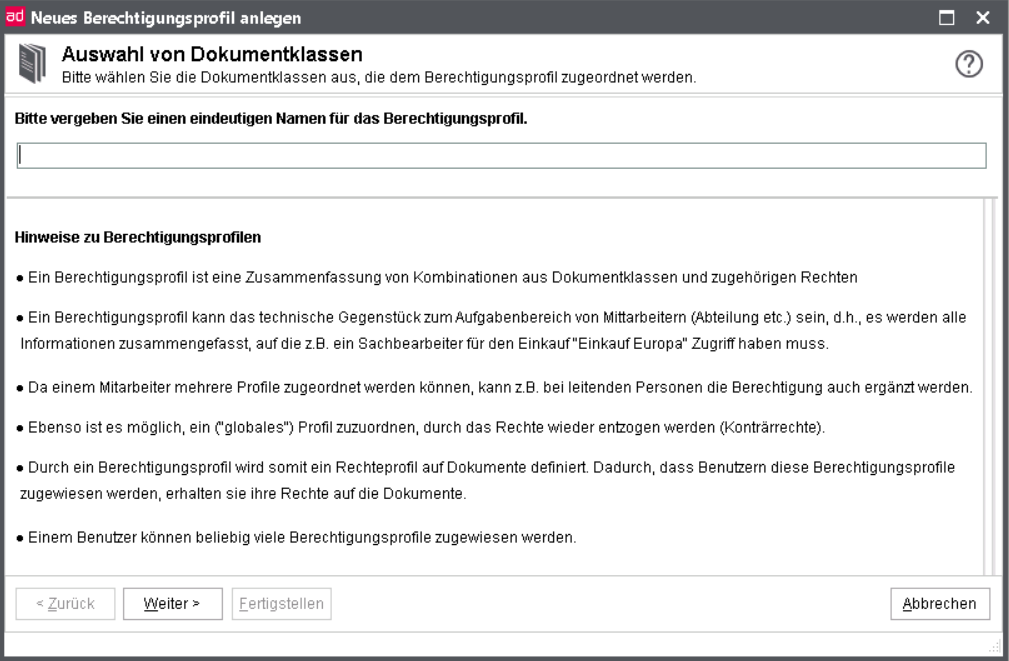
The name of an authorization profile must not contain any special characters except "+", "-" and "_". Other special characters are not permitted.
The first step in creating an authorization profile is to select the appropriate document classes. The number of document classes assigned to a role is not limited.
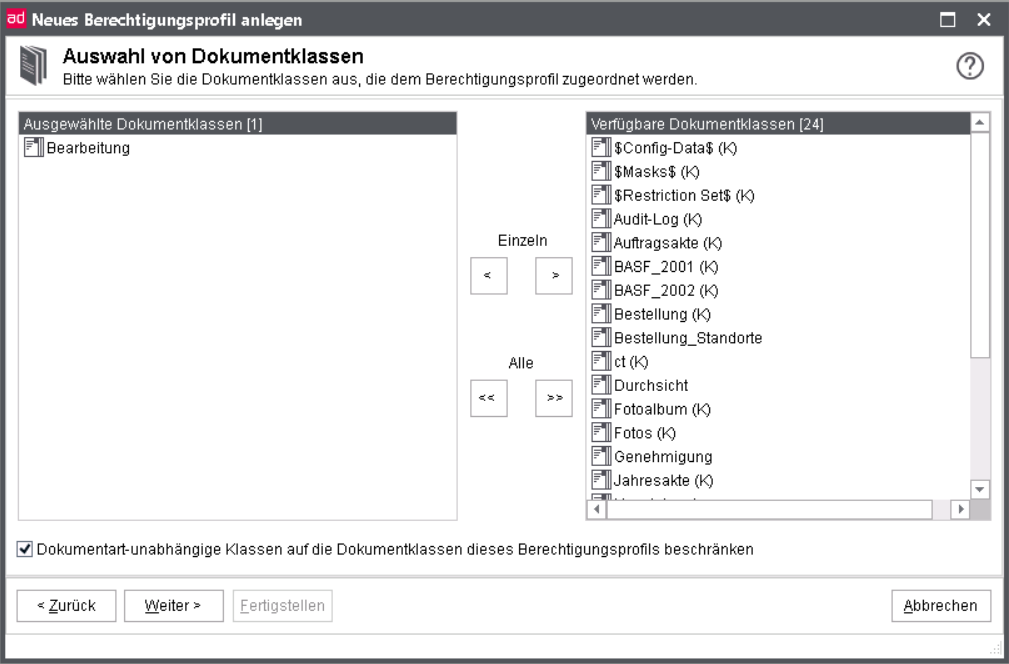
From the list of the available document classes, select the ones intended for the authorization profile.
Since the selected document classes may include so called document type independent ones, you can optionally limit the global restriction to this profile.
This is due to the fact that for such global document classes, the database table is only interpreted based on a database column. If this database column was however used for different values in other document types, this would result in an incorrect interpretation.
This can be the case, for example, if you assign several profiles to employees. The document type-independent class would be placed over all document classes contained in the profiles as a "template".
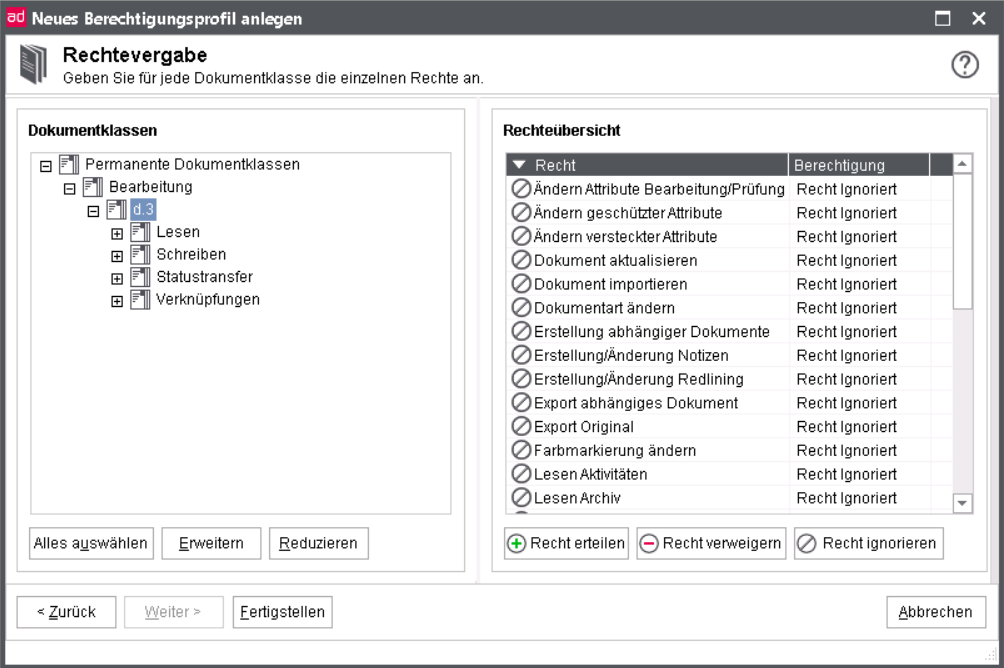
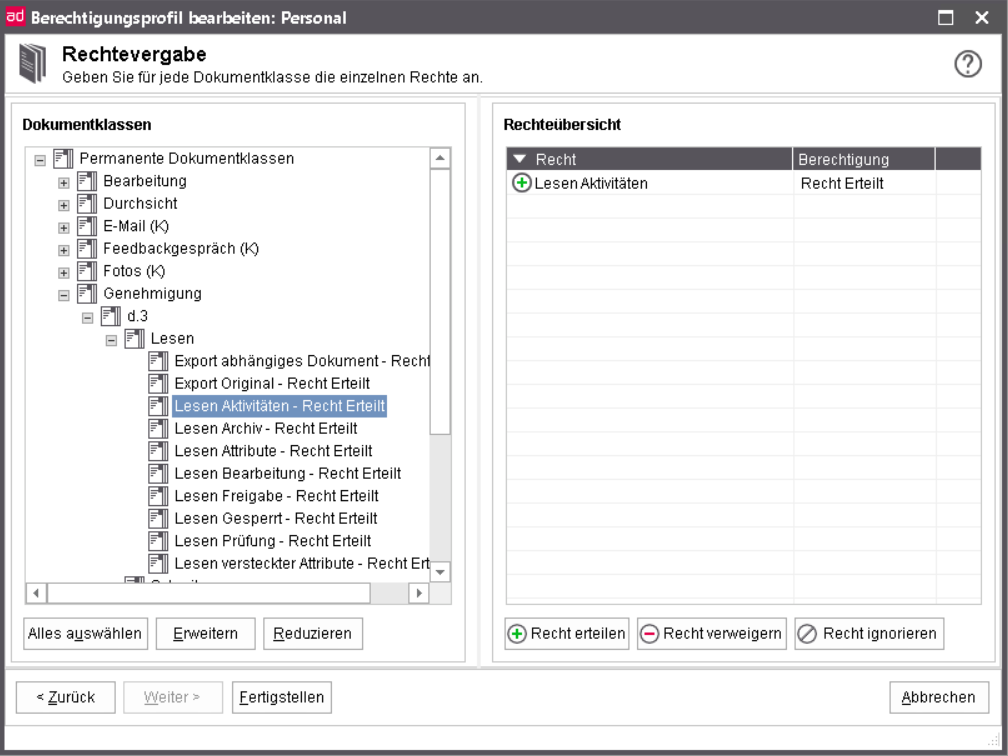
The excerpt shows the vast variety of options for the assignment of rights. For example, you can now prohibit a user to create notes or redlining elements via profiles and documents classes. Moreover you can prevent a user from changing the status to "Archive".
The buttons below the overview of rights have the following function:
Assign right: The authorization is always assigned for the selected right.
Deny right: The authorization is always not assigned for the selected right.
Ignore right: The authorization is neither granted nor denied at this point. The system checks whether the authorization is granted in another authorization profile assigned to the user. If this is not the case, the authorization shall be deemed not to have been granted.
On the right side you can also select several entries at once. Alternatively you can set the authorizations via keyboard shortcut:
CTRL+1: Assign right
CTRL+2: Deny right
CTRL+3: Ignore right
If you want to select several entries at once and set a right for them, use these keyboard shortcuts. The buttons ignore a multiple selection. The keyboard shortcuts only work via the number bar at the top of the keyboard, not via the number pad.
Here you assign reading permissions for the respective document class.
"Read processing" means here that you can permit a user to already read documents in the processing of a group member.
Via "Read hidden attributes" you can control, if properties marked as hideable are displayed for the user or not (Right rejected).
The following overview describes the rights in greater detail:
Export dependent document: Export of the dependent document.
Export original: Export of the original document.
Read activities: View of the activities.
Read archive: Reading documents in the status “Archive”.
Read attributes: If no reading right for a document exist, then at least the properties can be displayed in d.3 smart explorer, but the document itself can not be visualized.
Read processing: Reading documents in the status "Processing"; also applies if the document is located in your own processing.
Read release: Reading documents in the status Release.
Read blocked: Reading locked documents.
Read verification: Reading documents in the status Verification. This means the unverified as well as the verified documents.
Read hidden attributes: Show hidden properties (as hideable marked property). The right can only be set for all properties marked as hideable in the document class.
Displaying with watermark: For the visualization of a document a watermark is included and displayed.
Here you assign writing permissions for the respective document class. You can, for example, also influence the creation of notes and redlinings
Please take care to define suitable combinations of read- and write-permissions. Thus the right Change hidden attributes only makes sense if the permission to read these properties is granted.
The following overview describes the rights in greater detail:
Change attributes processing/verification: Changing the properties of documents in the status processing and verification.
Change attributes Release: Changing the properties of documents in the status release and verification. This right is only available, if the parameter ATTRIB_SUPPORT_MODIFY_RELEASE was enabled.
Change protected attributes: Right to edit properties even if later changes were disallowed for the property (see Modifiable fields).
Change hidden attributes: Changing the properties which are defined as hidden in the document type.
Update document: Right to change a document (create a new version). The document must be located in the user's own processing the document must be in the status processing of a group of which the user is a member.
Import document: Right to store documents
Change document type: Right to change a document type. This way you can change advanced properties but not the category.
Creating dependant documents: Right to create dependent documents on new import or a document update; this right does not refer to depending signature files.
Create/change notes: Right to create or change notes for a document.
Create/change redlining: Right to create or change redlinings for a document.
Change color marking: Right to create or change the color marking in d.3 smart explorer.
Delete Archive: Deleting documents in the status Archive. This right is only available, if the parameter ALLOW_DELETE_FROM_RELEASE was enabled.
Delete Processing: Deleting documents in the status Processing. The document must be located in the user's own processing the document must be in the status processing of a group of which the user is a member.
Delete Release: Deleting documents in the status release. This right is only available, if the parameter ALLOW_DELETE_FROM_RELEASE was enabled.
Delete Verification: Deleting documents in the status verification. Additionally, the rights Status change verification for the document is required.
Changing the document status can also be controlled using a profile. The fine granulation is obvious.
In order to use a workflow manually, the extended rights concept requires that all seven status transfer possibilities have been set.
The right to withdraw another user's processing is often assigned to key-users or people in charge of a process to allow to react if employees on sick-leave have important documents in their processing.
The following overview describes the rights in greater detail:
Transfer archive: Status transfer of a document into the status “archive”.
Status transfer processing: Status transfer of a document into the status processing.
Status transfer “Withdraw Processing”: Withdrawing the processing from another user.
Status transfer release: Releasing a document.
Status transfer verification: Verifying a document, finish verification.
Status transfer verification: Status transfer of a document into verification, verification pending.
Status transfer block: Blocking a document, release version blocked
Documents can be manually linked easily by drag & drop. To create a “controlled” link, define here, what or to what can be linked.
The following overview describes the rights in greater detail:
Create link (superordinate document): Right to select documents of the document class as the target of a link. A link between two documents can only be created using a combination of the rights Create link (supoerordinate document) and Create link (subordinate document).
Create link (subordinate document): The right to select documents of this document class as link sources. A link between two documents can only be created using a combination of the rights Create link (supoerordinate document) and Create link (subordinate document).
Remove link (superordinate document): Right to remove the link between two documents, where documents of the document class are the target of the link. A link between two documents can only be removed using a combination of the rights Remove link (superordinate document) and Remove link (subordinate document).
Remove link (subordiante document): Right to remove the link between two documents, where documents of the document class are the source of the link. A link between two documents can only be removed using a combination of the rights Remove link (superordinate document) and Remove link (subordinate document).
To permit the creation of links explicitly, two entries are required:
The right to create a link not only has to be assigned in the child element but also in the parent element.
About the activities
By the activities in d.3, the user finds out, how the life cycle of a document or a dossier looks like concretely. All user interactions and events as e.g. the import of a new document, a new version, changes of properties, workflows or new comments can be retraced and are listed in a chronological history. You can see, when which activity was done by which user or by the system. Thus, a project manager can see what happened in a certain project dossier lately.
The activity stream of a document or a dossier is displayed via a HTML-interface provided by d.3 server. The user can now see the history of changes to a document or dossier on the tab of the details view. The user can choose between two detail level: Compact means that only the important activities are displayed and for Advanced all activities are displayed.
An assigned right is required to enable this.
The display of the activities for documents can be controlled with the right Read activities. This is not active by default and must be enabled manually in the authorization profile. If the function is desired general, the script set_activitystream_rights.jpl to set the right can be used, so that the activities for the document/dossier can be displayed on existing right to read.
Configuration of the HTTP-interface
d.3 configuration
The HTTP interface of d.3 server is enabled by default. To disable this, you can set the parameter ENABLE_HTTP to No in d.3 config in d.3 admin. Now no new features can be used, if they require this interface. This affects currently:
The view of activities in each form (document-specific, user-specific, system-wide)
The welcome page
Configuration of the reverse proxy
d.3 server communicates usually by d.3 gateway with the d.3 applications. If the HTTP interface is used, then d.3 gateway uses additionally d.3 presentation server gateway as reverse proxy. The necessary steps can be found in the hints on the initial configuration and operation at the end of the setup of version 8.0.
Defining the right
By default none user has right to see the activities.
Individual rights assignment
The right to view the activities is called Read activities. It can be assigned or revoked in an authorization profile in d.3 admin.
Global rights assignment
Alternatively, the right to view the activities can be assigned to all users, which have the right to read the document. For this effect the external JPL script set_activitystream_rights.jpl (you can find it in the d.3 installation directory \d3\d3server.prg\ext_jpl) can be used. Then, follow the instructions in the script.
Configuration of the welcome page
On the welcome page a customer-specific website as well as optional two views for activities are displayed. Via the tab My activities and All activities you can switch between the views.
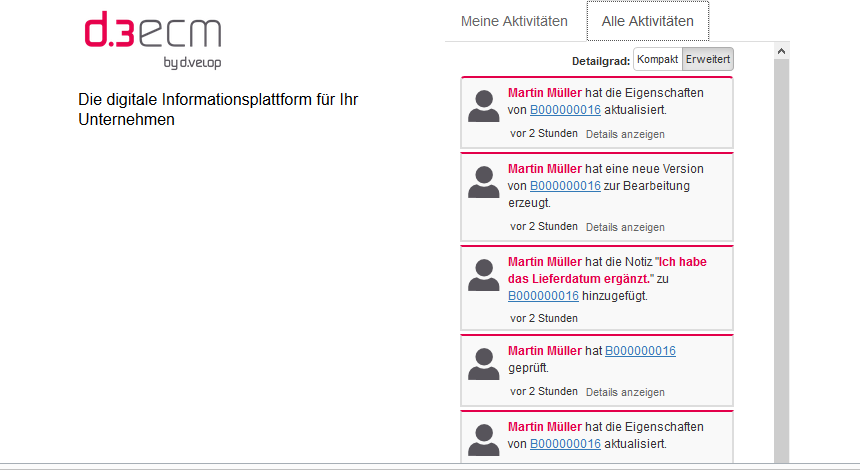
Enabling the activity view
There are two views for activities on the welcome page.
Activities of the current user
Activities in the entire system
For privacy reasons both views are disabled by default. To enable this, you have to do the following settings in d.3 config in d.3 admin.
Current user: HOME_ENABLE_OWN_ACTIVITIES = Yes
Entire system: HOME_ENABLE_ALL_ACTIVITIES = Yes
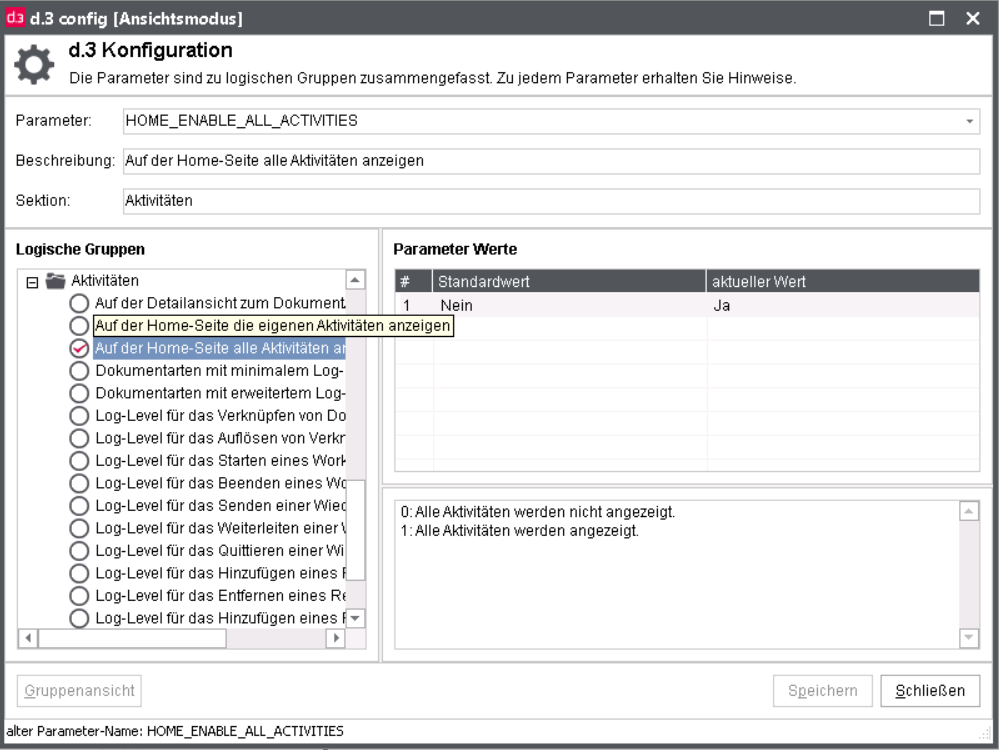
The parameter DETAILVIEW_ENABLE_ACTIVITIES enables the document-specific activities for all users.
Activity view in d.3 smart explorer
Activities lists the most recent activities for the user or for the entire system. This view is enabled by default by the parameter above and can be disabled for e.g. certain groups by the following setting:
d.3 client profile: d.3 admin > System settings > d.3 client config > d.3 smart explorer > Main Window > Activities (navigation)
Tracking activity stream of a document as user
Here, all changes to a document are displayed as an activity stream, for dossiers this includes the changes in its content.
The display of the activity stream for documents can be controlled with the right Read activities for the document class and can also be disabled for individual groups.
d.3 client profile: d.3 admin > System settings > d.3 client config > d.3 smart explorer > Main Window > Drop down menu > View > Activities
Creating a customer-specific website
In the installation directory of d.3 server you can configure a customer-specific website in the folder html/events/home. This will be displayed left-aligned on the welcome page. By default a placeholder is configured here. The website must be in the file welcome.html. Referenced files can be also configured in this folder.
This overview shows which authorization profiles are assigned to an user.
Having selected an user or an user group the authorization profiles are displayed in the overview.
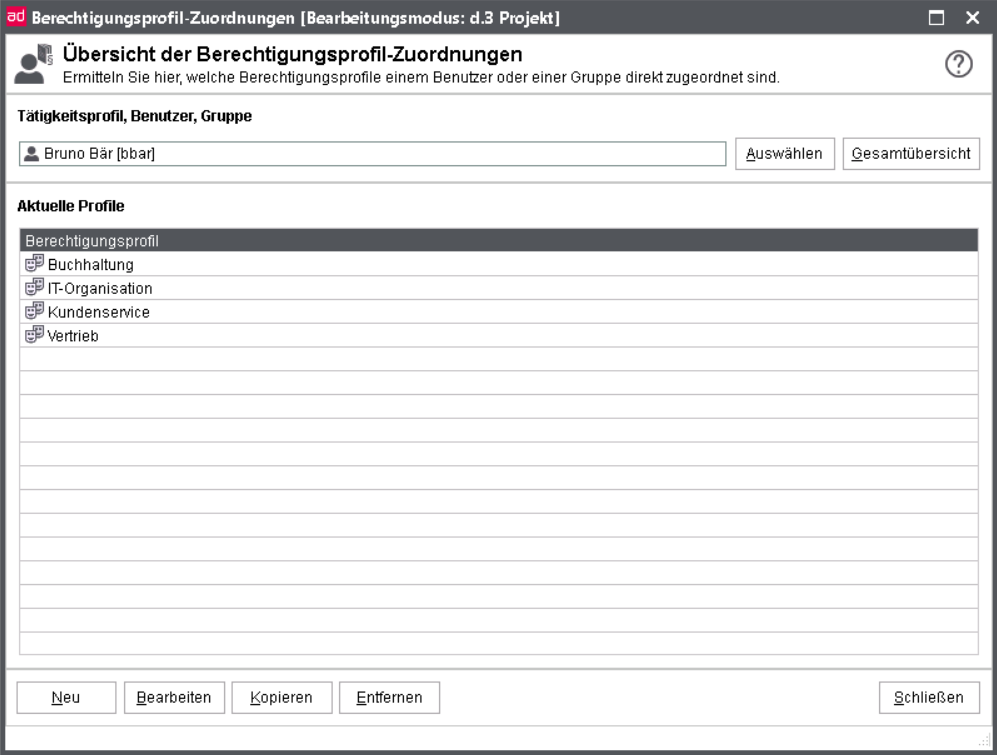
Using the checkboxes, the overview can be filtered.
Full name: the full name of the user combined with the technical name
d.3 distribution group:  Distribution of documents to all group members
d.3 structure group:  no distribution, only used to group the members.
d.3 job profiles:  Distribution to one member of the group (mailbox with load balancing)
If an user or a group has not been assigned any authorization profiles, the list remains empty. For detailed information about an authorization profile assigned to the user/group, double-click on an authorization profile in the overview.
An additional window is opened showing all classes of the current authorization profile.
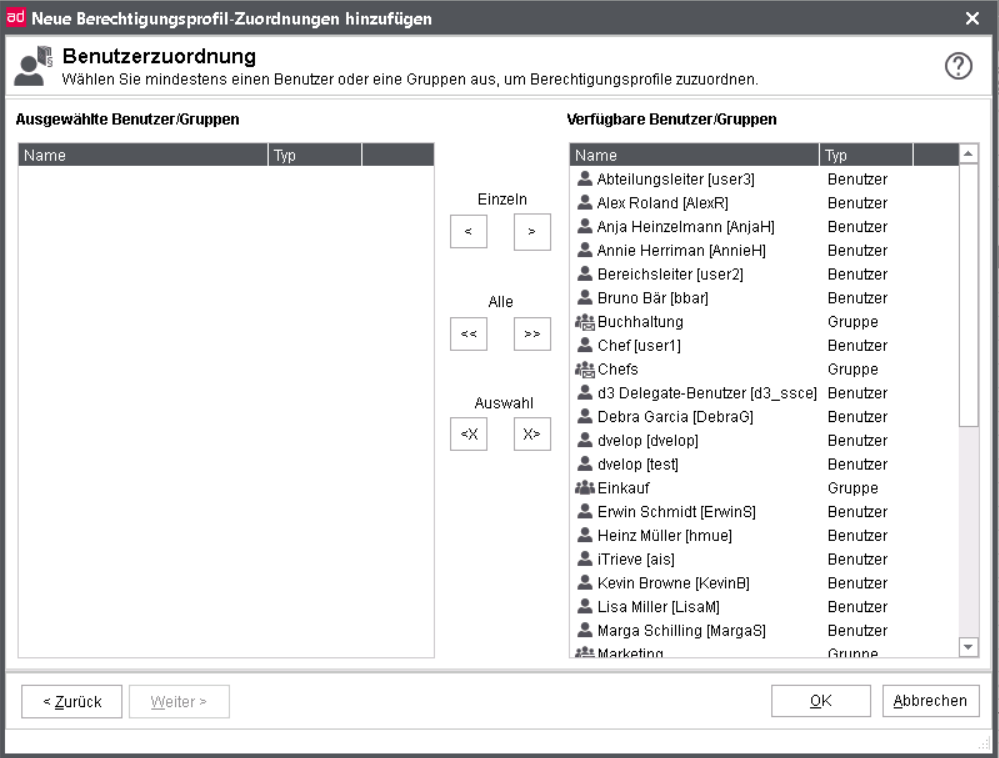
You can create a new assignment as follows:
Click New.
In the first dialog initially choose all profiles you want to assign.
Choose all users, user groups or job profiles for this assignment.
You can differentiate between the following options by means of the preceding symbols:
Users 
Groups (without mailbox) 
Groups (with mailbox) 
Job profiles (load balancing) 
To remove an assignment of profiles to the user, select these authorization profiles in the overview using the mouse.
Afterwards click on Remove.
Click on Edit to change an existing assignment.
These changes only refer to the currently selected users.
If you want to add additional profiles to multiple users follow the same steps as describer for a new assignment.
If you assign the user "user" to the authorization profile "profile1" and "profile2" this way but this user was already assigned to "profile3", then the user will finally be assigned to three authorization profiles.
It is unfortunately not possible to remove authorization profiles from several users at once.
The overview shows, which authorization profiles are assigned to which user or which group.
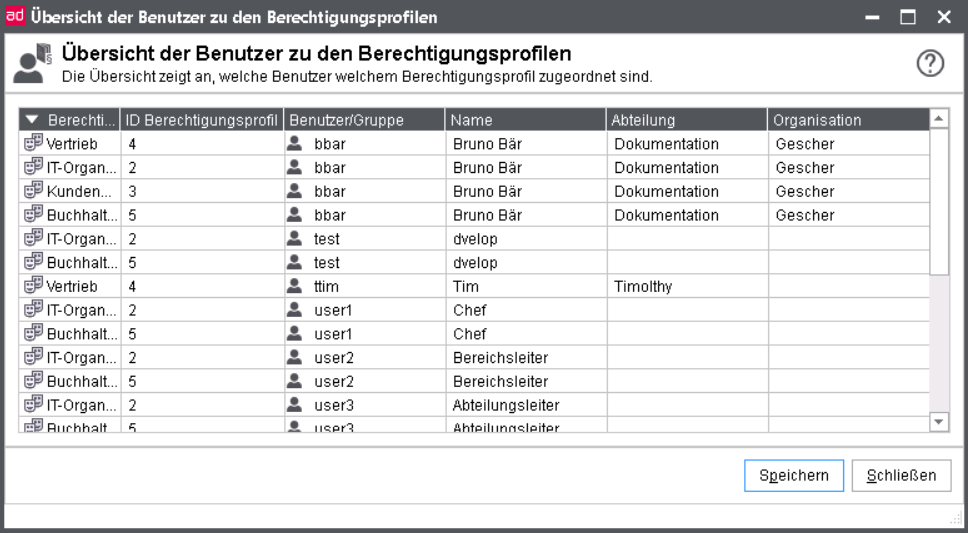 |
A summary of authorization profiles and the respective user/group is displayed.
Here, the prefixed icon also represents the type of assignment.
 User
User
 Mailbox notification without load balancing
 Mailbox notification with load balancing
 no mailbox notification, grouping only
If you want to save the overview, press the button Save or use the keyboard shortcut CTRL+S.
If an authorization profile is assigned to an user then this is an implicit assignment of rights, as the role itself is linked to one ore more document class, which accordingly controls the access to the documents. In contrast to this you can also explicitly assign classes directly to an user. The effective rights result from the sum of implicit and explicit assignments.
A direct (implicit) assignment can only be performed for one user.
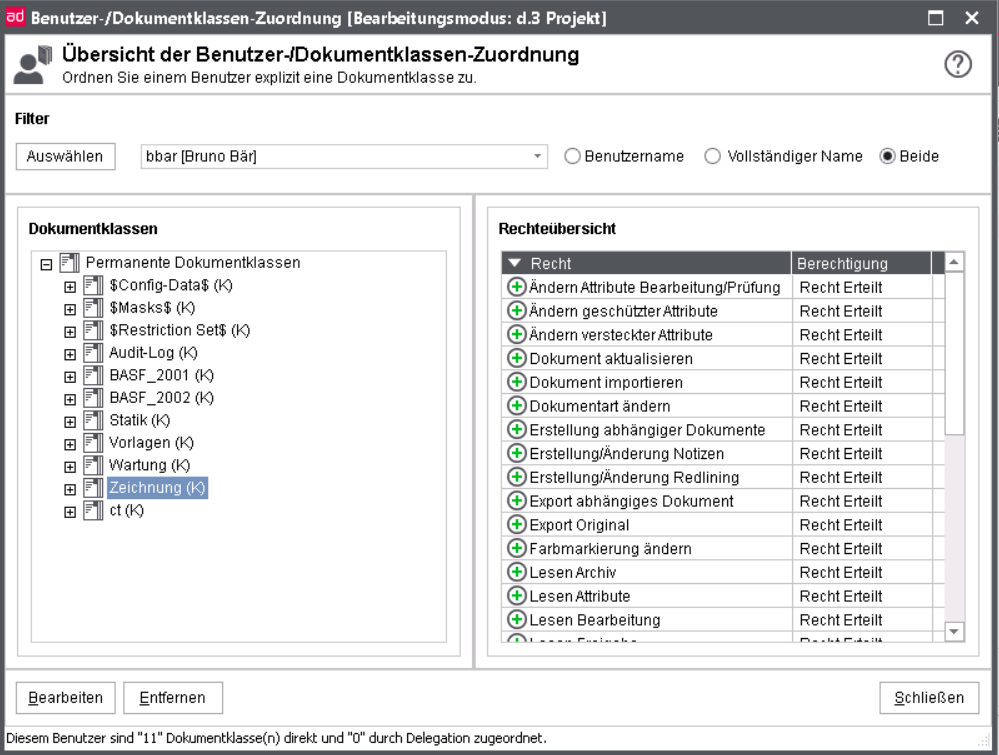
The Overview of user / class assignments always relates to one user. When selecting an user in the pull-down list, those document classes are displayed which are directly (explicitly) assigned to this user. In this overview, the names of the individual document classes and the rights are displayed.
In order to change an assignment, do as follows:
First, choose a user.
Use the option Edit.
The mapping dialog is displayed (see the details on Assigning the rights/permissions). You can also edit or remove assignments in this dialog.
You can also create or remove assignments in this dialog.
With d.3 version 6.3, the direct delegation of document rights was introduced. This provides differentiated functions to inherit document rights via document classes.
The so called temporary classes assigned by the d.3 server are managed separately from the permanent one defined in d.3 admin.
The adhoc-delegation of rights only works, if the recipient has got the respective document type in his authorization profile.
Under the Permanent Document Classes the “normal" document classes are listed. The list of Delegated Document Classes contains those classes generated by the delegation of document rights. These inherited document classes cannot be edited or appended with additional rights by the d.3 administrator.
If the user is "edited", then the temporary document classes are not listed the overview.
If the user has some inherited document classes, then the following dialog is displayed:
The d.3 administrator has the option to remove the document classes assigned by inheritance.
You are influencing running processes! Therefore this operation must be confirmed once again!
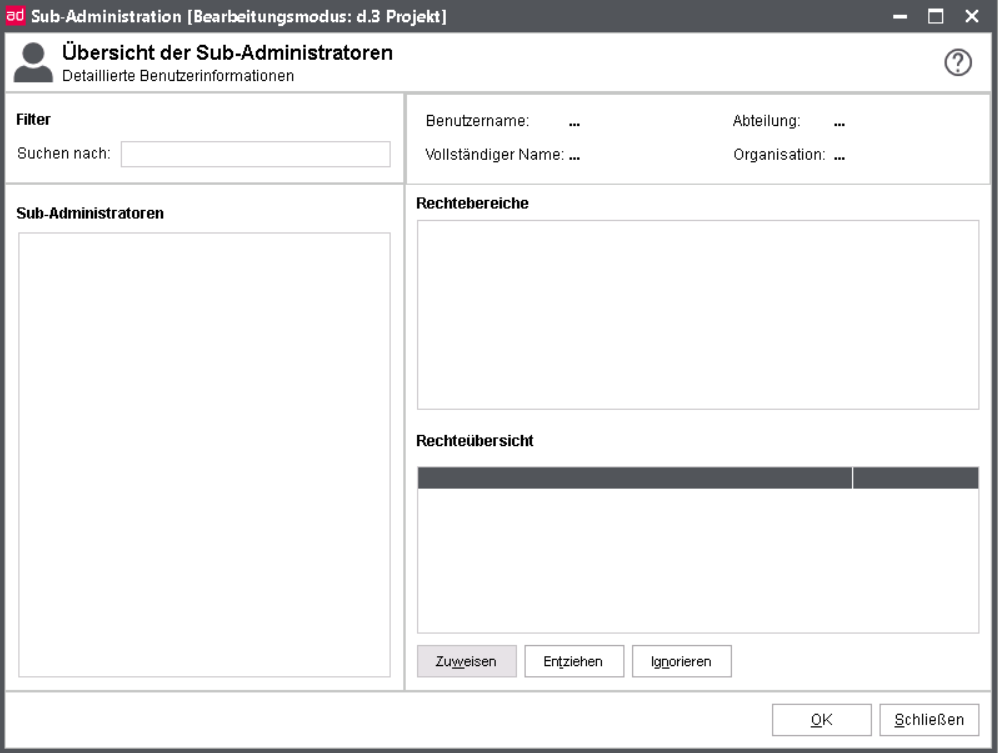
Sub-administration allows you to assign administrative rights to other d.3 users. You can configure here, that the respective user only gets certain rights or is only able to see and access to certain options in d.3 admin.
An administrator can appoint every user to a sub-administrator. A sub-administrator can create no further sub-administrators or change his own rights as sub-administrator.
Furthermore a sub-administrator can not import or export projects/milestones because importing projects/milestones into the productive system without care can lead to inconsistence and this would be a security issue for the productive system.
You have two options to appoint a sub-administrator:
Create a new user directly with all desired rights.
Add an existing user to the sub-administrators by assigning the rights in the sub-administrator-dialog.
Principal rights system:
The right to read effects that the sub-administrator can even see the menu option.
The right to write effects that the sub-administrator can open the module after switching to edit mode. If the right to write is not set, the menu option is grayed out.
The right to write implies the right to read and overwrites it. If the right to write is specified, automatically the right to read is set, too.
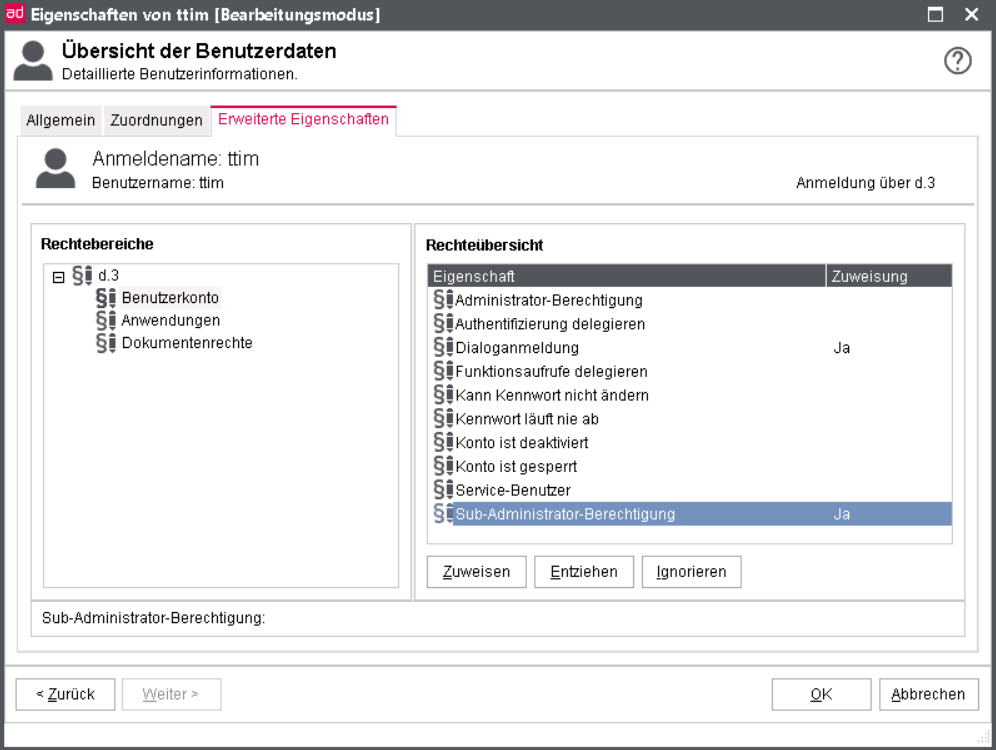
To add an already existing user as sub-administrator, do the following:
Choose the respective user from the user overview via Rights > User.
Open the Properties of the user.
Go to the advanced properties.
Assign the Sub Administration access in the rights section under User > d.3 > User account of the rights overview.
Then, switch from the menu option Rights to Sub-administration.
In the Sub-Administrators Overview dialog, select the desired user, now listed under Sub-administrators.
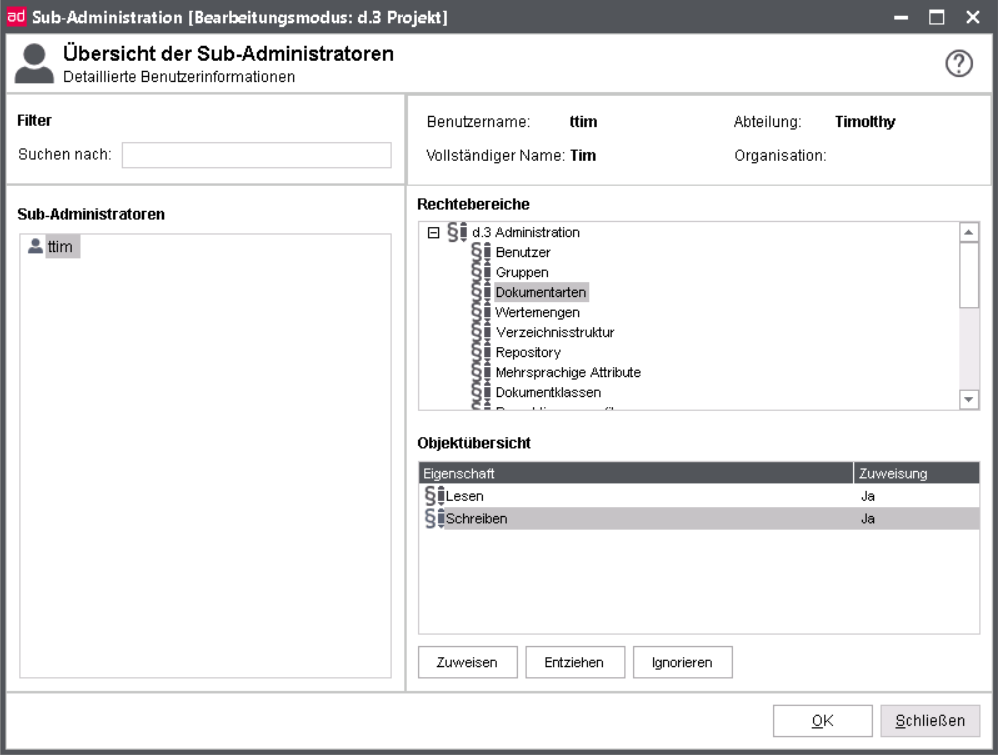
Then right in the rights areas the desired menu option of d.3 admin below d.3 administration.
Below you can find the rights overview, where you can define the respective right via click in the column Assignment or via the buttons Assign, Revoke, Ignore below.
Save the changes with OK.
The following illustration shows exemplary that an user has the right to read for the overview of users but can not make any changes.
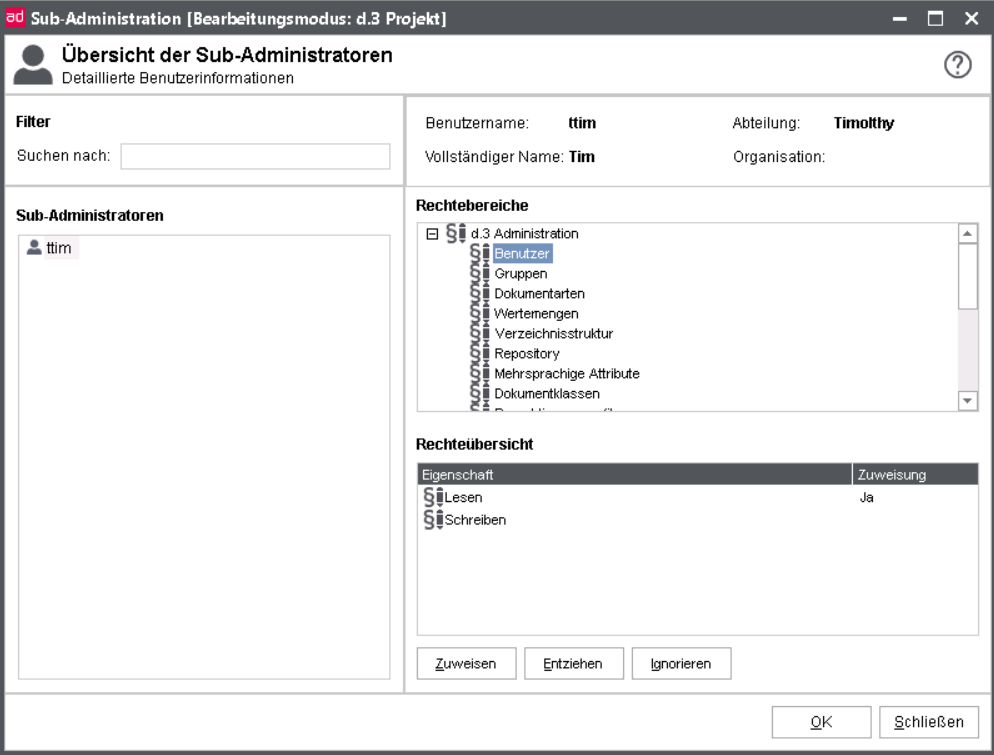
How can I create an sub-administrator, who can only change the user’s password?
If you crate a sub-administrator and assign the right to read to users, nothing else is needed to change the password in the user dialog.
Below Rights > Sub-administration you can find the earlier selected user in the overview of sub-administrators. You can still assign or revoke rights here.
The sub-administration is also available for groups. The rights for sub-administration can be assigned to all groups as well. The users of the group get the rights because the sub-administration works on basis of the effective user rights. You can see under Rights analysis where the sub-administrator has got the rights from.
LDAP-user can also be sub-administrators.
The plugin for the rights analysis is intended to provide you with an overview of the effective rights which a user has for documents and of the document classes and policies.
First, choose an user, for which you want to retrieve the rights.
Then select the desired type of rights (user or document class) for this user.
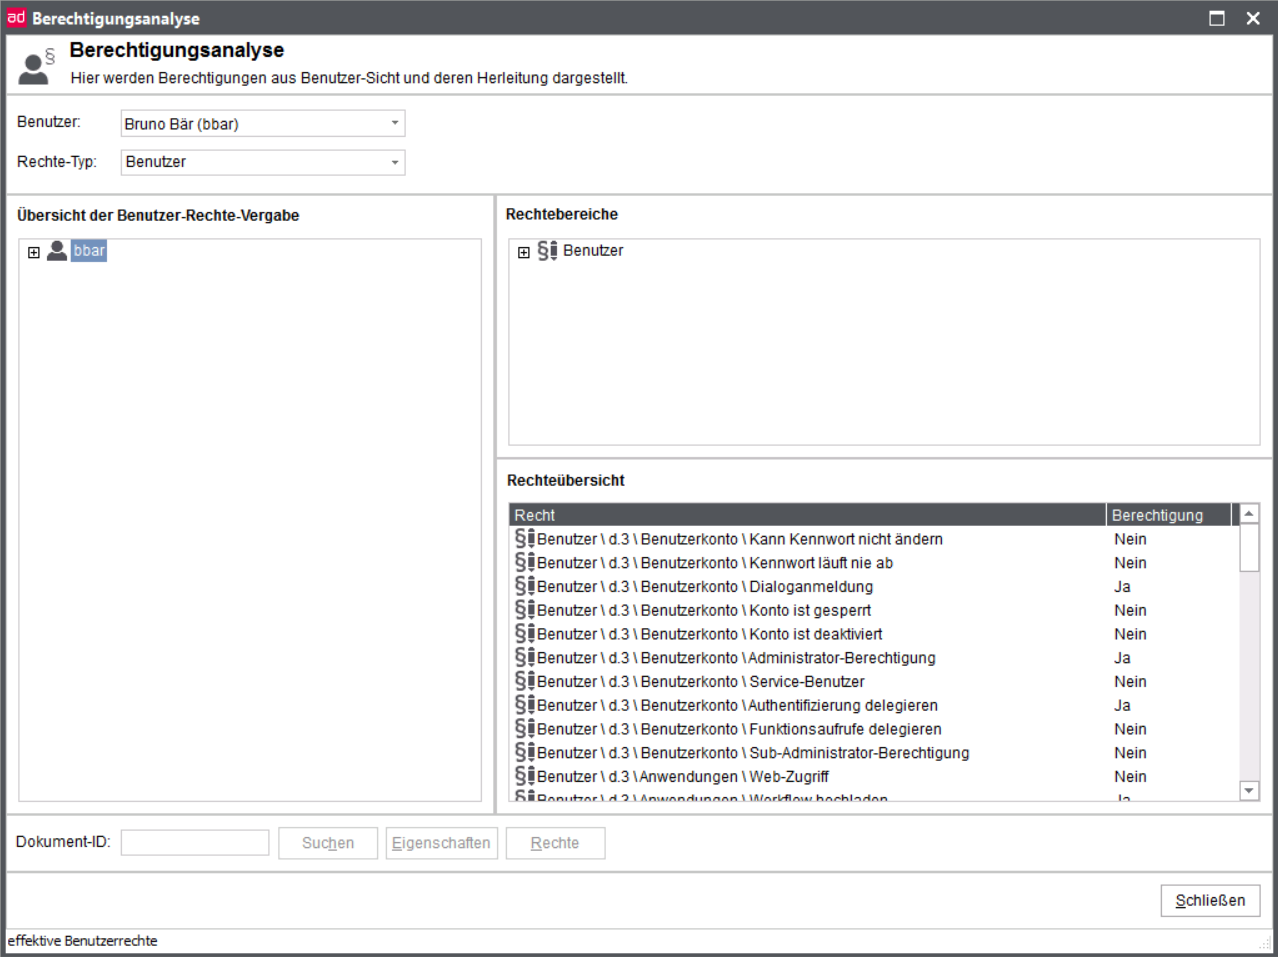
In the view for the rights type user, the advanced rights (policies) are displayed in the lower rights section. The tree structure on the left contains a main node and multiple sub-nodes. Here, you choose for which level a policy is to be displayed. Additional information can always be obtained in the statusbar of the window.
Using the main node, you see the effective rights of the user. Accordingly, all rights in the lower rights section are defined as Yes or No. If the rejection of the right (No) results from a direct assignment of Right denied or from an inherited Ignore Right, cannot be seen on the level of the effective rights. If you, however, select a sub-node wherby user, user group or organizational unit is chosen, then the rights are displayed which are assigned on this level.
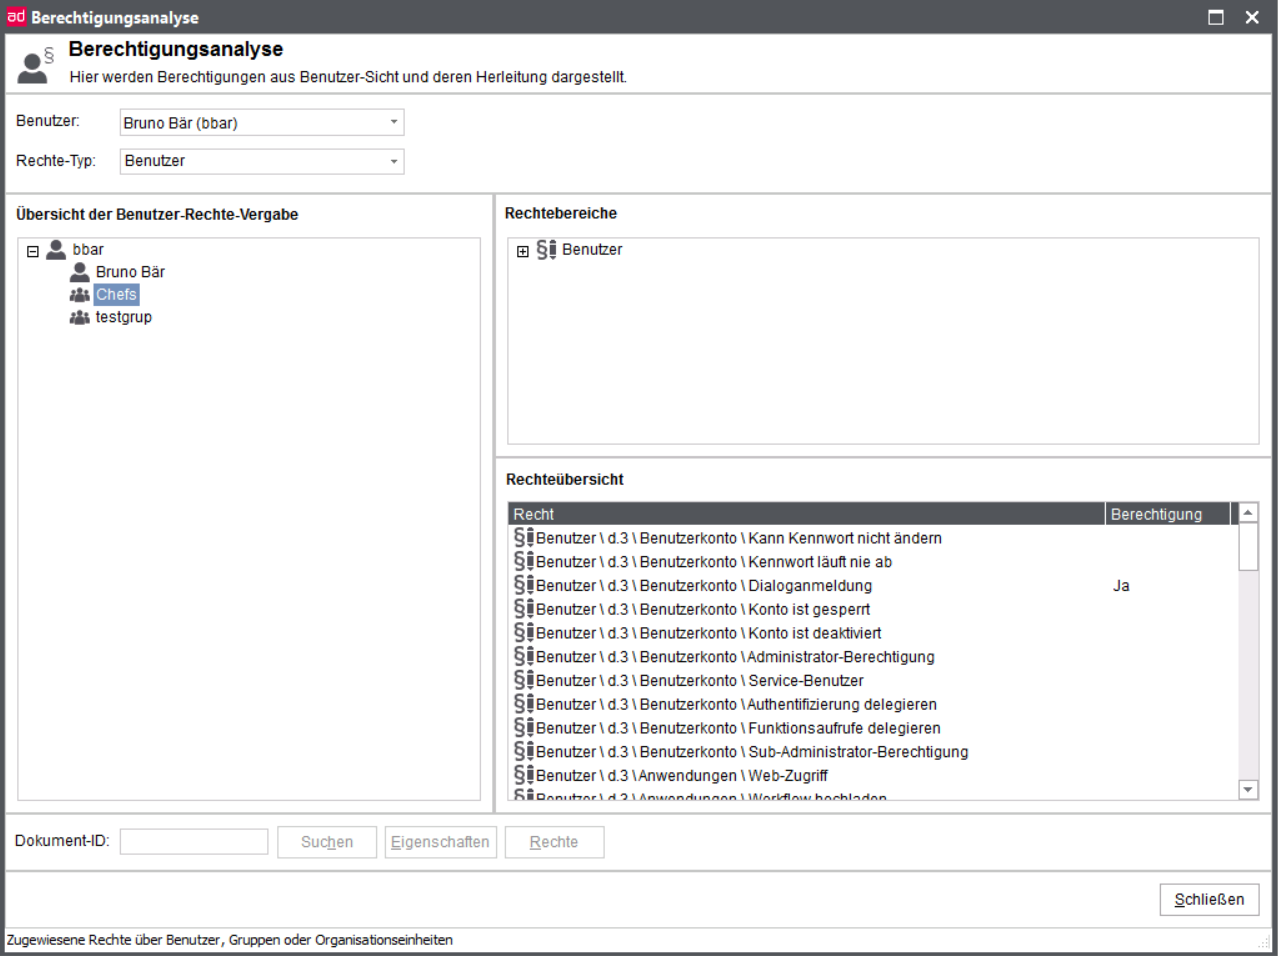
Using the selection in the upper right section you can further filter the view.
Please note that an empty entry on this level means Right ignored. Only when determining the effective right in the main node this may become a No.
If you want to get an overview of authorizations for a user based on the document classes, then select the rights type Document class.
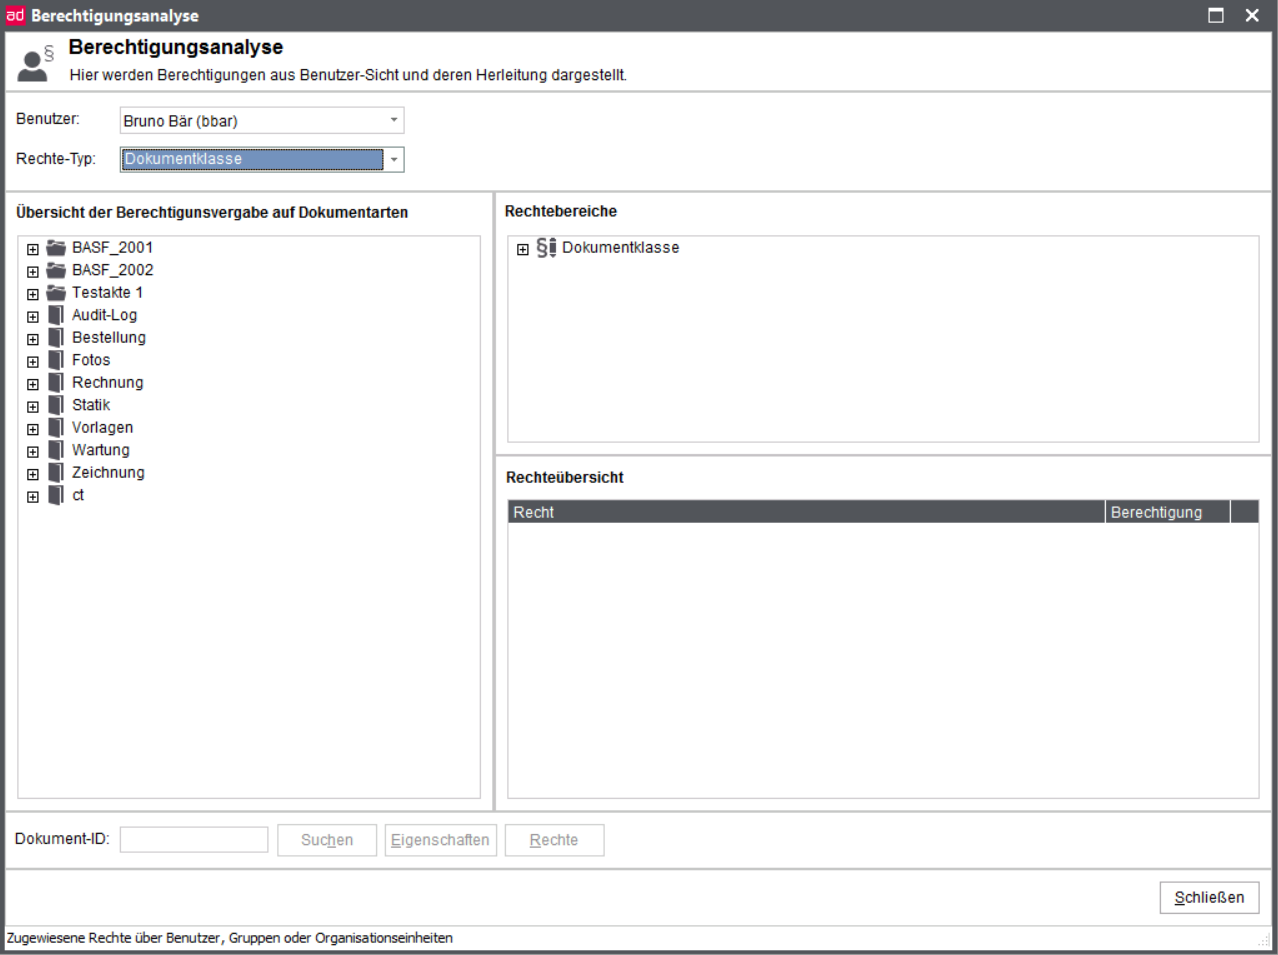
The left window shows all document classes assigned to the user while the upper-right window lists the document class-rights as filters for selection.
On selection of a folder- or document type you initially get an overview of all document- and folder types of the selected user. The bottom-right section of the window displays the general rights for the selected document type.
Specialty: The rights for hidden properties (Read hidden attributes, Write hidden attributes) are displayed with respect to their display in d.3 smart explorer and d.3 import.
I.e., the information is given if these fields are available in these applications or not.
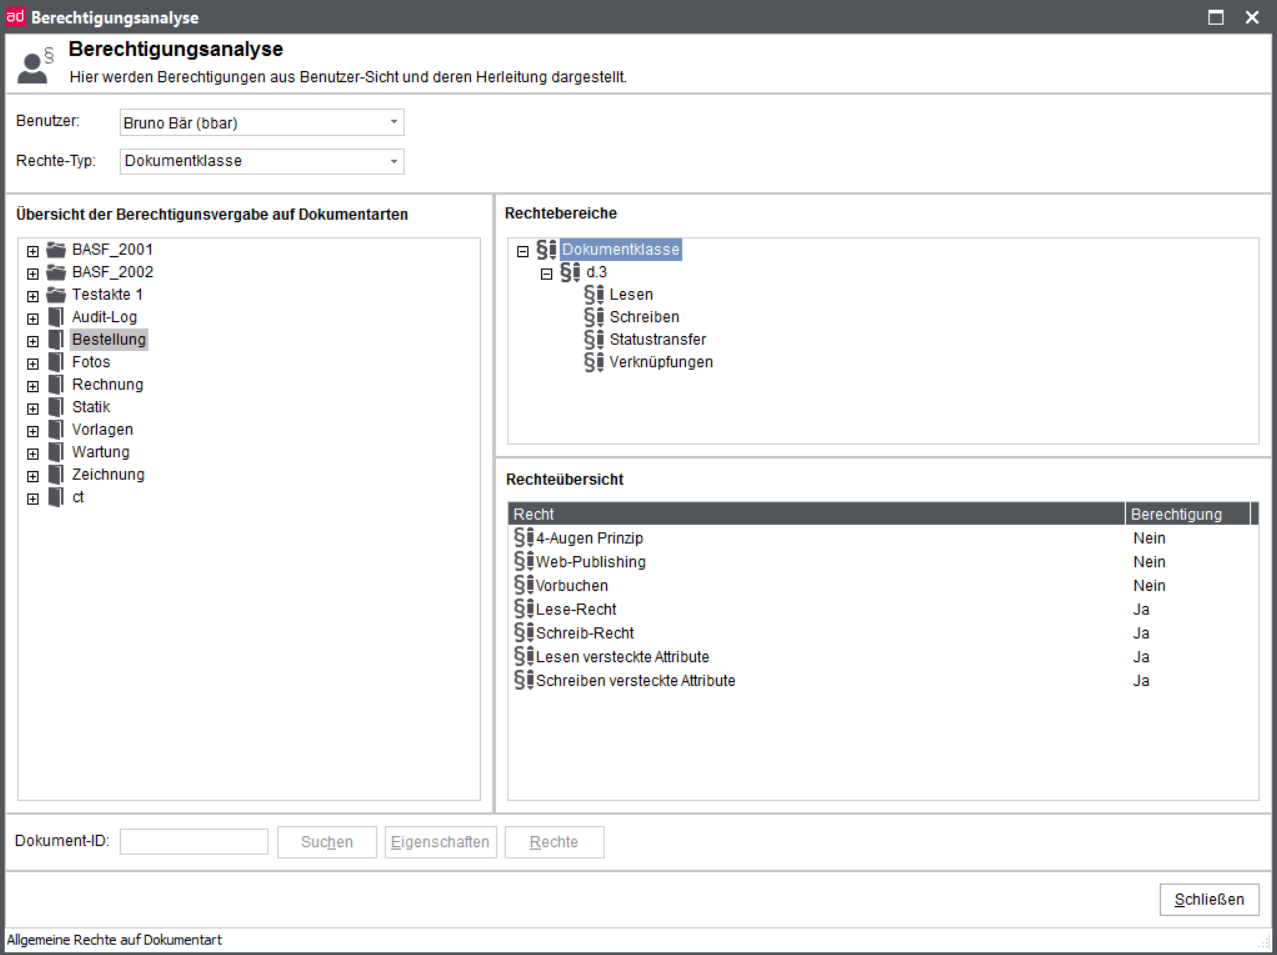
If you choose a document class under the document type in the tree, then the effective rights for this document class are displayed.
Yes: The right was granted
Denied: The right was denied
No: The right was ignored and the default is No.
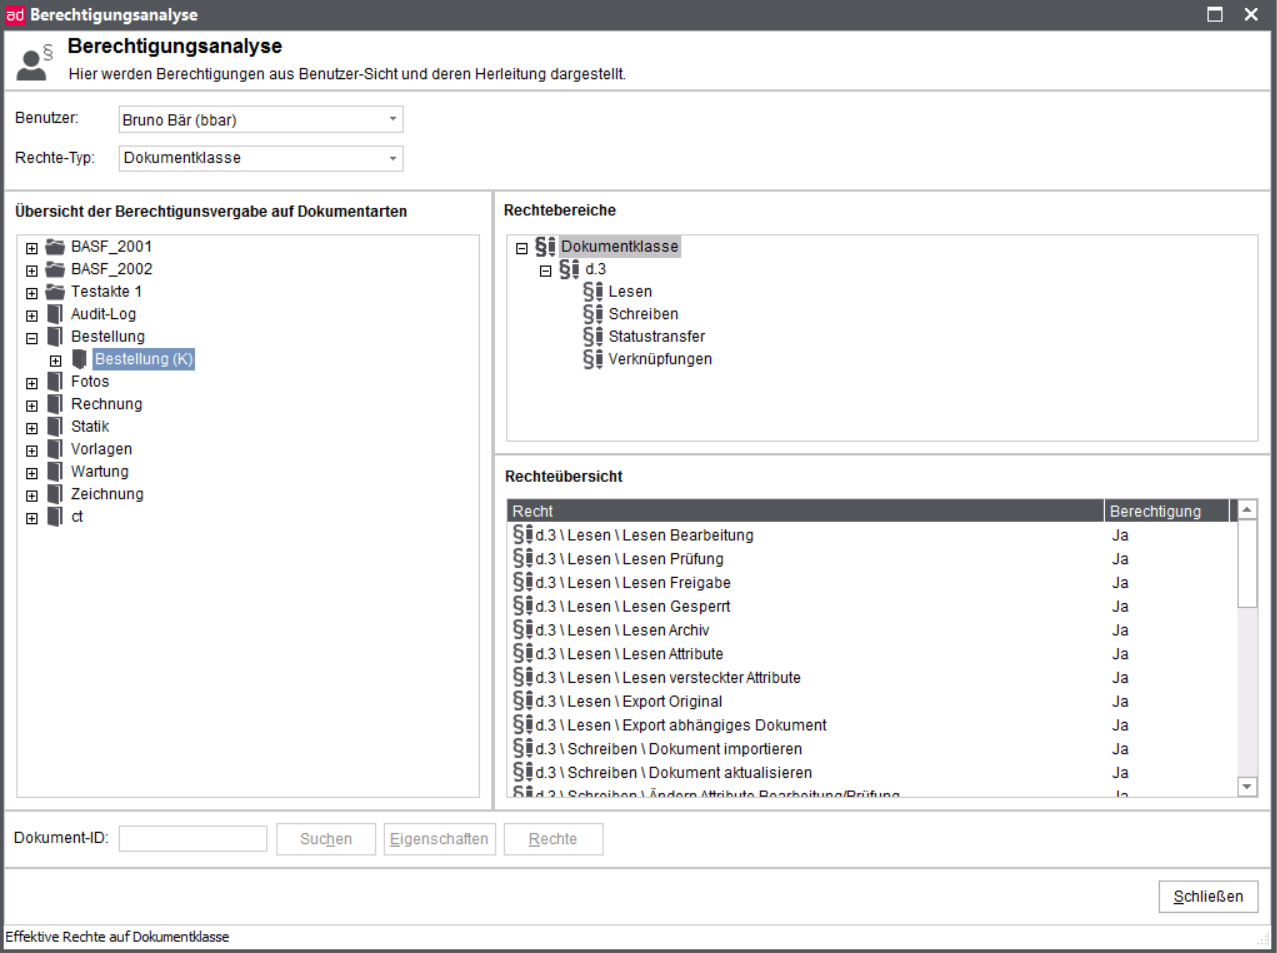
Open the left tree structure with the lowest level(s) and select an entry.
You receive the rights which are assigned via this element.
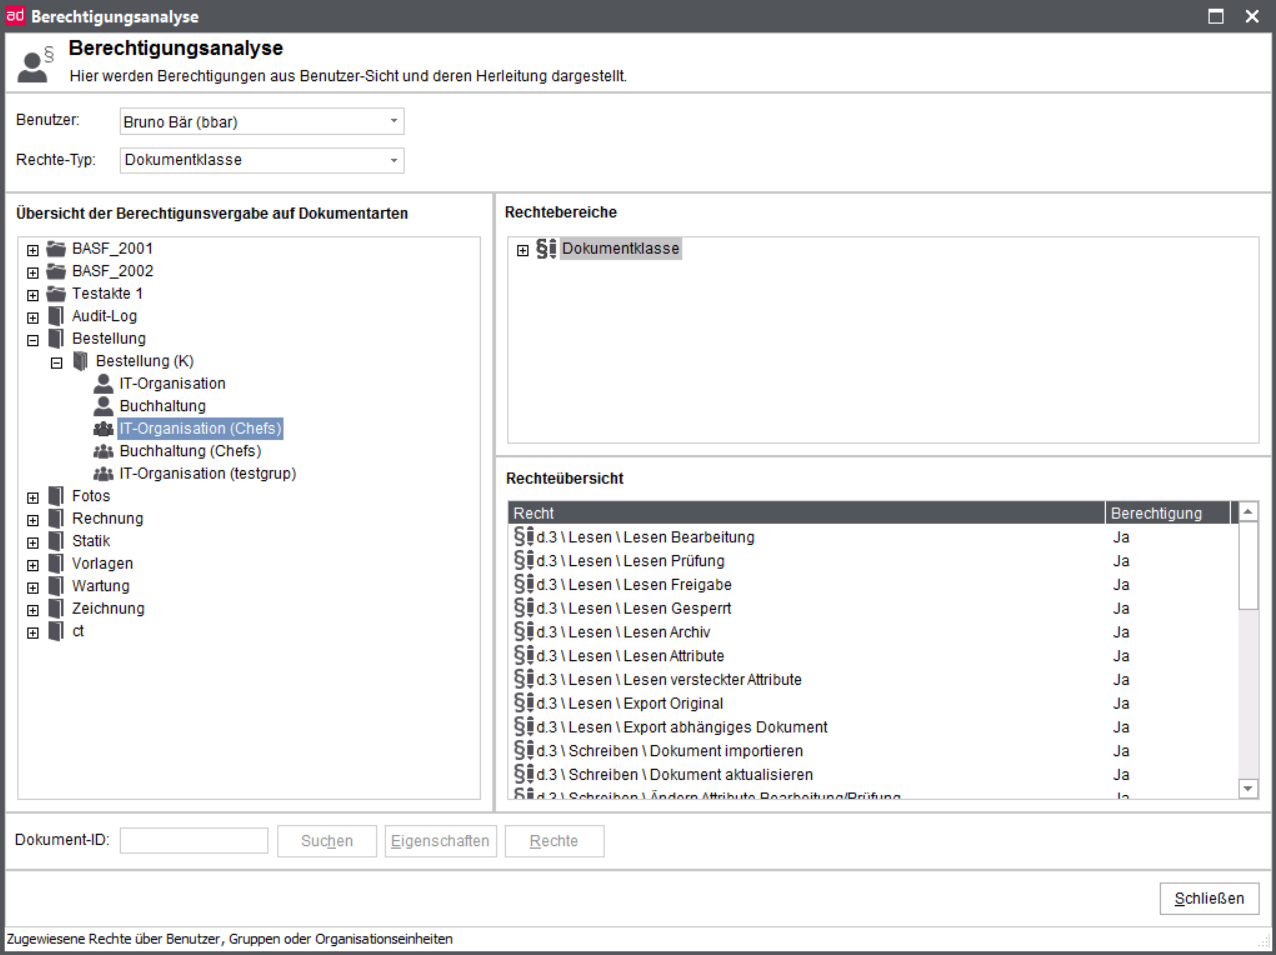
Here, the icons and text labels have the following meaning:
 Direct assignment of a document class or of an authorization profile to the user.
If it is an direct assignment of a document class or an authorization profile can not be seen in this view. You should therefore always specify descriptive names for document classes and authorization profiles.
 Assignment of the document class via a profile (name up to brackets).
The profile was assigned using the group (name in brackets).
The type of the group (load balancing, no load balancing, group without mailbox) can not be seen directly but does not affect the rights.
Using a document ID, you can determine the rights of the chosen employee for a document. To do so, enter the actual document ID in the field Document ID.

In the displayed result, the document type or dossier type to which the document ID belongs is marked in bold. Additionally, the tree structure highlights the document class via which the employee received the rights. The actual rights with reference to the document class can be viewed and filtered as described above.
The properties of the document can be retrieved via Properties.
To display the effective rights for a document found via a document ID, click on the button Rights.
The following overview is displayed.
Using the selection of the respective layer in the upper-right window, the filtered rights are displayed.
After the start of the d.3 admin plugin d.3 organizational structure the overview is displayed.
The organizational structure allows to create a hierarchy of the employees of your enterprise.
This structure is the basis for the substitute functionality incl. the workload distribution (see: Substitution rules). This allows the superiors to adjust the checkout-staus for their employees, e.g. in case of sick-leave. Substitutes and heads are defined in the group definition.
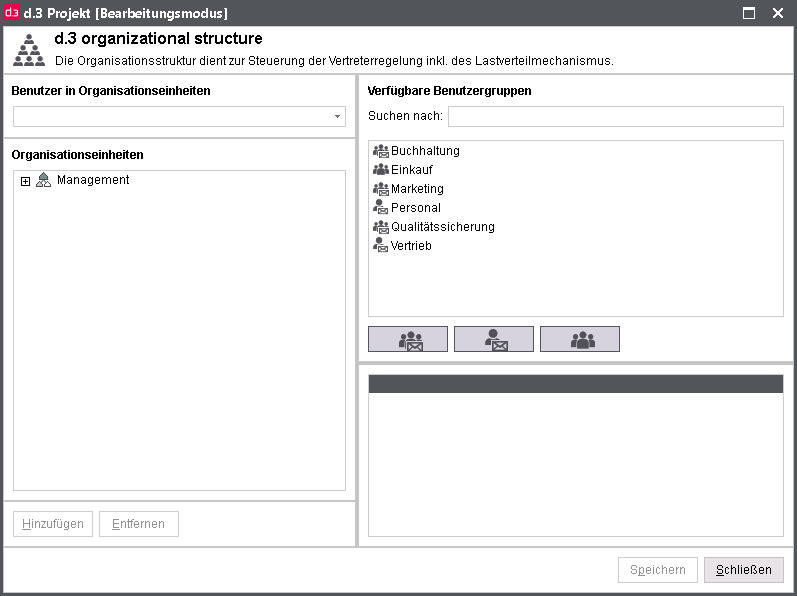
In the left-hand window, the created structure is displayed as a tree. The individual levels can be opened as required. With selected node - here "Purchasing" - the bottom right window displays the members of the group.
The upper-right window displays all groups for selection which were not yet assigned in the organizational structure. The prefixed icons easily allow to identify the type of group.
The bottom right window always displays the members of the selected group. Thus you can also select a group in the upper-right window. Members could be users as well as user groups.
To create a new organizational unit, do as follows:
Select the node under which the new unit is to be added.
Click on the button Add.
Enter the name of the new organizational unit in the appearing window.
The dialog always displays the parent level so that you can check the hierarchy.
Then, the new level is displayed in the tree structure and you can assign groups.
The assignment of user groups to an organizational unit is done via Drag&Drop. This means, "grab" a group in the right-hand selection with the left mouse-key and drag it to the organizational unit to which this group is to belong.
It helps in assigning the groups that the members of the selected group are displayed in the bottom right window.
You can also modify existing assignments via drag & drop. Simply drag a group into another organizational unit.
If you want to delete an assignment again, e.g. remove a group from the organizational unit, then you have the following option:
Select the group and press the key Remove.
Or:
Select in the context menu option Remove.
Or:
Drag the group from the upper-right selection window.
On acceptance of the confirmation prompt, the assignment is deleted and the group is available in the selection again.
If you delete an organizational unit containing group assignments, then the user groups are automatically assigned the next higher level.
The context menu allows you to define a group as the head of the organizational unit.
By doing so all members of this group are head of the organizational unit. You have to assign at least one more group to the organizational unit, so that the members of the leading unit are allowed to change the checkout state of the members of the subordinated group. Then all members of the leading unit are allowed to change the checkout state.
In most cases you will define the head of a group when you create a new user group for workload balancing (see Creating user groups, workload balancing).
If you want to find out in which organizational units an employee is assigned, then select a name in the User picklist.
Then, all levels containing the employee are underlined.
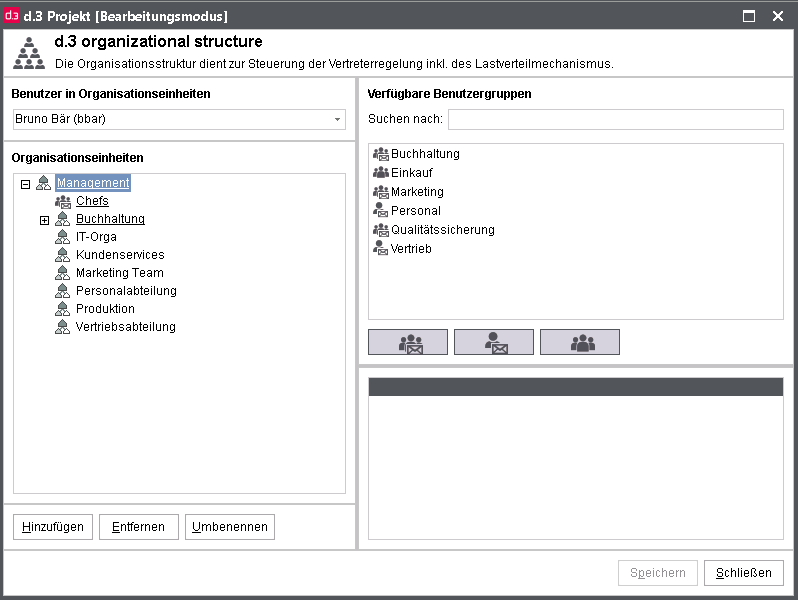
d.ecs identity provider (short IDP) authenticates users via different authentication processes such as Windows authentication (Kerberos) with user name and password against different systems for user administration such as Active Directory (AD) and provides the necessary user information for the use by other apps.
The purpose of d.3 IDP support is that you only have IDP as the leading system for user administration. This saves you from having to manage users on third-party systems such as Microsoft Windows and on the d.3 level twice.
From d.3 version 8.2 on, the IDP support is integrated in d.3 admin. It offers the possibility to couple user groups of IDP with d.3 user groups as well as d.3 authorization profiles and thus to grant users rights to d.3 objects.
For IDP support of a d.3 system, d.ecs infrastructure setup must be installed at least version 1.2.2.
In d.ecs http gateway the d.3 system must be registered as app d3.
In the d.3 repository the parameter ENABLE_HTTP is enabled by default.
Use the d.3 configuration parameter AUTH_SYSTEM to configure the authentication system for the access to the d.3 system. Set the value of the parameter to IDP here. You can find this parameter in d.3 config under d.ecs infrastructure.
Additionally you have to set the data of a service user for the access to IDP via the parameter DECS_SERVICE_USER and DECS_SERVICE_USER_PWD.
Save the configuration and close d.3 admin. Restart all d.3 prozcsses in d.3 process manager so that the new configuration becomes effective. Afterwards, restart d.3 admin.
Once the user control over the IDP link is enabled, the IDP is the leading system against which permissions are checked. If the IDP authentication has failed and a login to IDP is not possible, d.3 checks whether the user is a local user and, if so, performs the login.
In theory, all users can log on to the d.3 system who are defined via IDP and who are read out with the IDP assignments of d.3. However, this is only possible if corresponding authorizations have also been assigned to them via the authorization assignment in the d.3 IDP dialog.
With the first login, a d.3 user is created, which can also be maintained in d.3 admin. Changes to the d.3 user have no effect, because IDP is always the leading system and the authorizations assigned via the d.3 IDP dialog are always read in again. To the extent possible, basic authorizations must be configured in the d.3 IDP dialog.
With each d.3 login, the data is transferred to IDP. The login and password are verified via IDP.
In connection with IDP, users are only known to the d.3 system after they have logged in at least once.
The following additional parameters can be set in this context:
AUTH_SYSTEM_NEW_USER_ONLY_MODE: "New users only" mode for transferring users from external systems.
If this mode is enabled, only new users from external systems are adopted to d.3, but no more changes are made to existing users. This mode can be used, if the users are to be administrated and changed in d.3 admin.
The changes are then not overruled by the IDP interface. The defined properties and rights applied via the d.3 IDP dialog then only affect the initial transfer of an external user to d.3.
Default setting = 0 (disabled):
Any changes in the IDP configuration or to the data in the directory service are adopted in d.3.
AUTH_SYSTEM_SYNC_TIME: Time for synchronization of all user from external systems.
If a time (format: "hh:mm") is specified here, a synchronization of the d.3 user administration with the IDP d.3 connections configured via the IDP administration module will be performed every day at this time.
In this case, new users and changed user settings for existing users are transferred to d.3.
Open the dialog for creating and managing IDP mappings under IDP support.
The mapping of IDP data is divided into the areas Hints, Groups and User information.
Any changes that you make to the data in this dialog box are initially flagged internally. The data is not transferred to the server and does not become valid until you click Save.
You can click Reload to retrieve the data from the server again. Any flagged information that was not yet saved is lost.
Enable the option LDAP IDP conversion proposals to receive proposals for converting the previous LDAP configuration.
Please note:
This option is available only if you have not yet activated the IDP authentication system.
When you enable or disable this option, the dialog is reloaded. Any flagged information that was not yet saved is lost.
The proposals are displayed together with the mappings defined previously in the IDP mappings area under Groups and User information. The proposals are displayed in blue and the existing data is displayed in black.
If you have enabled the option LDAP IDP conversion proposals, hints may also be generated while determining the proposals. For instance, you get hints when LDAP settings cannot be mapped directly to IDP settings. You are shown these hints as a list under Hints.
Under Groups, you can configure which IDP groups you want to map to which d.3 user groups or d.3 authorization profiles.
You want to create a new IDP mapping. You can assign d.3 objects to multiple IDP groups. You can either assign a d.3 user group or a d.3 authorization profile.
This is how it works
Under IDP groups, select an entry from the picklist.
Under Object type, select the mapping type (user group or authorization profile).
Under d.3 objects, select an entry from the selection list.
Click Add to confirm the selection.
You have created a new entry under IDP mappings. The entry is displayed in green.
You want to delete an existing IDP mapping.
This is how it works
Select the IDP mapping to be deleted.
Click Delete. Note the following during deletion:
If the selected entry is a child item in the list, only this IDP mapping is deleted.
If the selected entry is a parent item on the main level, all its corresponding child IDP mappings are deleted.
The deleted entries are flagged for deletion internally and displayed in red with strikethrough.
You want to accept an automatically proposed IDP group mapping.
This is how it works
Select the relevant entry (displayed in blue) in the IDP mappings area.
Click on Accept. Note the following when accepting proposals:
If the selected entry is a child item in the list, only this proposal is accepted.
If the selected entry is a parent item on the main level, all its corresponding child proposals are accepted.
The accepted proposals are flagged for acceptance internally and displayed in green.
You want to reject an automatically proposed IDP group mapping.
This is how it works
Select the relevant entry (displayed in blue) in the IDP mappings area.
Click Reject. Note the following when rejecting proposals:
If the selected entry is a child item in the list, only this proposal is discarded.
If the selected entry is a parent item on the main level, all its corresponding child proposals are discarded.
The rejected proposals are flagged internally and displayed in blue with strikethrough.
Under User information, you can choose which user information fields in the user administration (IDP) are mapped to which d.3 user fields.
You want to create a new IDP field mapping. If you have defined an LDAP server as a user provider in your user administration (IDP), you can define the user property fields for this LDAP server as d.3 user properties.
Example: If the field streetAddress is defined for the street name in your LDAP server, you can assign this property to the d.3 field Option 1. In d.3, the field Option 1 then displays the corresponding street name for the user.
This is how it works
Select a d.3 user field in the IDP mappings area.
Under Field name, enter the name of the IDP property to be mapped to the d.3 field. You can determine the name of the IDP property in your LDAP server.
Click Add.
You have created a new entry under IDP mappings. The entry is displayed in green.
You want to delete an existing IDP mapping.
This is how it works
Select the IDP mapping under IDP mappings.
Click Delete. Note the following when doing so:
If the selected entry is a child item in the list, only this mapping is deleted.
If the selected entry is a parent item on the main level, all its corresponding child mappings are deleted.
The deleted entries are flagged for deletion internally and displayed in red with strikethrough.
You want to accept an automatically proposed IDP field mapping.
This is how it works
Select the relevant entry (displayed in blue) in the IDP mappings area.
Click on Accept. Note the following when accepting proposals:
If the selected entry is a child item in the list, only this proposal is accepted.
If the selected entry is a parent item on the main level, all its corresponding child proposals are accepted.
The accepted proposals are flagged for acceptance internally and displayed in green.
You want to reject an automatically proposed IDP field mapping.
This is how it works
Select the relevant entry (displayed in blue) in the IDP mappings area.
Click Reject. Note the following when rejecting proposals:
If the selected entry is a child item in the list, only this proposal is discarded.
If the selected entry is a parent item on the main level, all its corresponding child proposals are discarded.
The rejected proposals are flagged internally and displayed in blue with strikethrough.
For more information about the LDAP support see the documentation d.3 admin ldap.
d.3 policy manager allows to assign extended rights for users, groups and organizational units. The logfile is divided into three sections:
User account
Applications
Document rights
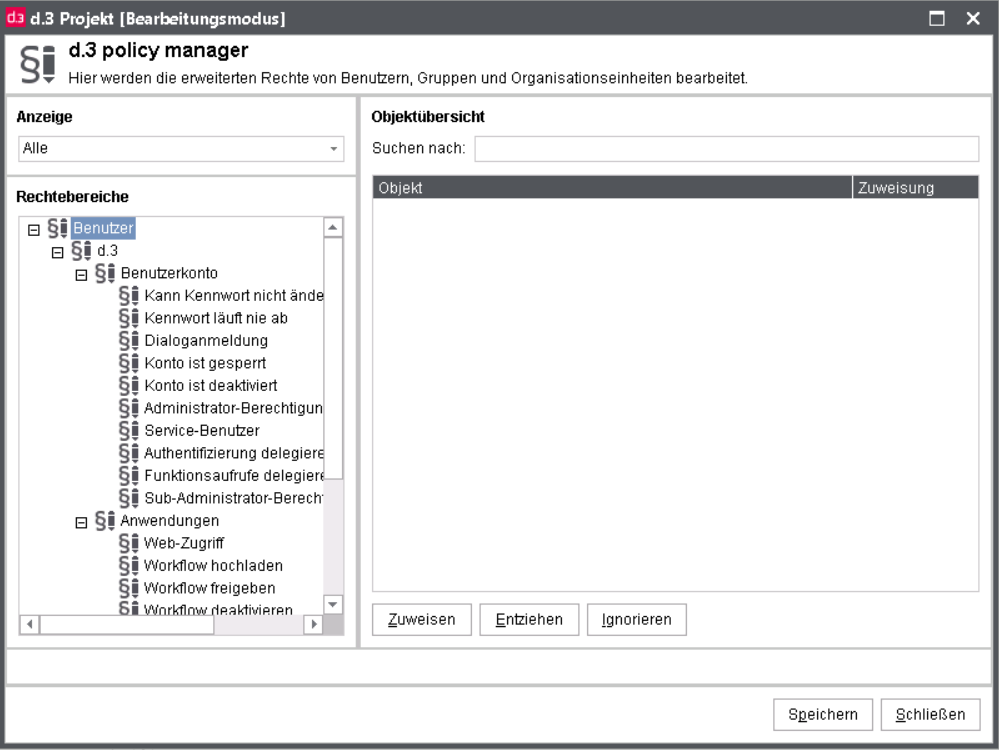
If a right was denied once, be it directly for a user or a user group etc., the right for the respective user is always denied. If a right for a user is overall set to Ignore, then it is usually denied. If there are exceptions to this rule, then these are listed below.
User-rights or "Policies" are rights or properties which can be asisgned to users as well as to user groups or organizational units. This means that a right for a user can also be derived from his membership in a user group.
Web access: Users with this right can use the web-search- and import-components. This right must be explicitly assigned when creating a new user.
Upload workflow: This right grants a user the premission to upload workflows to a server. With disabled extended rights, all users have this right. Enabling the extended rights, the user no longer have this right. Accordingly, the right must be explicitly assigned when creating new users.
Release workflow: This right grants a user the permission to release workflows on a server. With disabled extended rights, all users have this right. Enabling the extended rights, the user no longer have this right. Accordingly, the right must be explicitly assigned when creating new users.
Disable workflow: This right grants a user the permission to release workflows on a server. With disabled extended rights, all users have this right. Enabling the extended rights, the user no longer have this right. Accordingly, the right must be explicitly assigned when creating new users.
Workflow inspector: This right grants the user the permission to log in to the d.3 flow inspector and to monitor and administrate workflows there. This includes the permission to remove documents from a selected workflow or to move them within it.
Displaying the audit trail (everything): This right grants the user the permission to view all protocols.
View mailboxes of other users: This determines who is allowed to see other users' mailboxes. Requirement: a configured organizational structure defining the hierarchy. Please also note the configuration of the user groups, where you can define delegation rules for the load balancing.
Access to JPL scripts: Execute user-specific JPL scripts (for internal use, project-related)
Releasing incompletely signed documents: Even if not all signatures exist, the document can still be released.
Changing the e-mail notifications: d.3 users can use the option E-mail notification in d.3 smart explorer to specify, whether they want to be informed by e-mails about messages or workflow tasks.
As a d.3 administrator, you need to do the following so that your d.3 users can use the E-mail notification function:
In d.3 admin, you need enable the function to send e-mails.
The d.3 users must also be authorized to change the settings. If you did not assign the users the permission to change, globally defined values from d.3 admin are displayed. As a result, users can only call up and view the settings, but cannot change anything.
The rights for workflow functions and e-mail notifications cannot be assigned directly by the LDAP plugin. Instead, they must be assigned to a user group in d.3 policy manager. You can then assign an authorization profile to this group, to which the users are mapped in the LDAP-tree.
Cannot change password: The user to which this right is assigned will not be able to change his password.
Password never expires: If this rights is assigned, then the user's password is valid forever. This right overwrites the d.3 server setting PASSWORD_EXPIRE_DAYS.
Interactive login: The user gets the rights to login to a d.3 repository via d.3 login manager.
In the following, the extended rights of the user account are described in greater detail.
When creating a new user, this right is automatically assigned. Should you receive the error message "This user is not allowed to login“ (error number 5), then please check, if the respective user has been granted the right for interactive login in d.3 admin.
Account is locked: If this property is granted (assigned), then the user can no longer send any API-calls. However, the user is still "active" in the repository and is displayed in d.3 smart explorer in the list of users for the document forwarding etc.
The lock can be caused by too many failed login attempts etc..
Account is disabled: If this property is granted (assigned), then the user can no longer send any API-calls. The user is no longer "active" in the repository and is not displayed in d.3 smart explorer in the list of users for the document forwarding etc. A user can only be disabled, if he dies not have any documents in his processing and in his mailbox.
Account is hidden: If this property is granted (assigned), then the following applies for the user:
The authentication is performed and a login for the user via d.3 login manager is possible.
The user has a right for an interactive login.
The user does not appear in the list of recipients for the document forwarding (Send to d.3 mailbox).
The user cannot be chosen as an adhoc-deputy.
The user is not returned via the predefined dynamic datasets.
For a mailbox dispatch of the user none entries under "Sent" are saved.
Administration access: The user gets the right to login to d.3 admin. This permission allows him to perform all administrative actions.
Service User: These users are created for services which need to connect to d.3, e.g. d.3 abo service or d.3 iTrieve server.
The same applies for the user:
The authentication is performed but for this user a log in via d.3 login manager is no longer possible.
The user has no right for interactive login anymore (implicit rejection). ValidatePasswordForUser still works.
The password of this user never exires.
This user does not appear in the list of recipients for the document forwarding (Send to d.3 mailbox).
The user is not returned via the predefined dynamic datasets.
The user cannot be chosen as an adhoc-deputy.
Delegating authentication: This right makes this user is eligible to trust ta user when he is the caller of the user login. This right is designed to avoid the duplicate authentication and configuration of a trust relationship for services that already perform a user authentication themselves and access d.3.
Delegating function calls: If the user calls API functions, these can be executed by another user ID. The user ID is specified via the import parameter vice_user for each API function.
Sub-administrator access: The user gets the right to login to d.3 admin. This permission allows the user to perform all administrative actions. For this, the user must get the required sub-administrator access from an administrator.
Inheriting rights: Grants a user the permission to actively inherit rights when sending a document to the mailbox of another user, if the recipient does not have the required rights assigned for the document via document classes.
The permission can be granted for the existence in the mailbox or for a specified time.
Additional information can be found in the manual for d.3 smart explorer.
With the d.3 smart explorer plugin it is also possible, to inherit complete dossier structures.
Delete privileged: If the storage system supports “Delete privileged”, this right can be assigned.
Using d.3 inherit rights manager you can get an overview of the inherited documents and revoke granted rights, i.e. the access to selected documents.
Below d.3 administration you can precisely set read- and write-permissions for the selected users to the individual options and functions in d.3 admin.
Advanced properties via policies can be assigned to users, user groups or organizational units after selecting the right.
Using filter options you can easily reduce the number of recipients.
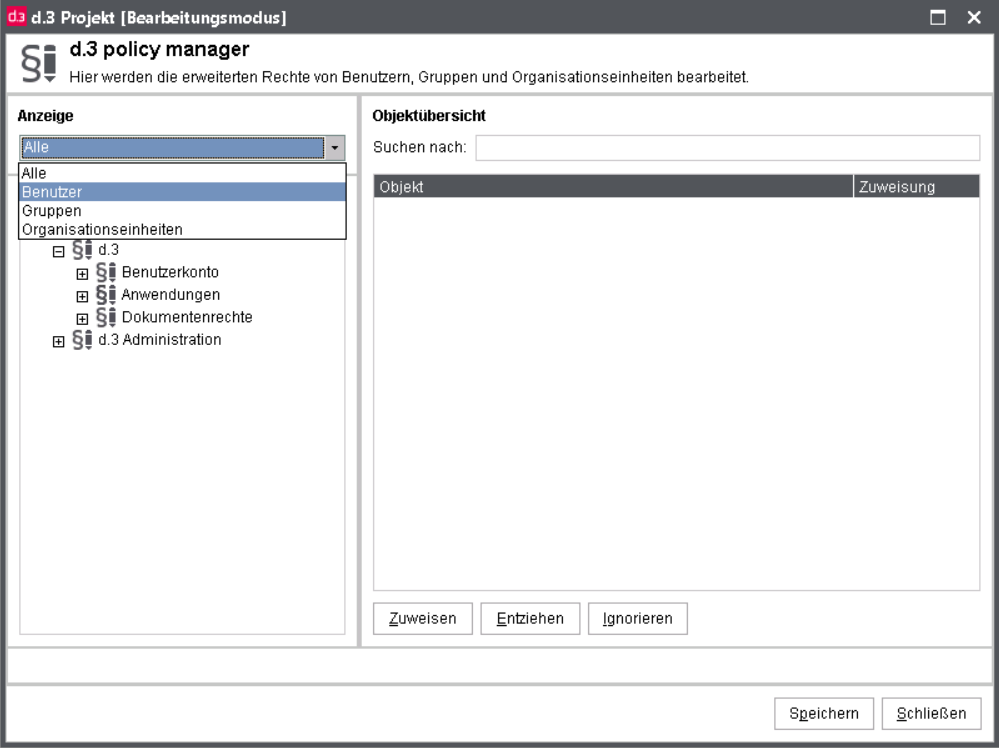
For the selected entries, rights can be granted whereby it must be made sure that here the default setting (right ignored) is equivalent to a NO, without a explicit assigned YES the right is thus not assigned.
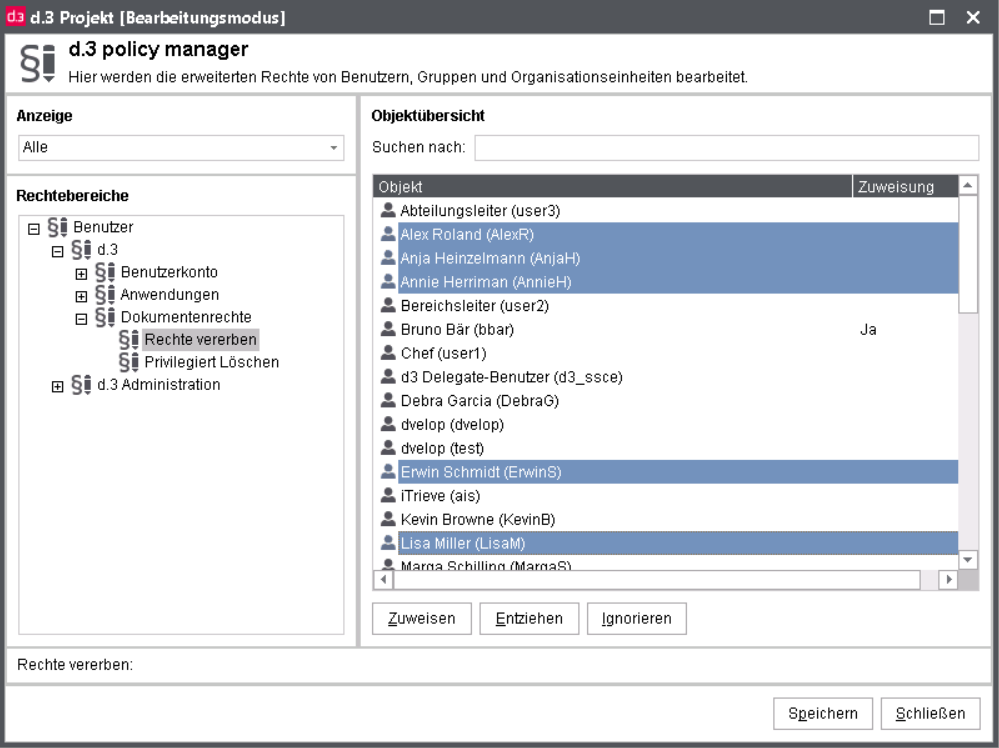
For this effect, use the buttons Assign, Revoke, Ignore or the context menu.
A specified NO cannot be overruled here by a YES, exactly as in the document classes.
Please also consider that you can assign rights to users as well as to user groups or organizational units and that you might be implicitly granting rights.
Thus, thoroughly plan the assignment of policies and document this.
The d.3 administration plugin Rights analysis allows to visualize an overview over the actually defined rights. However, this does not substitute for a thorough planning!
The d.3 inherit rights manager allows you to get an overview of the inherited documents. The plugin displays who actively inherited the document to whom. Additionally it allows to revoke the inherited documents, so that the access to the document or folder is no longer possible. The entry point is located under the d.3 components. Select d.3 inherit rights manager.
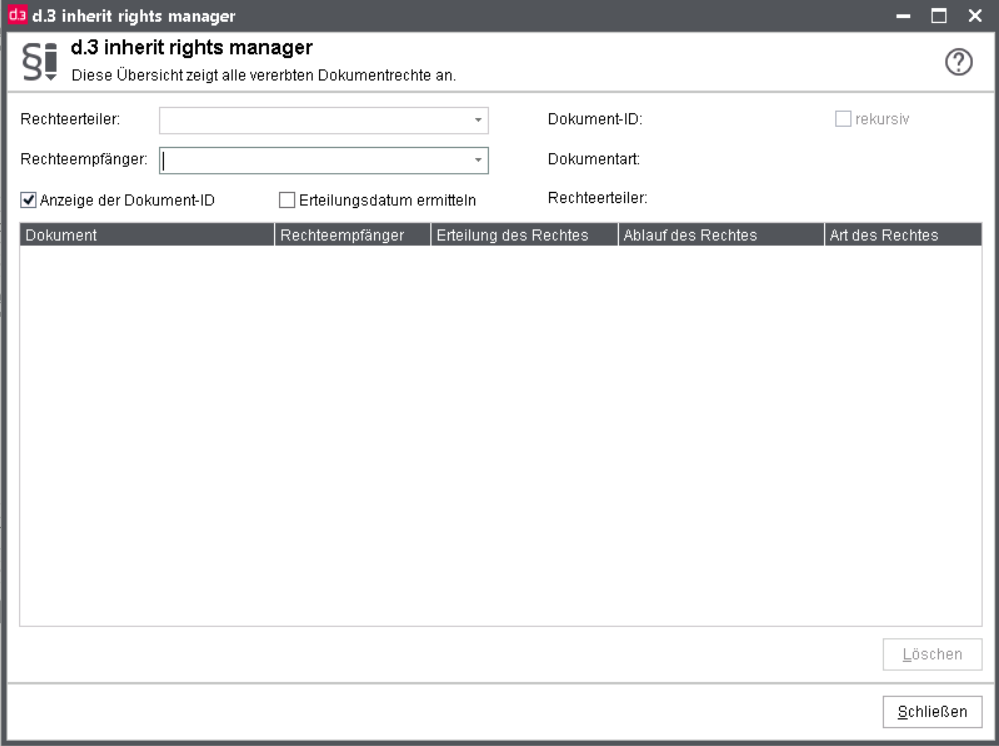
Initially all documents are listed. You can also filter for a delegator or a recipient of rights or both using the drop-down lists.
In the overview you can get the following information:
The document (title or document ID)
The Delegator, the Recipient of rights
And the Expiration date, if a timestamp was defined.
Additionally, the type of inheritance is presented, i.e. if only reading permissions or also write-permissions were granted.
If you want to remove assignments, then mark these assignments and click on Delete.
d.3 inherit rights manager is also available to users made eligible to inherit rights as a plugin in d.3 smart explorer. However, you can then only search for those documents inherited by this user, i.e. the delegator cannot be selected.
The prefixed icon easily shows, if the inheritance refers to a dossier or to a document. Since it is also possible to inherit the subordinate level when inheriting dossiers, this inheritance option is displayed with the checkbox recursive.
If you want to display the document ID instead of the caption-field in the overview, then enable the checkbox on the bottom left.
In the following you will learn what you can do with d.3 restriction set manager.
Using the restriction sets, several individual values for a document class can be specified as set.
This feature allows to collect various value combinations and to assign them using the macro @D3SET when defining the class restrictions. The advantage of this procedure is that it reduces the need for hook functions for the control of rights and permissions, which were regularly required, if the restrictions for a property were derived from several values, such as the assignment of a character range (e.g. A-H, etc.) or a date range.
The term "restriction set" or "set" characterizes the following:
A set defines one or more filter criteria for an property of a document class.
A set can be assigned to a user, a group, an activity profile, or to an organizational unit.
A set is defined as a filter for a property field in a document class using a macro (@D3SET (set_name)).
At runtime, all restriction sets are assigned during the interpretation of the document classes via the set names. The sets allocated to a user using the direct user assignment and using the membership in user groups are combined in a set union. This set union is then used to determine the permission to documents.
Sets can be sub-administrated (created, edited) by different users. This is implemented through an extension for d.3 smart explorer (plugin: d3setmgr.dxp).
Using the previous rights concept (up to d.3 version 6.1) regularly reached certain limits.
The creation of document classes was often tedious or had to be amended by hook functions which could significantly increase the processing time when determining the effective permissions.
The definition of document classes often used property restriction in the form of
ranges (cost center 100-200) or
an OR-search (cost center 100 or 200 or 300 or ... or ...)
[de] benötigt.
This was not possible up to d.3 version 6.1 (except for the ranges in numeric fields) so that you had to create several document classes instead.
Using the restriction sets, the following features were added with d.3 version 6.2:
Creating more flexible filter criteria for properties in a document class.
Dynamic compilation of the property filter for a document class with a combination of various sets during runtime.
Administration of sets by sub-administrators such as heads of department or key users.
Below you will find a few examples.
The document type “Invoice” contains a field “cost center”. This field can contain the values from "100" to "999". The d.3 permissions should be based on this field.
For this effect, a document class "Invoice access via cost center" is created.
The field "cost center" is defined with the set "cost_center" as a filter using the macro @D3SET (accounting_range).
In the d.3 system, the set "cost_center" is created.
The document class “Invoice access via cost center” is assigned to the user “User1” either directly or via an authorization profile. Furthermore, this user is a member of the group "Department 1".
As long as this set does not contain any filter criteria, the "user1" can access normal to the documents of “Invoice” regarding to his rights (group membership, assignment of document classes/authorization profiles).
In the first step, you assign the set "cost_center" to the group "Department 1" and defines the filter criteria "100;200-400". The members of the group "Department 1" from now on only have access to invoices in the accounting ranges 100 and 200 to 400.
If a user who is a member of the group "Department 1" now accesses the document type "Invoice" he will only see the documents where the property field "cost center" contains a value within 100 or 200 to 400.
In the next step, the set "cost_center" is directly assigned to the user "user 1". The filter criteria "!300;500“ are defined. You have thus defined a second selection of values to the set.
The "!" must (NOT) be defined in d.3 config under Retrieval_behavior.
If the user "user1" now wants to access to documents of the document type "invoice", the set union is created using the document class "Invoice access via cost center" across all sets with the name "cost center”.
The user "user1" thus gains access only to invoices with the cost center 100, 200-400 and 500 but not to the cost center 300.
You can see in example 1 that the authorizations for users can be directly granted or denied using assigned to restriction sets.
With restriction sets, you can let eligible users assign and create such authorizations via the d.3 smart explorer.
This could be implemented as follows:
You define a document class "Management of the set cost center" based on the document type in which the sets are stored. Among other things, this document type contains a property for the name of the set and the object (e.g. user name, group name) to which this set is assigned. You can use the name of the set such as "cost center" as a filter for this document class. For the object, you can either specify a user name or another set with @D3SET(…), which contains several user names.
You can thus apply the permission to create or change sets which can then be used to grant or deny these permissions to users.
Another example for using restriction sets can be found in the attachment under Example for restriction sets.
The restriction sets are stored as documents in the document type $Restrictionset$. Furthermore, this facilitates an easy definition of a rights concept for the editing of sets as document classes and authorization profiles allow to assign rights to these documents.
A list of the sets in the system is maintained in the database whereby an additional language-dependent description for the set is also saved there.
There is no versioning for restriction sets in form of the document files (because there are not any) but only for the properties to be viewed in the property history or in the audit-trail.
By selecting the plugin d.3 restriction set manager you open the dialog for creating and managing restriction sets.
Via the button Create you first create the set by assigning a descriptive name. Optionally provide a description of the set.
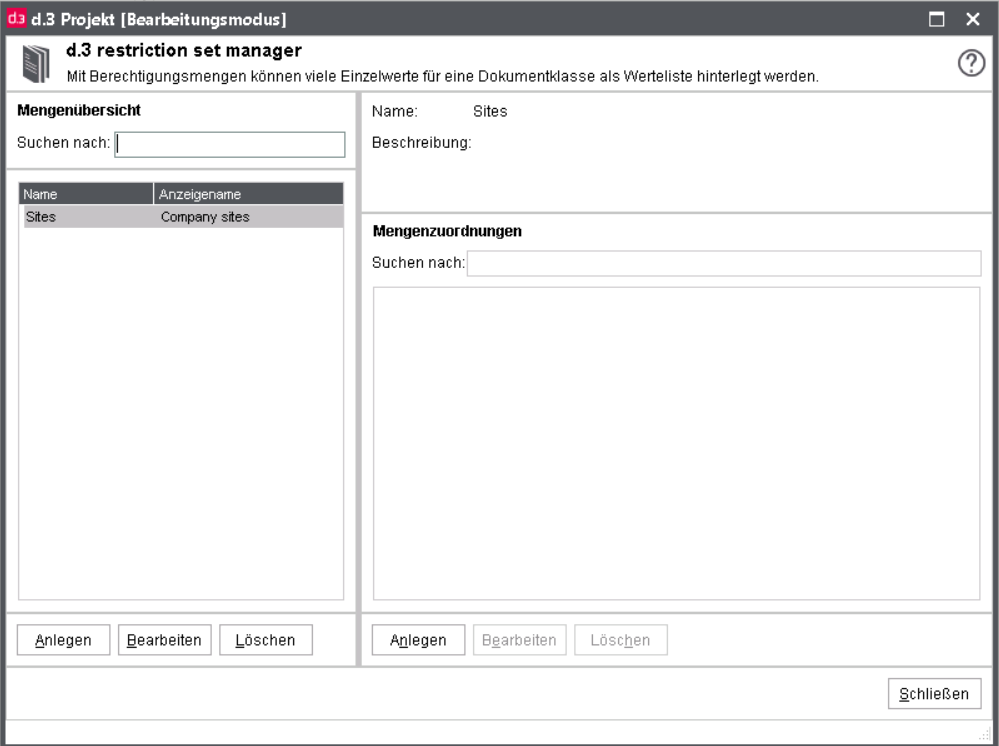
Enter a distinct name as well as an explanatory note:
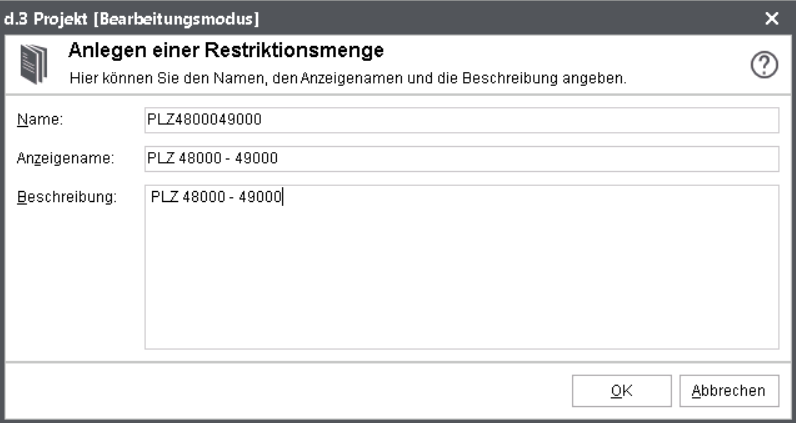
You can see this created set as a container for values against which the property values are checked later at runtime.
The such created sets can now be used in the Document class definition with the macro @D3SET (example: character range S to Z).
In the right area Assigned sets you can create a assignment via the button Create.
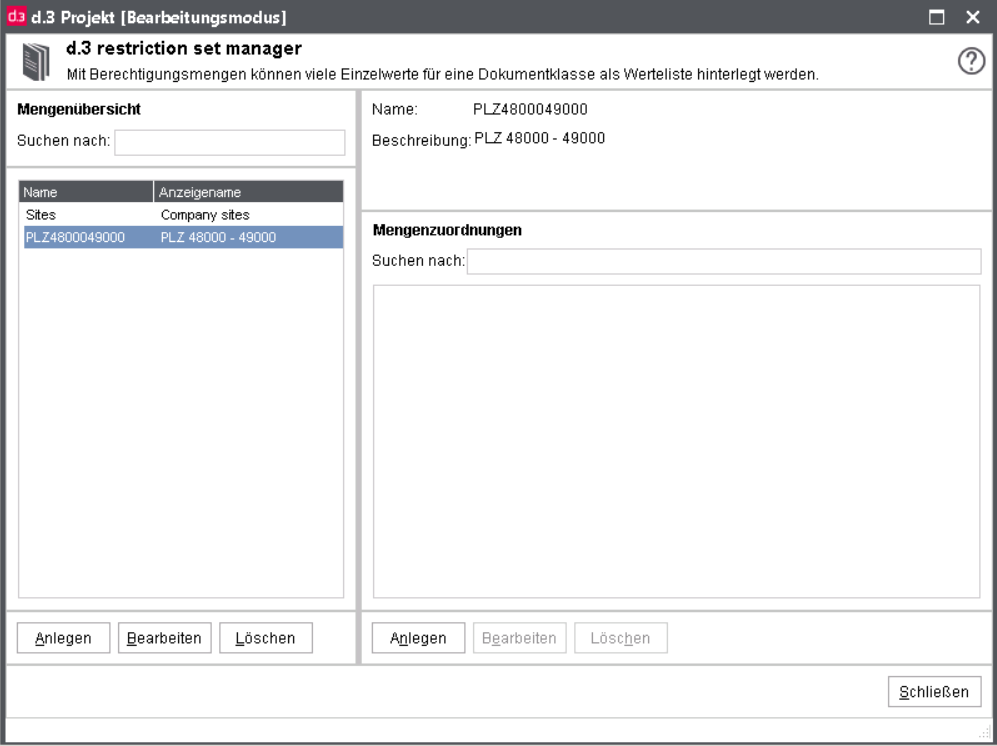
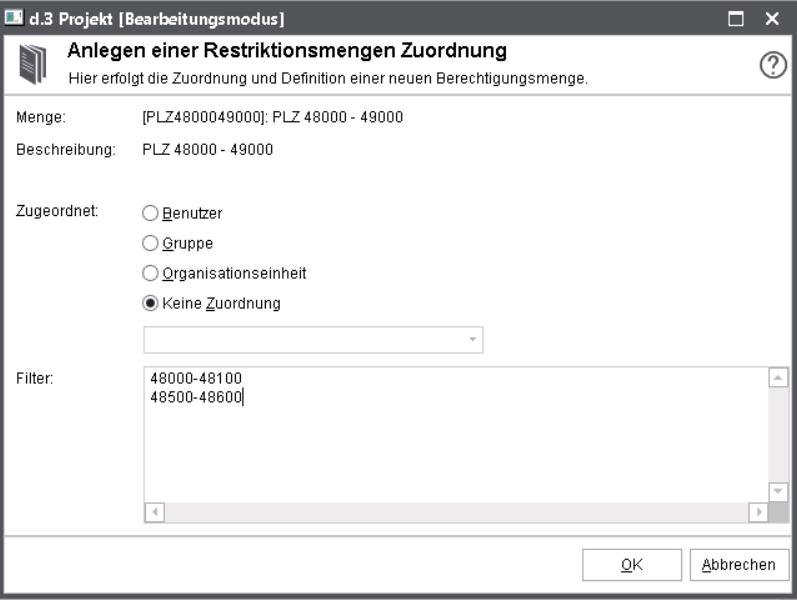
Assigned: Here, you are defining the filters, i.e. the set of permitted/prohibited values of a listed level. Depending on the assignment level, this restriction set will only be considered in determining the effective rights, if the user is a member of the group or the organizational unit or the filter was directly assigned to him.
of the Group or
the organizational unit or
the filter was directly assigned to him.
Choose the option No assignment, if you want to use the criteria globally as base values.
Filters: Here, you collect all allowed or prohibited values. The special characters (compare chapter d.3 retrieval behavior) are also available for the definition.
You can create a negation always with the internal allocated character “!”. A list of all comparative values is determined with the runtime, due to that the positioning of the negated entry is optional. However, a negated value cannot be overwritten by various positive associations.
You can enter the values separated by line feeds or use the defined or-character. A total of 150,000 characters can be entered for your filter criteria.
Only with assigning the class directly to a user or via an authorization profile, the actual rights are defined. The actual right/permission significantly depends on the user group or organizational unit of which a member. In addition to this, the restriction set is directly assigned to the user.
When creating the filters for sets various macros can be applied which are also used in the document classes:
@D3USER
@D3GROUP
@D3USER_OPTFIELD_XX
@D3USER_LDAPDN
@D3SET
@D3USER_REALNAME
@D3USER_LONG
With the d.3 version 6.3 of d.3 server, restriction sets can also be created by the hostimport.
Configuration
The parameter D3SET_IMPORT_PATH defines a directory for the hostimport process, from which set definition files are read. This parameter can be specified in d.3 config in d.3 admin. The file extension for such filter files is automatically defined as TXT.
Provisioning the import-files
As with the ordinary hostimport procedure, this also requires a JPL file and a document file. The document file gets the file extension TXT (see above).
The following parameters must be defined in the JPL file:
set_name
contains the short name of the restriction set and is a mandatory parameter
set_object
contains the object to which the set filter is to be assigned. You can specify the following:
a user name,
a group name,
an activity profile name or
an organizational unit name
The parameter can be set to a NULL string or left empty. In this case, a set without direct object assignment is created or modified.
The TXT-file contains the filter criteria either delimited with a ";" or are specified in separate lines.
Existing restriction set-filters are overwritten by the hostimport. Thus, you must always specify the complete filter in the TXT file.
Restriction set which do not yet exist are not created. The parameter set_name must therefore always contain the name of the existing set.
The created restriction sets can be administrated by eligible users, i.e. values can be appended or deleted/corrected. This could be a job for a head of department or area manager who want to adjust the short-term or long-term distribution of tasks in his group. A restriction set can generally also be created empty and then be filled accordingly by the person in charge based on the actual tasks.
For this task, a document class with the respective assignments and rights must be created.
Initially, create a new document class $RestrictionSet$ as usual for the system document type.
The system- and default classes are only available with disabled checkbox.
The properties of the system document type $Restriction Set$ have the following meaning:
$Set_Name$: Name of the restriction set(s) (e.g. character range S to Z) which is to be managed externally.
$Object$: Object to be accessed via this class such as the set(s) of the user cc, the group Purchasing, the organizational unit Dep. Accounting (as described in the examples above). Here, you can also specify an previously defined restriction set which contains all users, user groups, organizational units etc. for which the sub-administration is to be allowed.
$Object-Class$: The assignment range of the set.
0: No assignment
1: User
2: Group
4: Organizational unit
When updating the d.3 repository to the new version the value “3” for an job profile (pre d.3 version 7) is automatically changed to the value “2”.
The data type $Object-Class$ is numeric so that specifying a range is possible (1-3, -2, 2-).
You can directly combine as you know it from "ordinary" document types. Only the entered values of the restrictions are assigned.
In the example above, the access to the restriction set "PLZ 48000 - 48999" (ZIP code 48000...) is defined, however only for the sets of the users.
Examples for additional assignments:
Entering the value "2" alone for the $Object-Class$ and leaving all other fields empty, the eligible user later assigned to this document class can/cannot access all sets assigned to the groups. Keep in mind that only the logical patterns are defined here and that the actual rejected or granted permissions are defined when assigning the document class.
The assignment of the access can also be controlled using a set. For this effect you can create a set such as "My colleagues".
If the access is actually allowed or denied is still only defined in the assigned (authorization profile or document class-assignment) ("Right assigned" / "Right rejected" / "Right ignored").
The set is then selected in the document class-restriction and assigned.
The document class for the set administration is either assigned with the usual profile or via a direct assignment to a user and defined with the respective rights (read, write).
You can even define a restriction set containing the names of restriction sets. This can then be referenced in the field $Set-Name$ using the macro @D3SET(xxxxxx). Thus, nesting restriction sets is basically possible under certain conditions.
For d.3 smart explorer, the DXP d3setmgr.dxp (located under ...\d3client.prg\DXP) must be provided using the client distribution. Using the menu option Utilities eligible users can then open the restriction set manager.
With the installed plugin of d.3 smart explorer the eligible users can however only manage the restrictions sets assigned to themselves.
The active user thus can edit the sets for the users and groups and adjust the respective tasks.
However, he cannot create a new set!
From version 8.1.0 d.3 server supports the display of documents with an automatically added watermark. The simultaneous use of d.ecs sign and watermark in d.3 is currently not yet supported.
Several watermarks can be defined and document classes can be assigned. This way, the watermarks are rendered based on the ownership of a document to the document classes with the document file for the display of a document.
Note the following when using the extension hashcheck.dxp:
If a watermark is added to the document using the watermark functionality in d.3 server, hashcheck.dxp detects a change and issues a corresponding message.
With the d.3 configuration parameter WATERMARK_SUPPORT the general support for the display with watermark can be enabled.
You can find this parameter in d.3 config under System settings.
By enabling the parameter you can assign the property for users with the help of the document class right "Displaying watermark", so that these users are only allowed to view documents with watermarks.
An installation of d.ecs pdf extension version 1.4.2 or higher is required.
The central installation is recommended.
After a clean installation a restart of the machine is recommended, thus the d.3 server processes start successfully again.
The display of watermarks only works if the parameter V8RunningUpdateBackComp is disabled.
The display of watermarks is only valid for documents which are stored in PDF format.
If the parameter WATERMARK_SUPPORT has been enabled but d.ecs pdf extension has not been installed or exists in a version smaller than 1.4.2, then the d.3 processes cannot be started anymore!
If it is determined for the rights validation for the user that the right "Displaying watermark" and the file to be displayed is a PDF-file (document file is PDF or dependent file is P1), then for the request of the file via the d.3 gateway a routine for the application of watermarks is passed through.
This determines all document classes matching the document. This results in a list of watermarks which are assigned to these document classes.
A user who has the edit right to the document class can always see in the status Processing the original document without watermark because only this may be changed. These users see also in other status the original without watermark if it is no PDF and the asynchronous generation of the depending P1-file is not finished yet.
As a result for the users who are not allowed to see the document without watermark, the edit right to the document class must be revoked. In this case a view of the document is not possible, if it is no PDF-file and the generation of the depending P1-file is not finished yet.
If no watermark assignment was found, then automatically 2 default watermarks are generated, so that it is always ensured that a watermark is added.
After the application of the watermark the generated file is stored and provided in a temporary section of the d.3 document tree. This file is valid for 15 minutes. So if another download of the document is to be made within 15 minutes after the generation, then the document can be directly provided. Else, the watermark generation is executed again.
The master async deletes automatically the temporary watermark files which have been created in the last 5 days.
The following restrictions must be considered when using documents with watermarks in the offline section of d.3 mobile:
Offline saved documents with watermark, where a timestamp of the download time is added as watermark will no longer be updated.
Via the call "Provide now" in the d.3 mobile app this timestamp on the document will not be updated because the document will not be downloaded again.
For changes on user properties to which a watermark has been added will not be updated as offline provided document.
Via the call "Provide now" in the d.3 mobile app no change of a user property is displayed because the document will not be downloaded again.
For a change on the watermark configuration offline provided documents with watermarks will not be updated.
The change will not be displayed in the offline section. Also via the call "Provide now" in the d.3 mobile app has not the effect, that this change will be visible because the document will not be downloaded again.
Workaround in the d.3 mobile app:
To get a current watermark for these documents in the offline section, it is necessary to remove the document from the offline section and to add it again.
This can be done by this way:
Identify the document/dossier in the offline section and e.g. notice the document ID.
In the offline section for the document/dossier open the menu option "Remove from device".
Retrieve the document/dossier via the search for the document ID and provide it offline again.
Prerequisite is the use of the software versions d.3 mobile 1.6.0 and d.3 document render service 1.3.0.
Open the dialog for the creation and the management of watermarks by selecting the plugin Watermark.
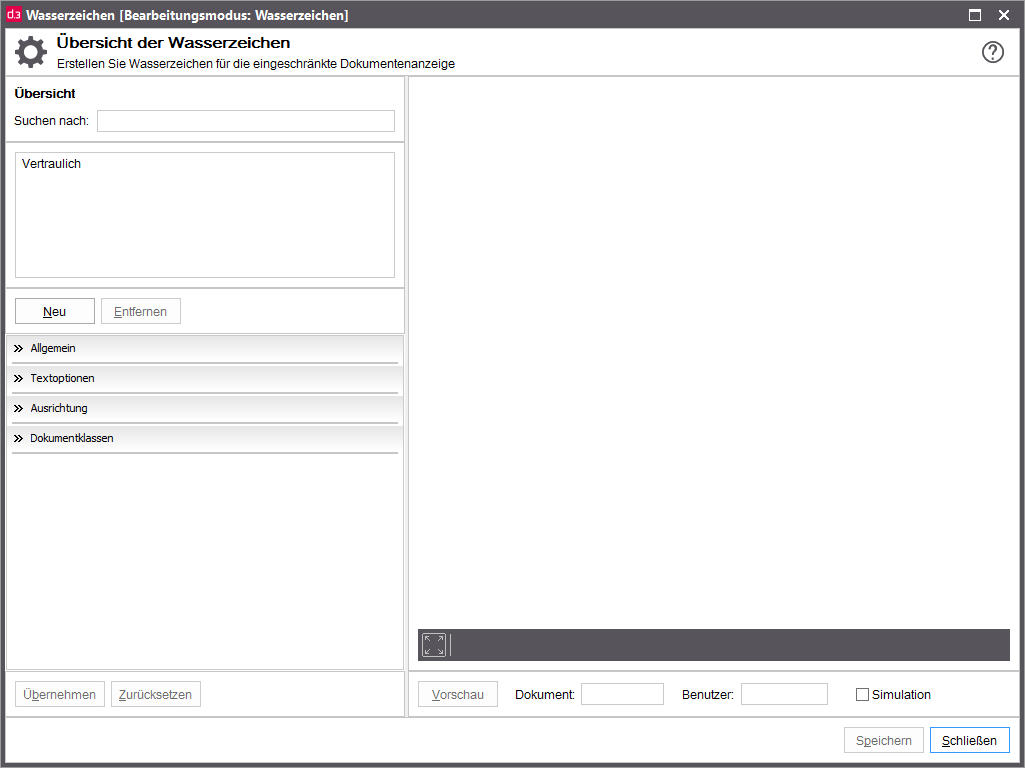 |
To create a new watermark use the button New in the overview.
General settings
Via the category General basic settings of the watermark are defined. This category opens automatically, if New was pressed.
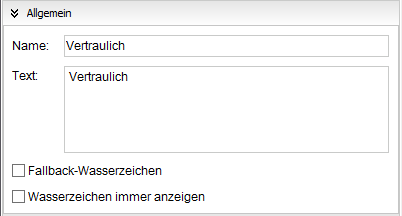
Please enter a Name for the watermark. This information has only administrative character and is not displayed outside of d.3 admin. The name can have a maximum of 50 characters.
In the Text field the components of the text for the display of the watermark can be defined.
This supports the open source template language "Liquid". More on this can be found on the pages https://shopify.github.io/liquid/ or https://github.com/shopify/liquid/wiki/Liquid-for-Designers . Properties of the d.3 document or d.3 user can be included in the text. These properties must be entered within the character string {{...}}.
Possible properties for a document are:
Property | Description | Syntax |
|---|---|---|
doc_id | Document ID | {{doc.doc_id}} |
number | Document number | {{doc.number}} |
current_status | current document status | {{doc.current_status}} |
file_id_current_vers | current file version of the document status | {{doc.file_id_current_vers}} |
current_version_id | current version number of the document | {{doc.current_version_id}} |
editor | Editor of the document | {{doc.editor}} |
field[...] | Property fields 1-59 and 70-89 | {{doc.field[15]}} |
field[6.][...] | Multi-value property fields 60-69 | {{doc.field[60][15]}} |
Possible properties for a user are:
Property | Description | Syntax |
|---|---|---|
id | User ID in d.3. | {{user.id}} |
long_name | Login name in d.3 | {{user.long_name}} |
name | full name of the user | {{user.name}} |
plant | Department | {{user.plant}} |
department | Organization | {{user.department}} |
opt_field[...] | optional field of the user | {{user.opt_field[1]}} |
Examples:
{{doc.field[1]}} displays the value of the d.3 document from the property field at the database position 1.
{{user.name}} displays the full name of the d.3 user.
By enabling the option Fallback-Watermark it allows you to configure that this watermark is displayed then, if no other watermark could be determined for the document.
By enabling the option Watermark always on top this watermark is always rendered and displayed, also if other watermarks have been added to the document.
Text options
In the category Text options you can make settings for the watermark text:

The following options are available:
Color: Use this to set the color for the watermark. The following colors can be used:
0: Black
1: Red
2: Green
3: Blue
Opacity: Use this to set the opacity or the transparency for the watermark. The value is specified in percent. The higher the value, the more intense the watermark is displayed. The value 0 results in a transparent and the value 100 results in an opaque representation.
Scaling: Use this to control the watermark's size in percent related to the page. The value 100 extends the watermark across the total width and length of the document.
Alignment
In the category Alignment you position the text of the watermark.
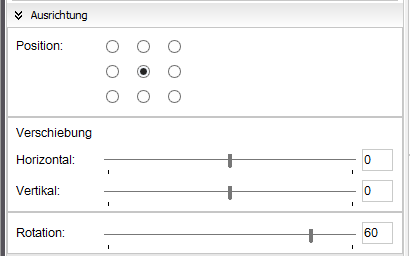
With Position you specify the horizontal and vertical position of the text. There are 9 anchor points available.
For the horizontal position the following rules apply:
Left: The text starts at the left margin of the document.
Center: The center of the text is in the middle of the document.
Right: The text ends up at the right margin.
For the vertical position the following rules apply:
Top The text starts or ends up at the top margin of the document (depending on the configured rotation).
Center: The center of the text is in the middle of the document.
Bottom: The text starts or ends up at the bottom margin of the document (depending on the configured rotation).
In the section Offset the position of the watermark is defined as percentage of the page width and page height.
Horizontal: This parameter sets the horizontal offset for the position of the watermark as a percentage of the page width.
A negative value moves the position to the left and a positive value moves it to the right.
Negative values may move the text or parts of the text beyond the left document page, while positive values may move it beyond the right document page!
Vertical: This parameter sets the vertical offset for the position of the watermark as a percentage of the page height.
A negative value moves the position to the top and a positive value moves it to the bottom.
Negative values may move the text or parts of the text beyond the top of the document page, while positive values may move it beyond the bottom of the document page!
Use Rotation to control the rotation of the watermark counter-clockwise. The value is specified in degrees. The value 0 shows the watermark horizontally, while the value 90 shows it vertically.
Document classes
In the category Document classes you define for which document class the watermark shall be displayed. More on this can be found in the chapter Displaying documents with watermark.
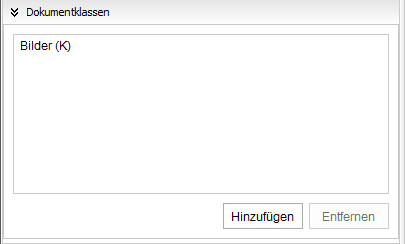
The overview displays the selected document classes.
Via Add new document classes can be selected or existing ones can be removed. The following window appears:
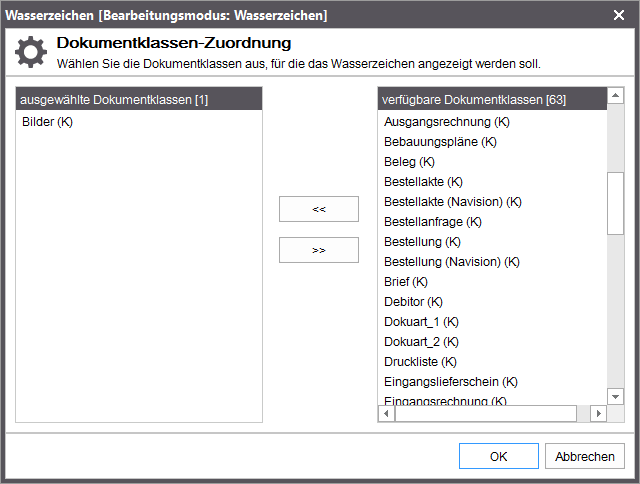
Via Remove document classes can be directly deselected. A multiple selection is possible here.
Apply changes or reset
If changes were made, then the buttons Apply and Reset are automatically released.
With Apply the changes are saved but not yet sent to the d.3 server. In the overview the name of the watermark appears in italic and bold, if an existing watermark has been changed and in bold, if a watermark has been newly created.
With Reset the changes are made undone and fall back to the state of the start of the plugin or to the state of the last save of changes.
Save changes
To save all changes on the watermark permanently, use the button Save.
To change an existing watermark, select it in the overview.
With Search for you can search for specific watermarks by the name.
This shrunks the list via full-text search case insensitive to the results.
Select a watermark and automatically the category Text options opens.
The further procedure is the same as described in the chapter Creating a watermark.
To delete an existing watermark, select it in the overview and use the button Remove.
Afterwards, the watermark is marked for the deletion and appears crossed out.
Only, if you use the Save button, then the watermark is permanently deleted.
As long as you have not yet pressed the button Save, the delete process can be revoked via Reset. A watermark which did not exist at the start point will be removed from the list and will no longer be available.
For a better validation of the settings to watermarks, you can use the preview function of the plugin.
 |
This is located in the upper right section of the plugin and can be used via the button Preview. The preview can only be used, if you have selected a watermark in the overview.
The preview can only be executed for documents existing in the d.3 system. So, initially choose PDF-documents by using the document ID from the d.3 system on which you want to try the watermark.
The d.3 document ID must be entered in the field Document.
In the field User you enter the ID of a d.3 user in whose name the watermark is to be rendered.
The option field Simulation allows you to render also the watermarks already saved in the d.3 system additionally to the selected watermark. This determines the document classes of the specified d.3 document and the assigned watermarks.
By using the button Preview a request for generating the preview document is sent to the d.3 server and after successful processing the document is downloaded and displayed in the preview section.
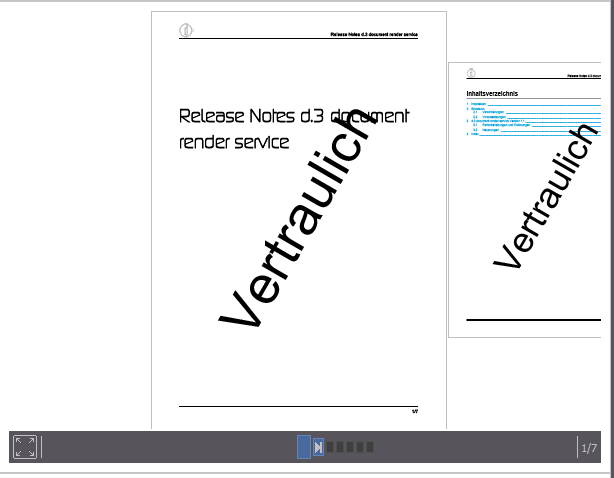 |
In the preview window you can enlarge the document, scroll through the document or view the document in full-screen mode.