About d.3 admin
Hints on the user interface
Prerequisites
Additional information

A dataset is a group of values. This dataset can be assigned to an advanced property, which again could be linked to a document type. This would provide the user with this selection of values for this field in the document type.
This applies to the search as well as, more significantly, to the storage of new documents. The value list can be provided as a pure selection as well as a list of suggestions. This way the values of a dataset can also be used for a validation check. The according specification is made in the configuration of a document type.
Example: Let us suppose, you created a dataset with the name “Companies". This dataset contains the six entries
"Border Books"
"Leonard Krower & Sons"
"Simply Save"
"Total Sources"
"Opticomp"
"Sports Unlimited".
Afterwards you created an advanced property field named “Company". This field was assigned to the dataset “Companies".
Finally you create a new document type with the name “Maintenance”. This document type is to be used for the management of maintenance contracts in a software company. This document type is now assigned to the Field “Companies”. Thus, the document type “Maintenance” has only one property field. If a user now looks for a maintenance contract for the company “Opticomp", then he first selects the document type “Maintenance” from the document types. Afterwards, he selects the company “Opticomp" from the selection list (dataset) and starts the search for these maintenance contracts.
The name of a dataset may not contain any special characters with the exception of "+", "-" and "_". Other special characters like ":" are not permitted. Up to 250 characters for a value in a dataset are permitted.
In this example, the dataset “Companies" was assigned to the advanced properties field “Company". This dataset can, however, also be assigned to other advanced property fields. One and the same dataset thus be assigned to any number of user-defined advanced property fields.
Currently, four different types of datasets are supported. These are the manually created datasets, the datasets from a database and the datasets from a hook function and predefined datasets, e.g. the user/group list.
The type of datasets is defined manually. This dataset is always "static". If this dataset is used as a list of suggestions but the user specifies an alternative value, then this will NOT appear in the list of suggestions afterwards. The amendment therefore must be performed using the administration.
Examples for "static" datasets: Locations, departmental names, capturing sources of documents (e.g. file, e-mail, note, hint, protocol, ...).
To create a dataset, first enter the name for this dataset. This name must not exceed a maximum of 255 characters.
Assign a data type to this dataset. These are the same data types which are used when defining a field.
Enter the values to be assigned to this dataset.
From version 7.1.1 you can determine, if the values shall be sorted or if the desired sort order shall be ascending or descending.
The values of the datasets can be translated in the additional languages to be supported.
Refer to chapter Multiple languages for more information.
With d.3 version 7 you can also use a list of numeric digits as values.
The actual specification as text is then applied in the translation of the dataset.
Example:
With the translation you can then define the actual texts.
You can find under Documents and dossiers > Advanced properties an overview of already created advanced properties and their contents. This allows you to search for certain properties by the filter, a Complete overview and a DB fields overview can be viewed as well as advanced properties can be edited, copied or removed and new advanced properties can be created.
This overview of advanced properties is a kind of “clipboard”. All repeatedly required "fields" are kept here.
Let us suppose, your company has defined 10 document types, which use an a property named "Machine-Nr.". This property is linked to a dataset and undergoes a plausibility check. Without the “clipboard” function of the repository, you would have to define this field 10 times.
With the definition as an advanced property field, however, it is sufficient to configure the field once. Afterwards, this field can be used in an unlimited number of document types. If the dataset of this advanced property is changed later on, and the field exists in ten document types, then the dataset is automatically adopted in all ten instances.
An advanced property has various properties. These properties are described below.
The title of an advanced property is displayed to a user if he selects a document type. The title can have a maximum of 50 characters. Please define telling names. Whenever possible, choose familiar designations used in your company.
The name of the title must not contain any special characters except "+", "-" and "_". The special character “:” is not allowed. The d.3 repository in Unicode mode allows all available characters.
You must configure a Data type for every advanced property. Currently, the following data types are supported:
Alphanumeric
Numeric
Date
Date and time
Money
Among other things, the data type affect the way, search queries have to be entered in d.3 smart explorer. Detailled information on this function can be found in the d.3 smart explorer manual.
Alphanumeric fields can contain any type of characters. The term “adopt” at this points refers to the entry of the property on import. This means, storage in the dialog (d.3 import) as well as the automatic processes (d.3 hostimport).
For the numeric fields, however, only the digits "0" to "9", the minus sign "-", the plus sign "+" and the decimal separator "." can be specified.
The fields of the data type Money can contain the same characters as the numeric fields.
The date fields are used to include a date.
Fields of the type date and time are usually normal date fields which, however, allow an additional specification of a time.
For the data type numeric and date you use the minus sign for the range-search or even for a search with an open range.
The properties must follow fixed syntactic rules using the batch procedures (HOSTIMP, D3ASYNC):
For numeric fields the decimal seperator “.” must be used.
The date fields must be provided in the German notation DD.MM.YYYY.
The data type of an property can only be changed retroactively, if the property is not yet used in a document type.
Before the preferred position of the advanced property can be explained, some general information on the storage of properties in the database must be given.
The d.3 repository stores the properties of a document in a database table which provides 89 columns for the storage of the property content. The data type of a field depends on the column it is stored in.
Database columns from – to | Field type |
|---|---|
1 - 49 | Alphanumeric |
50 - 59 | Date |
70 - 79 | Money |
80 - 89 | numeric |
The number of the column is also used in a term called "Database field". The multi-value property fields are located in the columns 60 to 69. Thus, a field located in the column “33” is referenced to internally as “dok_dat_feld[33]”, a multi-value field “dok_dat_feld_60[x]”, with the “x” standing for the x-th item.
This storage structure of properties in the database limits the number of properties per document type or dossier type. One document type/dossier type can therefore contain a maximum of 49 alphanumeric fields, 10 date fields and so on. A document type/dossier type can never contain two fields (properties) at the same position, i.e. store the values in the same database-column.
A retroactive change of the DB position is no longer allowed for new repositories created with the d.3 version 7.
If the preferred position of an advanced property is modified, then the position of this advanced property field is only changed in this document type.
If you define a property field with a length of more than 35 characters but move this field to another database field in the document type which only supports 35 characters, the following thing happens: Since the advanced property definition specifies that the field is longer than the standard (35 characters), d.3 hostimport will encounter a database error. If the attributes are validated during the API import before, the respective field is truncated after 35 characters and the import succeeds. If datasets are affected, this can lead to validation problems. Thus, if it should happen that a field of more than 35 characters must be transferred to another database field, then this column must also be extended.
The entry of a field length is only possible for alphanumeric fields. The default length for these fields is 35 bytes but can be extended to 250 bytes with a change of the database tables. An exception are the alphanumeric “multi-value property” fields. These fields are located at the preferred positions 60 to 69. The default length of these depends on the used data type. A length of maximum 250 bytes is predefined for the data type alphanumeric.
This is different for the fields 1-49: Since a direct change of the table firmen_spezifisch would occupy too much disk space, this table is initially still restricted to 35 bytes. Only if you want to create a field with a legth of more than 35 bytes, then only the respective column is extended.
To do so, simply enter the desired new length in the dialog, maximum 250. The database column is automatically updated to the desired length when creating the new property.
Be careful with extending database columns. Meticulously plan it so that you do not occupy too much disk space for the data in your database.
The usage of different character encodings results in various disk spaces of single characters. Thus, you will read “bytes” in this chapter.
If the update is not executed automatically, then a database script mod_doc_field.jpl_XX.jpl (XX = repository ID) is created containing the necessary database-statements and which must be started via the d.3 server interface of the d.3 repository.
Do the following:
Sign in to the d.3 server interface.
Open the menu option Programs > External Program , choose the file mod_doc_field_XX.jpl and start it.
All necessary changes are combined here and are applied.
As mentioned before, multi-value property fields are a special type of advanced properties which can only be stored in the preferred positions “60” to “69”. For this reason these fields are also called “60-fields”.
The “normal” advanced property fields are used to store exactly one value such as an invoice number, the order date or the company name. A multi-value property field can contain various values.
Let us suppose, you need a field called “e-mail addresses” for a document type. You could configure several individual fields like “e-mail 1“, „-mail 2“, “e-mail 3” and so on. This implementation would however be very restricted. A multi-value property field can by default contain up to 100 values.
The d.3 configuration (d.3 config, section document storage) allows you to increase the number of entries in the 60-fields.
The maximum value for extension is 2000.
Since the maximum number of fields for a document type currently are 89 fields (properties), it would not have been possible to define the fields "e-mail 1" to "e-mail 100". A multi-value property field with up to 2000 fields would thus be the only solution.
Multi-value property fields will be marked in the d.3 application as a table icon.
You can also use the multi-value property fields in document classes.
The description for an advanced property is for information only.
You can enter up to 255 characters. This descriptive text is also displayed in d.3 import, when the user right-clicks in the import form and the d.3 smart explorer and chooses the option Properties.
You can assign a dataset to an advanced property field. The dataset can be provided by a static dataset, a database table (or database view) or a hook function.
Afterwards you can allocate a manually created dataset (see chaptermanually created datasets). Please note that only datasets of the same data type can be selected.
If you want to read values immediately from a database of the d.3 repository, specify the names of the table and column. Thereby, the dataset is marked unique. This way, you can only address one table in the d.3 repository. The data of the database table must either be entered by d.3 or via a customized function.
However, you can also create so called database-views in your database system. Then, you enter the name of this view and the specified column name.
In order to access data in a database table which is not part of the d.3 database system, you must develop a hook function (see chapter hook function).
A maximum of 10000 entries are returned. If more are needed, a dynamic dataset hook based on the function user_dataset_add_value must be executed.
For this type of type of dataset you have to develop a hook function.
Hook-functions are customer-specific functions extending or changing the functionality of the d.3 server core. They can provide user-specific actions which are triggered by certain d.3 actions.
Hook-functions must be written in the interpreter language JPL (Jam Programming Language). This programming language is similar to the more widely know language “C” but significantly simpler to learn. However, it is not as powerful, either.
The document type “software order” is defined in your d.3 repository. This document type has the properties “Software company" and “Application". When archiving a document in d.3 import and searching a document in d.3 smart explorer the user should have a dropdown list for the property “Software company" from the values “Simply Save" and “Total Sources”. This can be easily solved by manually creating a dataset.
For the property “Application” the user should also be provided with a selection. In this case, however, the selection should be dynamically generated based on the property “Software company”. If the user selected “Simply Save” in the field “Software company” then the dataset should contain the values “File Storage Tool” and “Screenshot Creator”. For the value “Total Sources" the dataset should contain the values "Photo Editor" and "Total Sources” and “Video Editor".
This problem can only be solved by using a hook function which generates the dataset dynamically depending on the properties. Therefore, do the following in the d.3 repository:
Create an alphanumeric dataset named “Software companies" and the values “Simply Save" and “Total Sources".
Create an alphanumeric advanced property field named “Application” with the preferred position 1. Assign the dataset with the label "Software companies" to this field as existing data.
Create an alphanumeric advanced property field named “Application” with the preferred position 2. Assign the hook function with the label “BuildDataset” to this field as existing data.
Create a document type called “Software order". Assign to this document type the two fields created before.
Grant access to this document type to one or more user, e.g. in the form class <-> role or by adding them to a group.
Developing the hook function. How to develop and manage hook functions, you will learn in the d.3 Hook-training of d.velop AG.
Add the new hook function to the list of functions to be loaded by the d.3 server on application start. In order to do this, open the d.3 configuration and select the parameter HOOK_JPL_FILES_CUSTOMER. You find the d.3 configuration in d.3 admin below the System settings. Select the option d.3 config. Fill the parameter HOOK_JPL_FILE_CUSTOMER with the additional current value hook_dataset.jpl. If, for example, three functions were already defined there, select the fourth line by double-click and enter the value.
If you want to assort and load all values of the dataset by each access again, activate the checkbox in the picture of the hook datasets.
Afterwards save the d.3 config settings.
Close in d.3 admin.
Restart the d.3 server.
Below, you can find the source code of the hook function generated for the task described above.
This file can be generated in a simple text editor like Notepad.
The file has got the name hook_dataset.jpl and has to be in the application directory of the d.3 server.
The left column in the table contains the line numbers. These are not part of the source code. They are only included to describe the source code.
###
# Modul zum Ermitteln einer Wertemenge in Abhängigkeit von DOK_DAT_FELD_1
###
call d3_server_api_error_log("Hook-Demo: Modul geladen", 1, 9)
proc BuildDataset(repos_id, user, doc_type_short, row_no)
{
  call d3_server_api_error_log("Hook-Demo: Modul aufgerufen", 1, 9)
  call d3_server_api_error_log("Hook-Demo: DOK_DAT_FELD_1 = :dok_dat_feld[1]", 1, 9)
  if (dok_dat_feld[1] = "Simply Save")
  {
    call d3_server_api_error_log("Hook-Demo: Simply Save", 1, 9)

    d3server_field_no_allowed  [1] = ""
    d3server_value_char_allowed[1] = "File Storage Tool"
    d3server_date_1_array      [1] = ""
    d3server_value_num_allowed [1] = ""
    d3server_repos_id_allowed  [1] = repos_id
    d3server_field_no_allowed  [2] = ""
    d3server_value_char_allowed[2] = "Screenshot Creator"
    d3server_date_1_array      [2] = ""
    d3server_value_num_allowed [2] = ""
    d3server_repos_id_allowed  [2] = repos_id
  }
  else if (dok_dat_feld[1] = "Total Sources")
  {
    call d3_server_api_error_log("Hook-Demo: Total Sources", 1, 9)
    d3server_field_no_allowed  [1] = ""
    d3server_value_char_allowed[1] = "Total Sources Photo Editor"
    d3server_date_1_array      [1] = ""
    d3server_value_num_allowed [1] = ""
    d3server_repos_id_allowed  [1] = repos_id
    d3server_field_no_allowed  [2] = ""
    d3server_value_char_allowed[2] = "Total Sources Video Editor"
    d3server_date_1_array      [2] = ""
    d3server_value_num_allowed [2] = ""
    d3server_repos_id_allowed  [2] = repos_id
  }
  return 0
}Before developing your own hook functions you are urgently requested to attend a training at d.velop AG.
The lines 1-3 are comments and have no influence on the application behavior. Line 4 generates a log file entry in the logviewer. This row displays at program start of the d.3 server the entry “hook-demo: module loaded" in the logviewer. If you configured all settings correctly, then this entry should be displayed in the logviewer as soon as the d.3 server is started. In line 9, another logviewer entry is generated. The content of doc_field_1 will be displayed here. It is important to use the “:” before the name of the field. Otherwise the entry would display the text “doc_feld[1]” instead of the field content.
Now, in row 11 the content of doc_field_1 will be requested. In case of the term “Simply Save”, the rows 14 - 26 will be run through and in case of the term “Total Sources”, it will be the rows 30 - 44.
The command in line 15 has to be given for compatibility reasons. In row 16 the first entry of the dataset will be assigned. Because in our example we want to assign the dataset to a alphanumeric advanced properties, it is necessary to use the global list (array) d3server_value_char_allowed. In case of a date field, the array must be d3server_date_1_array, while it would be d3server_value_num_allowed for a numeric value. The date must be entered in the German notation “DD.MM.YYYY”.
Finally in row 19 the ID of the advanced property field will be assigned to a global array. This ID is passed on to the hook-function by the d.3 server during the function call (line 6).
Further literature on the topic of “hook-development" can be requested from d.velop AG.
The additionally available dynamic datasets include the users, user groups as well as already entered values (dynamic datasets) as selection options.
All users: You receive a list of all at runtime existing users of the d.3 repository.
All groups: Equivalently, all groups of the d.3 repository are listed by this assignment from the existing data.
All users/groups: All users and groups of the d.3 repository will be provided for selection as dataset.
All existing values: The database table is read and every existing value of the property field (of the selected document type) is shown.
This functionality had to be partially implemented using hook functions in previous versions.
From the database table, all values of the referenced document type are read, reduced to distinct occurrence and then displayed in alphabetical order.
The plausibility check for an advanced property field serves to test the validity of property values entered during the import process.
Let us suppose, a user wants to archive a document of the type “Invoice”. The document type contains an advanced propertiy called “Company” in which the user has to enter the company name from the respective invoice. At this place it is to prevent that the user enters names like “12345” as a company name. As a company name at first character a ["A" - "Z"] followed by ["a" - "ü] n times is admissible.
Without a plausibility check, the invoice would be stored under a wrong company name in the d.3 repository. A targeted retrieval of this document would therefore be almost impossible.
In the application d.3 import this plausibility check is automatically executed when importing. However, to optionally start the validation manually, select the function Validate input via the context menu, the link in the navigation panel or the button.
The plausibility check works in the automatic import processes like hostimp as well in the manual import procedures using d.3 import.
However, if the configuration parameter NO_ATTRIBUTE_CHECK_ON_BATCH is set to “Yes“, then no plausibility check is performed for the automatic import procedures. This parameter can be set in d.3 config.
As mentioned in the chapterDatasets, a hook function is a routine written in JPL, which is executed by the d.3 server. In the context of the plausibility check, hook functions can also be used. Within the hook function itself you can execute complex validation procedures. For example, you could check whether an entered value (such as the company name) exists in a specified database table Plausibility check).
Enter the name of the hook function in the settings of the advanced properties. The further procedure is similar to the one described in the chapter on datasets. As described there, you must create a text file with the names of the defined hook functions. Several hook functions can be entered in one file. Hence, you could also enter the program code of this function in the file hook_dataset.jpl (see chapter Assigning datasets from a d.3 hook function ). In addition to that, the file hook _dataset.jpl must be added to the list of loadable hook functions if not already done).
The check for a Minimum and Maximum only refers to numeric advanced property fields.
If the input of a numeric field has to be between 500 and 1000, you would enter 500 as the minimum value and 1000 as the maximum value.
Regular expressions are widely used in the Unix-environment to search and edit text. They serve to describe text patterns in a formal language.
In d.3, regular expressions are used to limit the entry of text in a property during the import to certain patterns. The following sections provide basic information on “single character patterns” and “multipliers” and are illustrated with examples.
Regular expressions only apply to alphanumeric fields in d.3. They cannot be used for numeric fields, date fields or currency (money) fields.
Further information about regular expressions can be found in UNIX reference literature or on the Internet. However, some expressions of the UNIX-specific dialects like anchors and braces will not work in d.3. Always check the new syntax with the test feature.
You can define the interpreter of the regular expressions (POSIX, PERL, JPL) in d.3 config. Thereby the allowed syntax can be significantly different.
The basic element of the regular expressions is the single-character-pattern. When you use a single-character-patterns as a regular expression in d.3 then no other character than the one specified in the single-character-pattern itself can be entered.
Regular Expression | User input |
|
|---|---|---|
A | A | |
A | B | |
A | Easy | |
Several characters or ranges can be combined to a set. The sets are entered in square brackets. A set in its entirety also serves as a single-character-pattern. This means, when using a set as a regular expression, the input is valid, if one of the characters in the set was entered.
Regular Expression | User input |
|
|---|---|---|
[abc] | b (lower-case) | |
[abc] | D | |
[0-9] | F | |
[0-9] | 7 | |
Vice versa you can enter a set of characters as set , that is not allowed in the property value. To do so, enter as first character “^” in the value bracket. Please note that regular expressions differentiate between upper- and lower-case characters!
Regular Expression | User input |
|
|---|---|---|
[^abc] | D | |
[^abc] | a (lower-case) | |
Finally, you can combine several single-character-patterns into a pattern. These patterns can also include sets. Ranges are validated against their ASCII value. Special characters like the German “Umlauts” or French accents have to be included in the pattern or they will not be accepted.
Regular Expression | User input |
|
|---|---|---|
[A-ZÄÖÜ][a-zäöü][a-zäöü][a-zäöü] | John | |
[A-ZÄÖÜ][a-zäöü][a-zäöü][a-zäöü] | Saw | |
[A-ZÄÖÜ][a-zäöü][a-zäöü][a-zäöü] | Administrator | (only exact four characters are allowed) |
[A-Z][a-z][a-z][a-z] | Saw | (ä is not allowed) |
The colon (.) is a special regular expression. It serves as a wildcard for any character except #013 (carriage return).
Regular Expression | User input |
|
|---|---|---|
[A-ZÄÖÜ].[0-9]. | BE13 | |
[A-ZÄÖÜ].[0-9]. | A999 | |
[A-ZÄÖÜ].[0-9]. | A1 | |
Multiplier characters designate how often a single-character-pattern can be entered:
Any number, including 0 times: | If a character should be permitted to be entered between 0 (not at all) and ? (as often as desired) times, you can add the * (Asterisk) to any single-character-pattern ("*") |
Exactly n time(s) | if a exact number (n) of characters should be entered append the characters \{n\} to the single-character-pattern and substitute the number for the n. |
at least n time(s) | if a character should be entered at least n times, append the characters \{n,\} to the single-character-pattern and substitute the number for the n. |
Between n and m times. | if a character should be entered between n and m times, append the characters \\{n,m\\} to the single-character-pattern and substitute the minimum number for the n and the maximum number for the m. |
If for interpretation of the regular expressions the "POSIX Extended Regular Expression Syntax” is used, leave the backslashes “\”.
Regular Expression | User input |
|
|---|---|---|
Alpha.* | Alpha.* | |
Alpha.* | Alphabet | |
Alpha.*c | Alphanumeric | |
x\{3\} | X | |
x\{3\} | xxx | |
Yes\4\}! | Yes! | |
Yes\4\}! | Yeeees! | |
Cancel\{2,3\}ation | Cancelation | |
Cancel\{2,3\}ation | Neighbour | |
The button Test can be used to check a sample entry against the regular expressions. Enter a string in the field and click on Test.
The validation of the regular expressions is executed in a JPL interpreter. This interpreter truncates all appended spaces from a value in a property field. That means, trailing spaces in a property field are deleted before the validation!
Use this function to display all advanced properties defined in the database together with their property fields in one table. To display the overview table, do the following:
Open the window Overview of advanced properties.
Right-click on any field.
Select the context menu entry Complete overview.
The assignments show which advanced properties were mapped to which database field. Duplicate mappings can also be recognized.
Use this function to display all advanced properties defined in the database together with their property fields in one table. To display the overview table, do the following:
Open the window Overview of fields.
Right-click on any field.
Select the context menu entry Complete overview.
The assignments show which advanced properties were mapped to which database field. Duplicate mappings can also be recognized.
The central characteristic for classification of documents in d.3 environment is the document type. All documents (e.g. a Microsoft Word document, an AutoCad drawing, a sound file, an executable file or a video clip in d.3) are assigned to a document type or dossier type when stored or created via the d.3 import or the Hostimport). For the end user, the document type is the most important criterion for searching for documents.
You must make sure, that you create document / dossier types, which match to your company. Use names which are familiar in your company.
You can define up to 2,000 document-/dossier types for the d.3 repository.
The overview of document types does not display the system document types. However, these are still available for the definition of document classes.
For the creation of a document- or dossier type, the following information must be entered. You are guided through the process in various dialogs.
You have to allocate further information besides the name for each document or dossier type.
For the user, the name of a document type is the most important property to differentiate between the document types. You will find this name in all d.3 applications.
The name or long name of a document type can have a maximum of 50 characters.
The name of a document type may contain all characters. The names of the document types must always be unique.
Changing the name of the document-/dossier type afterwards requires a user to re-login to the d.3 repository.
The user is signaled to do so with a blue exclamation mark overlayed over the d.3 icon in the notification area (systray). Alternatively the symbol is displayed in the result list.
d.3 smart explorer can not create the display in this case, because the structure of the new document type is not loaded.
Please note that the change of existing names can lead to problems. Problems always arise when processes use the name of a document/ dossier type in your d.3 environment for internal procedures. This is the case when using the product d.cold of d.velop AG.
The same applies for the module d.3 hostimp, which might be configured to use the name of the document or dossier type. The name can also be used in hook functions.
You should therefore always try to use the 5-digit short name of a document type for reference. In contrast to the document name, the short name will remain constant for the entire lifetime of a document type. The name of a document type, however, can easily be changed and translated.
The d.3 environment differentiates between document types and folder types.
The most significant difference is that dossiers can contain subordinate and superordinate documents.
In dossiers, usually no document is directly stored as they are only intended for the structured storage (as accustomed from paper archives).
The short name of a document-/dossier type is the unique identifier and the most important characteristic for processes and actions in the d.3 environment. The short name differentiates between lower- and upper-case characters. Hence, the two short names XFILE and Xfile designate two different types. The maximum length is five characters. The short name may only contain the following characters: "a..z", "A..Z", "0..9" and the minus character “-”.
Proposal for using a short name:
Use all five digits.
Use upper-case only.
Select “F” for a dossier type as first or last character, “D” for a document type.
As the short name is displayed in case of errors in the central protocol, this significantly helps you at troubleshooting.
The short name of a document/dossier type cannot be changed later. You must delete the document/dossier type and create a new one under the new name. In order to be able to remove a document/dossier type you must first delete the documents assigned to this type.
A change of the short name (Remove + Add) can lead to problems. Please note that processes in the d.3 environment might be using the short name for internal procedures. Among these processes are d.cold, the d.3 hostimp or hook functions.
The d.3 repository supports several secondary storage systems via d.ecs storage manager which is controlling them. The secondary storage is addressed via d.ecs storage manager. You can store the documents in individual "logical" archives on the secondary storage medium.
For example, the documents of the type "Deliverynote" are to be stored in one logical archive (such as "DA" for "Deliverynote Archive") while those of the document type "Invoice" are stored in another one (such as "IA" for "Invoice Archive"). For this effect, the repository ID is used.
You can enter a maximum of two characters for the repository ID. Upper- and lower-case characters are supported. Currently, the number of repository ID’s is limited to five. The allowed IDs will be adjusted at the d.3 config in the section document storage. There, select the parameter server_archive_id_array. These settings can also be accessed from the point d.3 Document Storage choosing the option Additional Server IDs.
The unique identifier of documents (document ID) is generated using the repository ID. If, for example, you choose the repository ID "IN", then a document ID could be "IN500000".
Even if you are not using secondary storage, you can assign an repository ID. This way you could classify the document types and prepare the system for a later use of a secondary storage system. Once installed, the documents could then be moved to the secondary storage using this existing classification.
If you are using different repository ID's you must configure d.ecs storage manager as well. A detailed description of the possible settings can be found in the manual on d.ecs storage manager. An adjustment is also necessary if you subsequently change a repository ID, otherwise the documents are not stored.
This setting is needed, if you want to use d.3 webpublisher by the d.velop AG .
This product enables the access to documents in the d.3 repository via the World Wide Web. The user does not have to authorize against the system here. There is therefore no query of the user name or password.
The software d.3 web publisher is not supplied with version 6.3 since it used the outdated technology of CGI scripts.
On opening the URL for d.3 webpublisher, all documents/dossier types which have been configured with the option Web published are displayed for search.
Within the web published document/dossier type, however, only those documents are displayed, which were previoulsy marked as published in d.3 smart explorer.
In order to publish documents in d.3 smart explorer, the file WebPub.DXP must be located in the working directory. If this file does not exist, you can either include it in the d.3 application distribution or manually copy it to the working directory. After copying the file manually, you must set its file property to “hidden” (command line call: attrib +h WebPub.DXP), to prevent a deletion with the next start of d.3 smart explorer.
Once the file exists in the directory you must restart d.3 smart explorer. Then, you can retrieve the documents to be web published in d.3 repository and choose Web published from the context-menu of the document.
Keep in mind that publishing is only possible for released documents.
If the menu entry Web published does not exist in d.3 smart explorer, then either d.3 smart explorer was not re-started or the file WebPub.DXP is not located in the d.3 smart explorer working directory.
If this option is active for a document or dossier type, the owner of a document assigned to this type is not permitted to verify a document himself (status Verification -> complete verification) even if he has the necessary rights. The editor is always the one holding the document in his processing while the owner is the user who stored the document in d.3 who created the release version in case of multiple versions.
This means, the editor (creator/modifier) of a document must be another person than the one verifying it.
The booking of documents is a special procedure of d.velop AG.
This procedure is used to create properties for a document, before the actual document is archived. In this procedure, the document is archived some time later (e.g. late capturing with barcode).
This procedure is used by d.3 import. If you change into the booking mode in d.3 import, only those document or folder types are displayed for selection, for which the option Book was set. Additionally, no document is stored whit a click on Book but only the attribute data are created in the d.3 repository.
Furthermore, a barcode cover page can be printed, which will be laid over the “analog” document at the clerk and afterwards it will be sent to the central scanning department. Using the barcode, the document is then mapped to the existing properties.
Please refer to the customizing manual for d.3 import to find out how the booking mode can be enabled.
During booking, an entry is made in the database table firmen_spezifisch when the properties (characteristic data) are created. By default, the entry in the database dok_dat_feld_88 is made. This default setting can be changed using the d.3 configuration. To do so, choose System settings > d.3 config > Import Settings > field number for barcode status the parameter BARCODE_STATUS_FIELD_NR.
When creating the attribute data, the value "0" (zero) is entered in this database column. This value specifies that no document exists for these property data yet. When the document (file) is imported at a later time, this entry is changed to the value "1" (one).
Since there may be a different retention requirement for each type of document, you assign the data for retention here. The default setting is for the retention period is 50 years.
For the GDPR-compliant planning or configuration of your d.3ecm system, however, it may be necessary to change this setting. You should therefore inform before creating document types with the requirements of GDPR so that you can set the correct retention periods. An ECM system like d.3ecm can only be set up or put into operation when the retention periods for the individual document types have been clearly defined and configured. A subsequent change of the retention periods on the secondary storage - after initial configuration and operation - is extremely costly or even impossible.
Please also check whether the desired settings for deleting documents/objects are set in d.3 admin under d.3 config. Please note the following settings:
„Logical“ Deletion of Expired Documents
„Physical“ Deletion of Expired Documents
Delete Documents from Secondary Storage
If a retention period other than eternal is specified for a file, the warning message appears: "To avoid unintentional, automatic removal of dossiers, the retention period of a dossier should always be “forever”."
Please note that the retention period can not be "0".
The lifetime is added as a value to the current date with every new version of a document and written as the retention period in the database.
You can define for each document type, if you want to use the Eventless deletion (previous default setting) or the Event-based deletion.
You can now define for event-independent deletion when the lifetime should begin.
By default, the lifetime will be specified from the import date, that means the count of months will be added to the import date and sets the retention period.
The lifetime can also be projected by the end of the selected month to comply with special requirements, e.g. the end of the quarter oder fiscal year.
This option specifies that the document/dossier types are to be written to the secondary storage system to store them in an audit-proof manner. Only the documents in the d.3 status "Release" and "Archive" are written to the secondary storage.
This setting does not effect the automatic storage of documents by itself. Additionally, you need to set the parameter AUTO_DOCS_ON_SEC_STORAGE to "Yes" in the d.3 configuration. This setting can be found under the section Secondary storage. Please also check the other settings for addressing the secondary memory. Furthermore you have to have installed and configured the product d.ecs storage manager. A jukebox with a jukebox controller is supported.
If you enable the secondary storage for a document type and also apply the settings in the d.3 configuration but no secondary storage exists, then a copy of the document is written to the cache directories for the status "Release" and "Archive", but is not deleted automatically due to the "missing" receipt.
The components d.3 async and d.ecs storage manager must work correctly for the outsourcing of documents to run smoothly.
If the option Write to secondary storage is configured for a document type and you perform a status transfer (e.g. in d.3 smart explorer with a right-click and selection of Status transfer > Release, then the document is persistently written to the secondary storage.
If the event-based deletion is selected, then the retention period is determined via a defined event such as a product cancellation.
For more information see chapter Retention periods and deletion.
The actual deletion requires additional parameters in the d.3 configuration to be set (see d.3 Asynchronous processing).
If a document is transferred into the status "Release" or the status "Archive", either directly by creating the document with d.3 hostimp into the status "Release" or manually in d.3 smart explorer, then the document is copied to the Jukebox exchange directory on the d.3 file server, as the settings for the option Write to secondary storage were applied.
If the document was copied suscecssfully to the secondary storage system, then the document remains on the file server for the specified time.
If a deleted document is requested by a user, it is transferred from the secondary storage to the d.3 file server again. On the file server this document can be found in the exchange directory Jukebox. There, the document will be provided until d.3 gateway deletes it again. The detailed settings for the deletion of the documents in the Jukebox directory can be found in the manuals for d.3 gateway and d.ecs storage manager by d.velop AG.
The retention period in cache in days does not affect this deletion in the Jukebox directory.
The components d.3 async and d.ecs storage manager must work correctly for the outsourcing of documents to run smoothly.
Furthermore, a correctly configured d.3 gateway is needed for the retrieval.
If the free hard disk capacity on the d.3 file server becomes too low, documents already written to the secondary storage system ("burned") will be deleted from the hard disk in any case, regardless of the setting Cache retention time, if this was done with the option Allow removal in case of lack of storage space.
From d.3 version 6.3 you can determine to prevent documents from being deleted from the cache at all (cache retention time: forever). However, this entry has to be used with care. It should only be applied to document types with low data load. Therefore, you also receive a warning message.
The cache retention time cannot be "0" anymore.
You can define a color marking for the document type by clicking on Add or by performing a double-click in the clear zone.
A window “Color marking” opens, which displays the color palette and provides a text field for a description and language selection.
|
Select the desired color from the color palette.
Optionally, enter a descriptive text.
Change the language, if needed.
Confirm your color marking with OK.
Color markings are some type of customizable feature for flagging documents as each company can internally define the meaning of the colors. Similar to real-world dossiers (populated with pages made of paper) you can now add a kind of sticker in a specific color to a document.
There are 24 colors available. It is recommended, e.g. to define a number of colors as signals for specific company-wide or departmental processes and to leave a number of colors for individual purposes for d.3 users. For example, a certain color means that a document needs revision, needs verification before printing, or is part of a specific workflow step.
Furthermore you as a d.3 administrator can also define for each category (document type or dossier type) each color a text, that is displayed to the users, if they show the mouse pointer on it.
The text will only be displayed, if you assign the color to a document or a dossier in a certain category. The same color can also have another text in another category.
Every document- or dossier type is assigned to between 1 and 89 advanced properties. These assigned advanced properties are filled with the properties for the documents of this document or dossier type during the d.3 import. If you later add documents to the d.3 repository, either in dialog or in batch mode, these properties are filled with values. When searching for documents, you can explicitly search for these values.
You can allocate maximum the following properties to each document type:
49 alpha-numeric properties
10 date properties
10 money properties
10 numeric properties
10 multi-value properties
If you subsequently change the assignment of the extended properties, it is necessary for users to log on to the system again.
The retroactive change of this assignment does not result in a loss of this information, even if a large number of documents have already been imported with a different mapping. If you restore the previous assignment, all previously entered properties are displayed again in d.3 smart explorer.
The dialog advanced properties allows to assign the advanced properties to the document type.
To do so choose property von der rechten Seite aus Available advanced properties.
Add to the document type on the left side (< Add, << Add All).
If you want to remove an advanced property, proceed as follows:
Select it on the left under Selected advanced properties.
Click on Individually > or All >>.
In order to influence the displayed order of columns in the result list in d.3 smart explorer or of the fields in the property dialog for a search or import, proceed as follows:
Mark a field entry in the list.
Move this entry as you want with a click on the buttons.
You can simply change the position by drag & drop, "picking" a row with der left mouse button and drawing it to the corresponding position.
Please note that the manual repositioning of columns by the user in d.3 smart explorer might override these defaults. In d.3 smart explorer however it is also allowed to restore the default positions under View | Reset column arrangement .
PropertiesThe following context menu options are available when selecting the property:
Usage
Modifiable Yes/No
Hideable property
There are no problems if you change the display positions subsequently. However, it is necessary for users to log on to the d.3 applicationanmelden.
A retroactive change of the database position is no longer supported by d.3 version 7 in a new created d.3 repository.
To get an overview of the properties in the dialogs Overview of document types, Advanced properties and Positions of advanced properties , open the context menu and select the option Properties.
In this window you can find information on the selected property.
Click on the buttons < Back or Next >, to navigate to the other properties of this list.
To get an overview of the document types and classes which use the property field, open the context menu and select the option Usage.
In this window you can find information on the usage of the selected property field.
Click on the buttons < Back or Next >, to navigate to the other properties of this list.
To change the property, mark an entry in the positions of the advanced properties and click on the button Properties.
Alternatively: Open the dialog Properties by double-clicking.
This opens the editing dialog.
From the d.3 version 7 a retroactive change of the database position is not possible. For an update to version 7 it is considered, that this was possible in older versions.
The following explanatory notes ONLY apply to d.3 repositories, that were created by an version older than 7.
Alphanumeric fields 1 to 49This option changes the database position of the property field.
When changing the database position you must take account of the requirements for property:
Date fields 50 to 59
Multi value-fields 60 to 69
money fields 70 to 79
numeric fields from 80 to 89.
A retroactive change of the database position can be forbidden via a server parameter! Thus, all positions should be worked out and defined meticulously in the planning phase!
If the parameter Mandatory is set on “Yes”, then the field has to be filled by import (manually oder hostimport) of the document. If the field is still empty at the storage of documents, an error message will be produced.
Hidden fields should never be made mandatory at the same time since the import of such a document might then fail!
If this option is set on “Yes” (standard), then the property value can be edited after the import of the document. Else the change will not be applied.
If the property is thus defined for a document type as "protected" property, then its value can only be edited by an eligible user.
Title fields are used to improve the display of document properties in d.3 smart explorer.
If you open a document in d.3 smart explorer and select the context menu option Display Links, then you would usually see the document ID together with the name of the document type, e.g. "T000065565 Supplier Invoice".
If you want to use more descriptive identifiers, then you can choose one or multiple title fields. d.3 version 7.2 allows you to define different d.3 system fields as title fields.
This function allows you to prepare the properties in a document type for later hiding.
Via the rights management of document classes or profiles you can show the hidden property again.
This function is also available in the context menu > Hideable property or via the Properties dialog.
If a property is marked as hideable, then the icon in the overview is transparent:
In the overview of document types you can see that one property is marked as hideable:
As you can see in the illustration, the column Hideable must feature a "Yes" for a property to be hidden later, else the column contains "No".
By default, the value Hideable is set to "No" for all properties.
If you hide a mandatory field, then the users cannot fill this field with "content" on import and the user will receive an error message!
Never hide properties which are also marked as mandatory fields!
To display hidden properties for individual users again, you must grant the right Read hidden properties and if necessary, Edit hidden properties.
Please also note the option to hide individual fields only for d.3 import or d.3 smart explorer.
By default, hidden properties (hideable) will not be sent to d.3 search. You have to enable this explicit with the parameter DSEARCH_ADD_HIDDEN_ATTR.
This parameter must be set manually into the d3addon.ini of the repository.
DSEARCH_ADD_HIDDEN_ATTR=1
After changing this, you must restart all d.3 processes (d.3 hostimp, d.3 async and d.3 server) for this respective repository to enable the settings.
The tab Extended allows settings for the conversion and display in d.3 import and the result list or the search form of d.3 smart explorer.
For each property, you can decide whether the values are to be displayed in upper-case, lower-case or in the original.
For category specific property fields in d.3 import or in d.3 smart explorer (search and result list), you can determine the display option in the section Visible in. If you disable an option, the property is no longer displayed in the feature.
Please note that this setting is not equivalent to the global configuration via the property Visible inHideable in connection with the class-based but only supplements it.
If you disable the visibility for a property, a user can still display the property again. The property is still displayed in d.3 smart explorer under Result list > Arrange columns in Available columns.
If you enable Hideable for a property, the user cannot display the property. The setting Hideable then affects d.3 import as well as d.3 smart explorer with its advanced search and result list.
Perform a search for the document type (category). In d.3 smart explorer, the d.3 users can display a property, which you have disabled under Visible in by doing as follows:
Select the context action Result list and then Arrange columns.
Under Available columns choose the properties which you want to display in the result list.
You can also preset the display of the results list for document types.
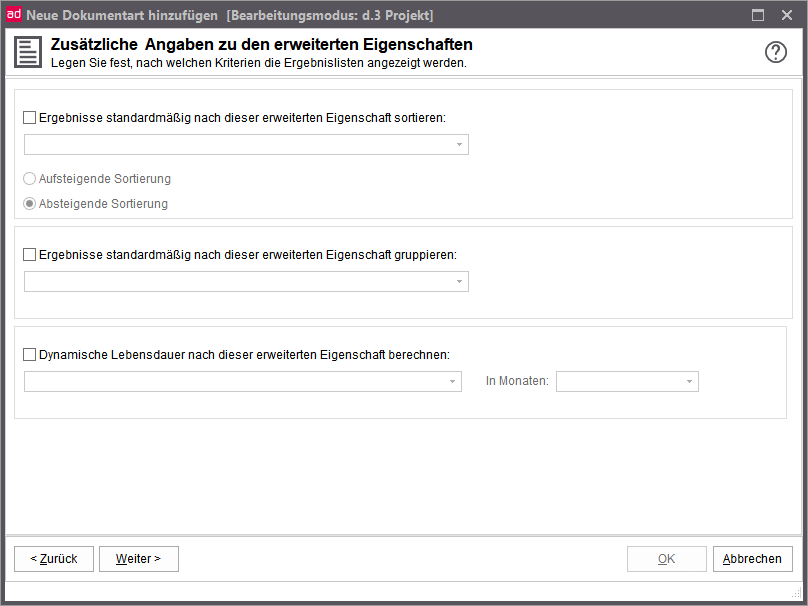 |
By default, sort results by this advanced property:
This default setting can be "overwritten" in d.3 smart explorer via the user action.
By default, results are grouped by this advanced property
Also this setting is only a default setting and can be changed in d.3 smart explorer in each result list.
Calculate dynamic time to live by this advanced property: This setting allows you to specify that a document of this document type receives a calculated deletion date based on a date in the advanced property (Date fields only). The entry at "In months" indicates when the document should be deleted depending on the value of the advanced property. Besides the selection, free entries are also possible. Negative values and "0" are not allowed. If a value in the past is entered in the advanced property, the document will still not be deleted for a month.
The multi-lingual properties include the names of the document types, the advanced properties, the group names and the values of static datasets. These names should always be translated, if you intend to support several languages in your d.3 repository.
Let us suppose you usually operate your d.3 system in English and German. If you want to provide your users with more languages, then the product d.3 national must be installed, e.g. for the language Dutch.
To display the property names, document type names or the group names e.g. in Dutch, enter the tanslations in this dialog.
Currently, the default languages German and English are supported in d.3 admin without any further installation.
To add a language such as Spanish, do the following:
Click the button Add language. A new dialog window is opened.
Select the respective language.
Click OK.
To remove a language, click the button Remove language. The languages English and German are not removable. For all further languages, an entry is created in the file d3admin.ini in the configuration directory of the repository.
Do NOT edit the d3admin.ini manually because it will be written by the server from d.3 version 8! Immediately changes of the file will be lead to discrepancies of d.3 admin and the transport system.
Once you added all desired languages you can start your translation.
To do so, either select
Document types
Repository fields
Activity profiles
or
Datasets
Depending on the selection a window is displayed where you can enter the desired translations.
For example, to translate the name of a document type, simply choose the button Document types.
Afterwards, you can translate every name with a double-click on the respective row.
When translating the user groups, the respective types are again represented by the icons.
Group without mailbox-distribution
Group with mailbox-distribution
Members of a group with workload balancing
Organizational unit
In the same way you can translate the advanced properties and the group names.
For this effect, choose the pages with the buttons.
To return to the start window for the translation of the multi-language properties select the option Information.
To translate the static datasets, do the following:
Choose the dataset first.
Translate into the selected language.
In contrast to the translation of repository fields and document types, the translation is not stored before you confirm it with a click on the button Apply.
With Delete Changes you can clear all changes not yet applied.
Please note that the advanced property fields accessing a dataset are always stored in the database under the ID. The translations are only determined for the search and for display.
However, you can also translate the static dataset IDs into the respective target language (see Manually created datasets).
You can find detailled information on the dossier generation in the manual for d.3 admin folder scheme.
For the configuration of d.3 explorer folder browsers read the respective manual.
To facilitate the storage of multiple documents for the users, it can be enabled that the documents to be stored can be dragged and dropped onto the “target dossier" (d.3 smart start or d.3 smart explorer). Afterwards, all documents are stored in the d.3 repository without any further user interaction. A progress bar informs the user about the running import.
If mandatory fields are defined in the storage document type, which cannot be filled from the properties of the dossier, then the d.3 import application is displayed. All changes applied here are then valid for all further documents to be stored.
If the user has no write access to the specified document type, he receives an according error message and can change the properties to allow a storage. These properties are then valid for all other documents to be stored.
This functionality requires a set of rules which are configured in this plugin.
This set of rules basically describes the following:
If documents are dragged on the dossier of a dossier type listed here, then store the document into the assigned document type with the properties of the dossier.
Rules are defined in the following dialog.
To create a new mapping, click on New.
Select the dossier for which you want to define a mapping rule in the upper selection.
Choose the document type later to adopt the properties of the dossier in the lower dropdown list.
If you defined several mappings, then you can manage them with the respective buttons.
For this effect, select the mapping.
Click on the required button.
Remove: Remove mapping (without confirmation!)
Edit: Map a different document type
Close: Close application
Do not forget to save your configuration with OK.