cloud center API
Introduction
In this topic you will find general information about the cloud center API, the range of functions as well as the skills that are useful when using the API functions.
Range of functions of d.velop cloud center
The d.velop cloud center is the self-service user interface for the d.velop cloud. App builders can register and manage their apps here, allowing end users to purchase them for their d.velop cloud.
Technical background information
The cloud center is a tool that communicates with your app over the Internet. As an app builder you therefore should be familiar with the following web technologies:
- HTTPS
- RESTful
- JSON
For secure communication between the cloud center and your app, you should know the hash function SHA256 and the authentication code HMAC.
In the following chapters you will find out more about the App Secret and the signature process. The App Secret and the signature process ensure that the communication between your app and the cloud center is secure.
App Secret basics
The App Secret consists of randomly created bytes which have been converted into a Base64 string. Before you can use the App Secret, you need to convert (decode) the Base64 string into bytes. Many programming languages have libraries that will do the converting for you.
The App Secret is used to secure the communication between the tenant and your app (see Tenant Header). In addition, it is also used to secure the events that have been sent by the cloud center.
After creating the app in the cloud center, you can see the App Secret as a Base64 string in plain text on the editing page of your app under Technical Details. You should start by copying the App Secret and placing it in your app. After the first modification, your App Secret will only be displayed in encrypted form. In case you have forgotten to copy the App Secret, you can have a new App Secret created under Technical Details at any time. To do so, switch to the editing mode and select the button Generate new App Secret. You can have a new App Secret created in the following dialog. Copy the App Secret and place it in your app, otherwise your app will not be reachable.
Signature process basics
To ensure that an incoming request originates from the d.velop cloud center, you need to check the validity of the signature in your app. To do so, you use the same process to create the signature based on the App Secret, which is known only to you and the d.velop cloud center. If your calculated signature matches that from the request, you can be sure that the request was sent by the d.velop cloud center.
Header request
The following headers must be supplied to your app during the request by the cloud center:
- Authorization: Bearer token with the calculated signature in hexadecimal format.
- x-dv-signature-headers: Comma-separated list (without blank spaces) of all header names used for the signature in lowercase letters. The list also contains the proprietary header name.
- x-dv-signature-algorithm: Algorithm used for the signature. Currently, this is DV1-HMAC-SHA256.
- x-dv-signature-timestamp: Timestamp with UTC time as per ISO 8601 (format: "yyyy-MM-ddTHH:mm:ssZ", e.g.: 2019-08-23T08:49:42Z).
Implementing the signature process
Below you will find an example telling you more about the steps required in the signature process.
App Secret used:
Rg9iJXX0Jkun9u4Rp6no8HTNEdHlfX9aZYbFJ9b6YdQ=
Sample name of your app:
myapp
Payload/request body used:
{"type":"subscribe","tenantId":"id","baseUri":"https://someone.d-velop.cloud"}\n
Please note the appended "\n". Some parsers cut the new line from the output which will result in a different hash value.
Timestamp used:
2019-08-09T08:49:42Z
Sorting and normalizing the headers
All headers listed under x-dv-signature-headers are sorted alphabetically. For further processing, the headers are strung together according to the following pattern:
Schema:
    Lowercase(header1) + ":" + Trim(value1) + "\n" +
    Lowercase(header2) + ":" + Trim(value2) + "\n" +
    ...
    Lowercase(headerN) + ":" + Trim(valueN) + "\n"
Example
"x-dv-signature-algorithm:DV1-HMAC-SHA256\nx-dv-signature-headers:x-dv-signature-algorithm,x-dv-signature-headers,x-dv-signature-timestamp\nx-dv-signature-timestamp:2019-08-09T08:49:42Z\n"
Normalizing the request
In this step the parts of the request are listed in normalized form, separated by line breaks. A SHA256 hash of the payload will be appended aswell. You can find further information about generating hash values in the next paragraph.
Schema:
    HTTP-Verb            + "\n" +   // GET, PUT, POST...
    Pfad der Resource    + "\n" +   // With leading slash
    Querystring          + "\n" +   // Without ?, urlencoded
    Headers              + "\n" +   // Normalized header string
    SHA256(Payload)                 // SHA256-Hash of request body as hex value
Example
"POST\n/myapp/dvelop-cloud-lifecycle-event\n\nx-dv-signature-algorithm:DV1-HMAC-SHA256\nx-dv-signature-headers:x-dv-signature-algorithm,x-dv-signature-headers,x-dv-signature-timestamp\nx-dv-signature-timestamp:2019-08-09T08:49:42Z\n\nc2a6fefc93b809eeaf2f069504fe8e02b0f3341b3c5e488e6a402ca45301415c"
Creating a hash value in hexadecimal format
Use the hash algorithm SHA256 and the library of the respective programming language to create the hash values. To create the hash value, calculate an SH256 hash from the normalized request string first. The hash is then converted into a hexadecimal value with lowercase letters.
Example
fcecaac3dae4d40d6f2a065678f59f4794dfbe8497fe9ca825f737299887ebf4
Calculating the signature
The calculated hexadecimal request string and the App Secret are now used to calculate a checksum by means of the HMAC SHA256 procedure. The result is again converted into a hexadecimal value with lowercase letters.
The App Secret is Base64 encoded and has to be decoded before use.
Example
02783453441665bf27aa465cbbac9b98507ae94c54b6be2b1882fe9a05ec104c
Verifying the signature
The signature verification consists of two parts. You can use the timestamp in the header x-dv-signature-timestamp to check whether the request is a current one. The timestamp refers to the UTC time the request was sent to your app. To compensate for time differences between servers, requests are valid for the period of 5 minutes before and 5 minutes after the indicated timestamp. If the indicated time falls outside of the time window, the signature is to be considered invalid and the request needs to be rejected with the HTTP status "403 Forbidden". The app now calculates a comparison signature using the described signature process. If the calculated signature does not match the hexadecimal value from the authorization header, the request likewise needs to be rejected with the HTTP status "403 Forbidden".
Remove the word "Bearer" prior to the comparison to obtain the purely hexadecimal value.
Using the API functions
The cloud center provides an API which you can use to view various information, such as when your app was purchased.
App lifecycle event basics
To let you know when your app was purchased by a customer, for example, the cloud center issues four event types (subscribe, unsubscribe, resubscribe and purge), which are described below. You can find out how to receive and process these events in chapter "Receiving events".
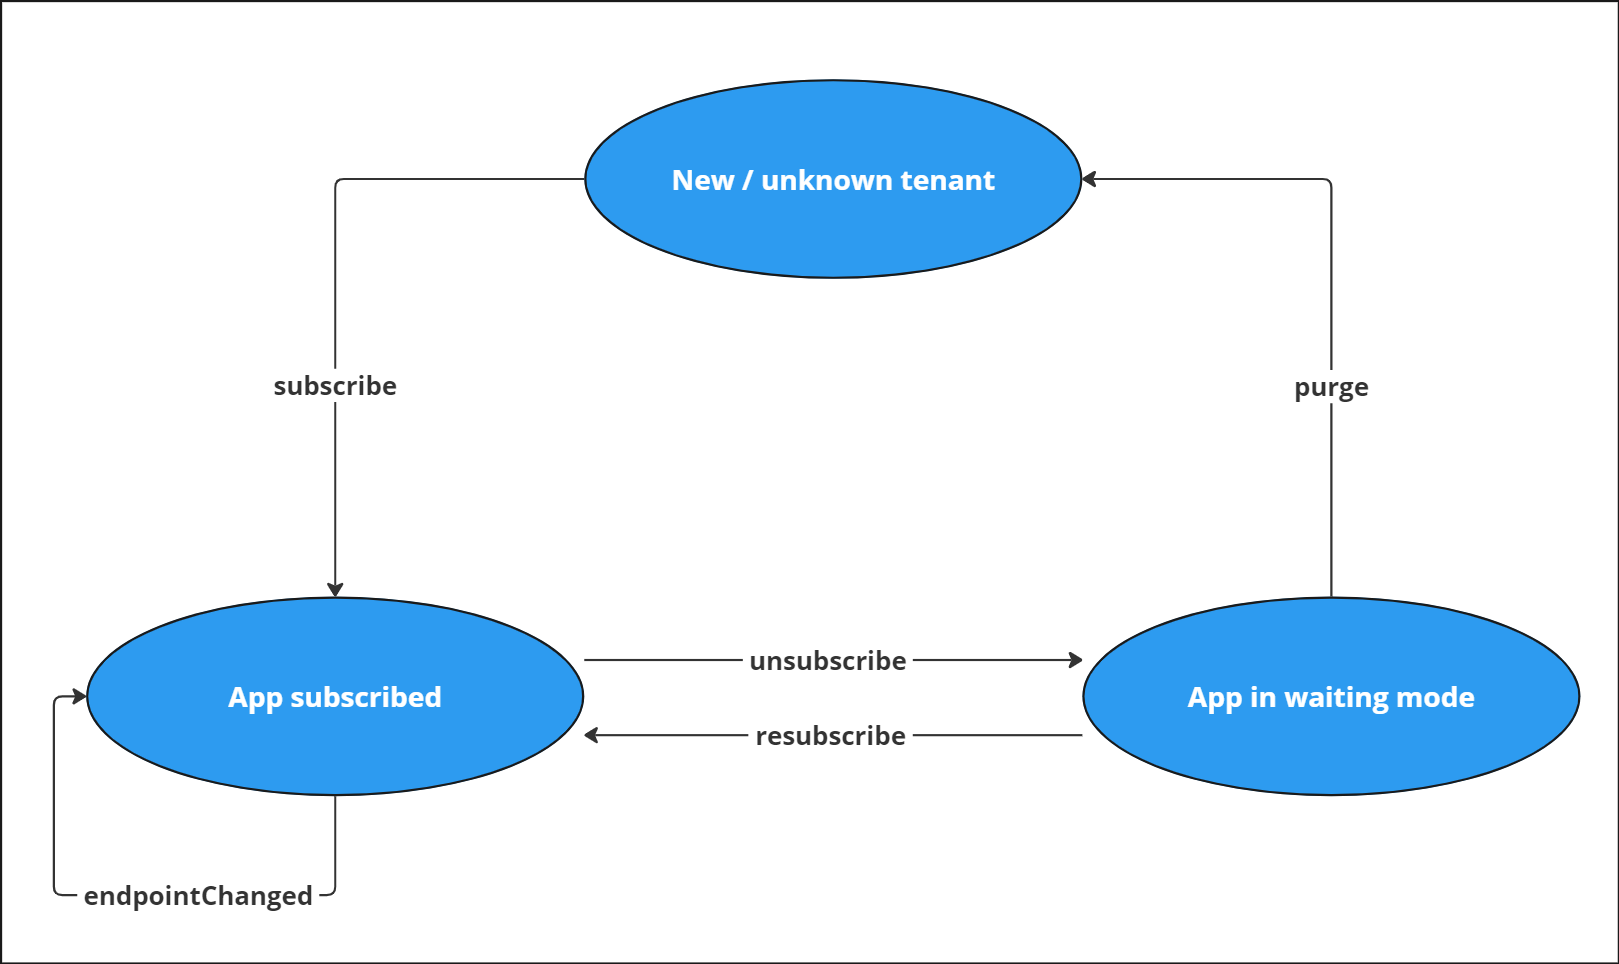
In some cases an event will be sent to your app multiple times, e.g. when a customer purchases an app which is dependent on your app. For this reason, you always need to check first whether you have already received the event. If you have not received the event yet, you need to treat it according to the event type.
Event type "subscribe"
You will receive this event as soon as a customer purchases your app. Depending on the function of your app, initializing your app will be necessary. For instance if you need to store customer-specific information in your database.
Event type "endpointChanged"
You will receive the endpointChanged-event as soon as a customer change the endpoint your app in his d.velop-Cloud. The Event will be send only to new endpoint.
Event type "unsubscribe"
You will receive the unsubscribe event when the customer does not want to use your app anymore and discontinues it. Initially, this is merely a notice to you stating that the customer no longer uses your app. As soon as the unsubscribe event has been sent, your app will no longer be available in the customer’s d.velop cloud. The customer therefore cannot interact with your app anymore. It is imperative that you do not delete the customer’s data (see: event type purge).
Event type "resubscribe"
You will receive the resubscribe event when a customer reconsiders his/her decision after discontinuing your app and would like to continue using it.
Event type "purge"
After a customer has discontinued the app and the grace period has elapsed, your app will receive the purge event. This approach protects the customer against premature deletion of his/her data after discontinuing the app. You need to delete all data of the customer as soon as you receive this event. The event will tell you which data you need to delete.
Receiving events
In this section you will find information about the prerequisites for receiving events.
HTTP request
Your app must provide a resource called "dvelop-cloud-lifecycle-event".
The request by the cloud center looks as follows:
    POST  https://myapp1.example.com/myapp1/dvelop-cloud-lifecycle-event
    Content-Type: application/json
Event body
The request by the cloud center contains the following body in the form of a JSON document.
- "type": Contains the respective event type. Your app needs to perform the corresponding actions depending on which type was sent.
- "tenantId": This is the unique identification number of the customer’s d.velop cloud.
- "baseUri": The customer’s d.velop cloud can be reached at this address. The baseUri is always supplied in absolute form and without a slash at the end.
Example
{
    "type": "subscribe",
    "tenantId": "xyz",
    "baseUri": "https://mandant.d-velop.cloud"
}
Validating the events
The request is secured by the described signature mechanism to assure you that the request is really coming from the cloud center. As soon as you receive an event, you need to check whether the request has been properly signed (see Signature process basics).
Dependencies to other Apps
An app can be dependent on other apps. When a customer subscribes to an app, it is ensured that all dependencies are either already subscribed or will be subscribed in the process automatically.
Dependencies are provided for the following use cases.
- Bundle – You want to provide several apps at the same time, e.g. to sell them to customers as a product variant. To do this, you create an app that itself has no functions. There you can add all the apps that you want to deploy at the same time as dependencies. Since the app itself has no functions, you can leave the setting for the permission level on the dependencies at the default value "None".
- Technical Dependencies – You want to use an API endpoint of another app, e.g. to retrieve documents from the DMS app. To do this, add the app that provides the API endpoint as a dependency. In order to use the API endpoint, you have to set the permission level of the dependency accordingly (see Permission Levels).
Permission levels
Authorization levels control the type of access to the dependency. The least privilege principle should be followed here.
| Permission level | Explanation |
|---|---|
| None | All API calls from your app to the dependency will be blocked. |
| Read | Only read operations from your app to the dependency are allowed. Allowed HTTP-Methods are: GET, OPTIONS, HEAD. |
| Read and write | Read and write operations allowed from your app to the dependency. Additional to reading HTTP-Methods are following HTTP-Methods allowed: POST, PUT, PATCH, DELETE. |
Usage
To add a dependency to your app, you must first navigate to your app via your provider account. On the app edit page, navigate to the "Dependencies" section. Here you can add more dependencies. By editing a dependency you can adjust the access permission of your app to the dependency or remove the dependency.
Adding, removing, and changing a dependency are only possible as long as your app is not yet released. Once your app has gone through the approval process and your app is approved, no more changes to the dependencies are possible. If a change is required, please contact your responsible Solutions Architect at d.velop AG.
Automatic Subscription
At the dependency there is a property for automatic subscription. If the property is active, the dependency is automatically subscribed when you subscribe your app. When you add a new dependency, the automatic subscription is not active. You can change the behavior in the edit dialog of the dependency. If you activate this property afterwards, the dependency will be subscribed in all tenants of your app when you click save. If you deactivate the property afterwards no cancellation of the changed dependency will take place in the tenants of your app.
Tenant Information
You can receive information about the tenant from within the tenant via the _self-route. The result will contain basic information about the tenant as well as its subscribed apps, the apps dependencies and their access permissions.
GET /center/t/_self

Accept: application/json OR application/hal+json
Example:
https://example.d-velop.cloud/center/t/_self
Objects and Properties
Tenant Object
| Properties | Type | Explanation |
|---|---|---|
| id | string | The ID of the tenant |
| name | string | The name of the tenant |
| domainName | string | The subdomain of the tenant |
| fullQualifiedDomain | string | The full domain of the tenant |
| organizationId | string | The ID of the tenants overlying organization |
| apps | object | A list of apps the tenant has subscribed |
| overwrites | object | A list of app overwrites for hybrid clouds |
App Object
| Properties | Type | Explanation |
|---|---|---|
| name | string | The apps name, acts as ID |
| displayName | string | The apps name in user interfaces |
| dependencies | array:string | An array of app names / IDs from which the app is dependent |
| acl | object | Holds information about which permissions other apps have over this app |
ACL Object
| Properties | Type | Explanation |
|---|---|---|
| readonly | array:string | A list of app names which can read data from the app |
| full | array:string | A list of app names which can read and write the apps data |
Overwrites Object
| Properties | Type | Explanation |
|---|---|---|
| appName | string | The name of the app that will be overwritten |
| endpoint | string | The endpoint of the overwriting service |
| host | string | The host of the overwriting service |
Result:
HTTP-Status: 200

{
    "tenant": {
        "id": "xyz",
        "name": "Example Tenant",
        "domainName": "example",
        "fullQualifiedDomain": "example.d-velop.cloud",
        "administrators": [
            "tenantadmin",
            "example@mail.com"
        ],
        "created": "2020-11-11T11:11:14.987654321Z",
        "updated": "2021-09-30T12:00:21.123456789Z",
        "organizationId": "abc123xyz",
        "apps": {
            "basis": {
                "name": "basis",
                "displayName": "d.velop cloud platform base",
                "dependencies": [
                    "config",
                    "home"
                ],
                "acl": {
                    "readonly": [
                        "config",
                        "home"
                    ],
                    "full": null
                }
            },
            "config": {
                "name": "config",
                "displayName": "config",
                "dependencies": null,
                "acl": {
                    "readonly": null,
                    "full": null
                }
            },
            "home": {
                "name": "home",
                "displayName": "home",
                "dependencies": null,
                "acl": {
                    "readonly": null,
                    "full": null
                }
            }
        },
        "overwrites": {}
    }
}