About d.velop process
Open Documentation Menu
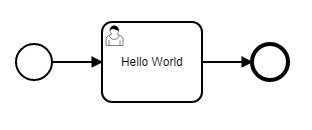
Creating a sample process in a BPMN file
When getting started with the modeling of your own processes, it is useful to create a simple process as an example first. Prerequisite for the modeling of your own processes are a set user roles. In addition, you need a text or BPMN editor with XML view and a tool to call a REST API.
A simple process will look like this:
 |
To model your own process, first create the following basic structure in your BPMN file:
<?xml version="1.0" encoding="UTF-8"?>
<definitions xmlns="http://www.omg.org/spec/BPMN/20100524/MODEL" xmlns:camunda="http://camunda.org/schema/1.0/bpmn" targetNamespace="" exporter="d.velop process modeler">
  <process>
    <startEvent />
    <sequenceFlow />
    <userTask />
    <sequenceFlow />
    <endEvent />
  </process>
</definitions>
To this basic structure, add the individual process items.
Adding the process item
The BPMN item process encapsulates the entire process. Add the properties id, name and isExcecutable to the BPMN item.
<process id="hello_world_process" name="Hello World Process" isExecutable="true">
Explanation of the properties
id: This property is used as a unique identifier for the process.
name: This property is used as a display name in the user interfaces.
isExecutable: This property must contain the value true to enable the process to be started.
Adding a start and end event
The BPMN items startEvent and endEvent are used as markings which indicate where the process begins and where it ends. Add the property id to the respective BPMN items.
<startEvent id="start" />
<endEvent id="end" />
Adding a user activity
The BPMN item userTask stands for a user activity in the process. When this activity is entered, one or more users are assigned a task. Add the properties id, name, and camunda:candidateUsers to the BPMN item.
<userTask id="task_hello_world" name="Hello World" camunda:candidateUsers="${variables.get('dv_initiator')}" /> Explanation of the properties
id: This property serves as an identifier of the activity in the BPMN model and is used for the connection by means of sequence flows.
name: This property is added as a subject to the task.
camunda:candidateUsers: This property refers to the person who is to process the task. In the BPMN file, the expression ${variables.get("dv_initiator")} uses a variable. The variable dv_initiator always refers to the person who has started the process. The task is therefore always assigned to the person starting the process.
Adding sequence flows
Connect the individual process items to create a sequence. To connect the process items, use the BPMN item sequenceFlow. Add the properties id, sourceRef and targetRef to the BPMN item.
The sample configuration in the BPMN file shows how you connect the start event to the user activity and link the user activity with the end event:
<sequenceFlow id="s1" sourceRef="start" targetRef="task_hello_world" />
<sequenceFlow id="s2" sourceRef="task_hello_world" targetRef="end" />
Explanation of the properties
id: This property is a unique identifier for the sequence flow within the BPMN model.
sourceRef: This property refers to the starting point of the sequence flow.
targetRef: This property refers to the target of the sequence flow. In this property you enter the identifiers of the items to be connected.
After you have added the individual process items, the BPMN file will look as follows:
<?xml version="1.0" encoding="UTF-8"?>
<definitions xmlns="http://www.omg.org/spec/BPMN/20100524/MODEL" xmlns:camunda="http://camunda.org/schema/1.0/bpmn" targetNamespace="" exporter="d.velop process modeler">
  <process id="hello_world_process" name="Hello World Process" isExecutable="true">
    <startEvent id="start" />
    <sequenceFlow id="s1" sourceRef="start" targetRef="task_hello_world" />
        <userTask id="task_hello_world" name="Hello World" camunda:candidateUsers="${variables.get('dv_initiator')}" />
    <sequenceFlow id="s2" sourceRef="task_hello_world" targetRef="end" />
    <endEvent id="end" />
  </process>
</definitions>
Adding graphic information
If you want to view your created process in a diagram, you can add graphic information to the BPMN file. This graphic information defines the size of the diagram and the position of the individual items. You add the graphic information by means of the BPMN item bmpndi:BPMNDiagram.
<?xml version="1.0" encoding="UTF-8"?>
<definitions xmlns="http://www.omg.org/spec/BPMN/20100524/MODEL" xmlns:camunda="http://camunda.org/schema/1.0/bpmn" xmlns:bpmndi="http://www.omg.org/spec/BPMN/20100524/DI" xmlns:di="http://www.omg.org/spec/DD/20100524/DI" xmlns:dc="http://www.omg.org/spec/DD/20100524/DC" targetNamespace="" exporter="d.velop process modeler">
  <process id="hello_world_process" name="Hello World Process" isExecutable="true">
    <startEvent id="start" />
    <sequenceFlow id="s1" sourceRef="start" targetRef="task_hello_world" />
    <userTask id="task_hello_world" name="Hello World" camunda:candidateUsers="${variables.get('dv_initiator')}" />
    <sequenceFlow id="s2" sourceRef="task_hello_world" targetRef="end" />
    <endEvent id="end" />
  </process>

  <!-- Diagram information -->
  <bpmndi:BPMNDiagram id="BPMNDiagram_1">
    <bpmndi:BPMNPlane id="BPMNPlane" bpmnElement="hello_world_process">
      <bpmndi:BPMNShape id="start_di" bpmnElement="start">
        <dc:Bounds x="173" y="102" width="36" height="36" />
      </bpmndi:BPMNShape>
      <bpmndi:BPMNEdge id="s1_di" bpmnElement="s1">
        <di:waypoint x="209" y="120" />
        <di:waypoint x="259" y="120" />
      </bpmndi:BPMNEdge>
      <bpmndi:BPMNShape id="task_hello_world_di" bpmnElement="task_hello_world">
        <dc:Bounds x="259" y="80" width="100" height="80" />
      </bpmndi:BPMNShape>
      <bpmndi:BPMNEdge id="s2_di" bpmnElement="s2">
        <di:waypoint x="359" y="120" />
        <di:waypoint x="409" y="120" />
      </bpmndi:BPMNEdge>
      <bpmndi:BPMNShape id="end_di" bpmnElement="end">
        <dc:Bounds x="409" y="102" width="36" height="36" />
      </bpmndi:BPMNShape>
    </bpmndi:BPMNPlane>
  </bpmndi:BPMNDiagram>
</definitions>